Set up one Google OAuth client for Gmail, Drive, Calendar, Docs, Sheets, and every other Google app in OneCLI. Enable the APIs, choose the audience, create the client, and connect.
One Google OAuth client covers every Google app in OneCLI: Gmail, Calendar, Drive, Docs, Sheets, Slides, Forms, Meet, Tasks, Contacts, Chat, Photos, Admin, Analytics, Search Console, Classroom, and YouTube. Set it up once.
On OneCLI Cloud, Google apps work out of the box. Follow this guide only if you want your own Google client, for example to show your company name on the consent screen or to keep tokens in your own Google Cloud project. Self-hosted instances need this guide unless GOOGLE_CLIENT_ID and GOOGLE_CLIENT_SECRET are set on the server.
Open the credentials form for any Google app, for example Gmail:
For the whole organization:Global Connections → Apps → Gmail → Custom credentials.
For one workspace only:Connections → Apps → Gmail → Custom credentials in that workspace. This overrides the organization’s client in that workspace.
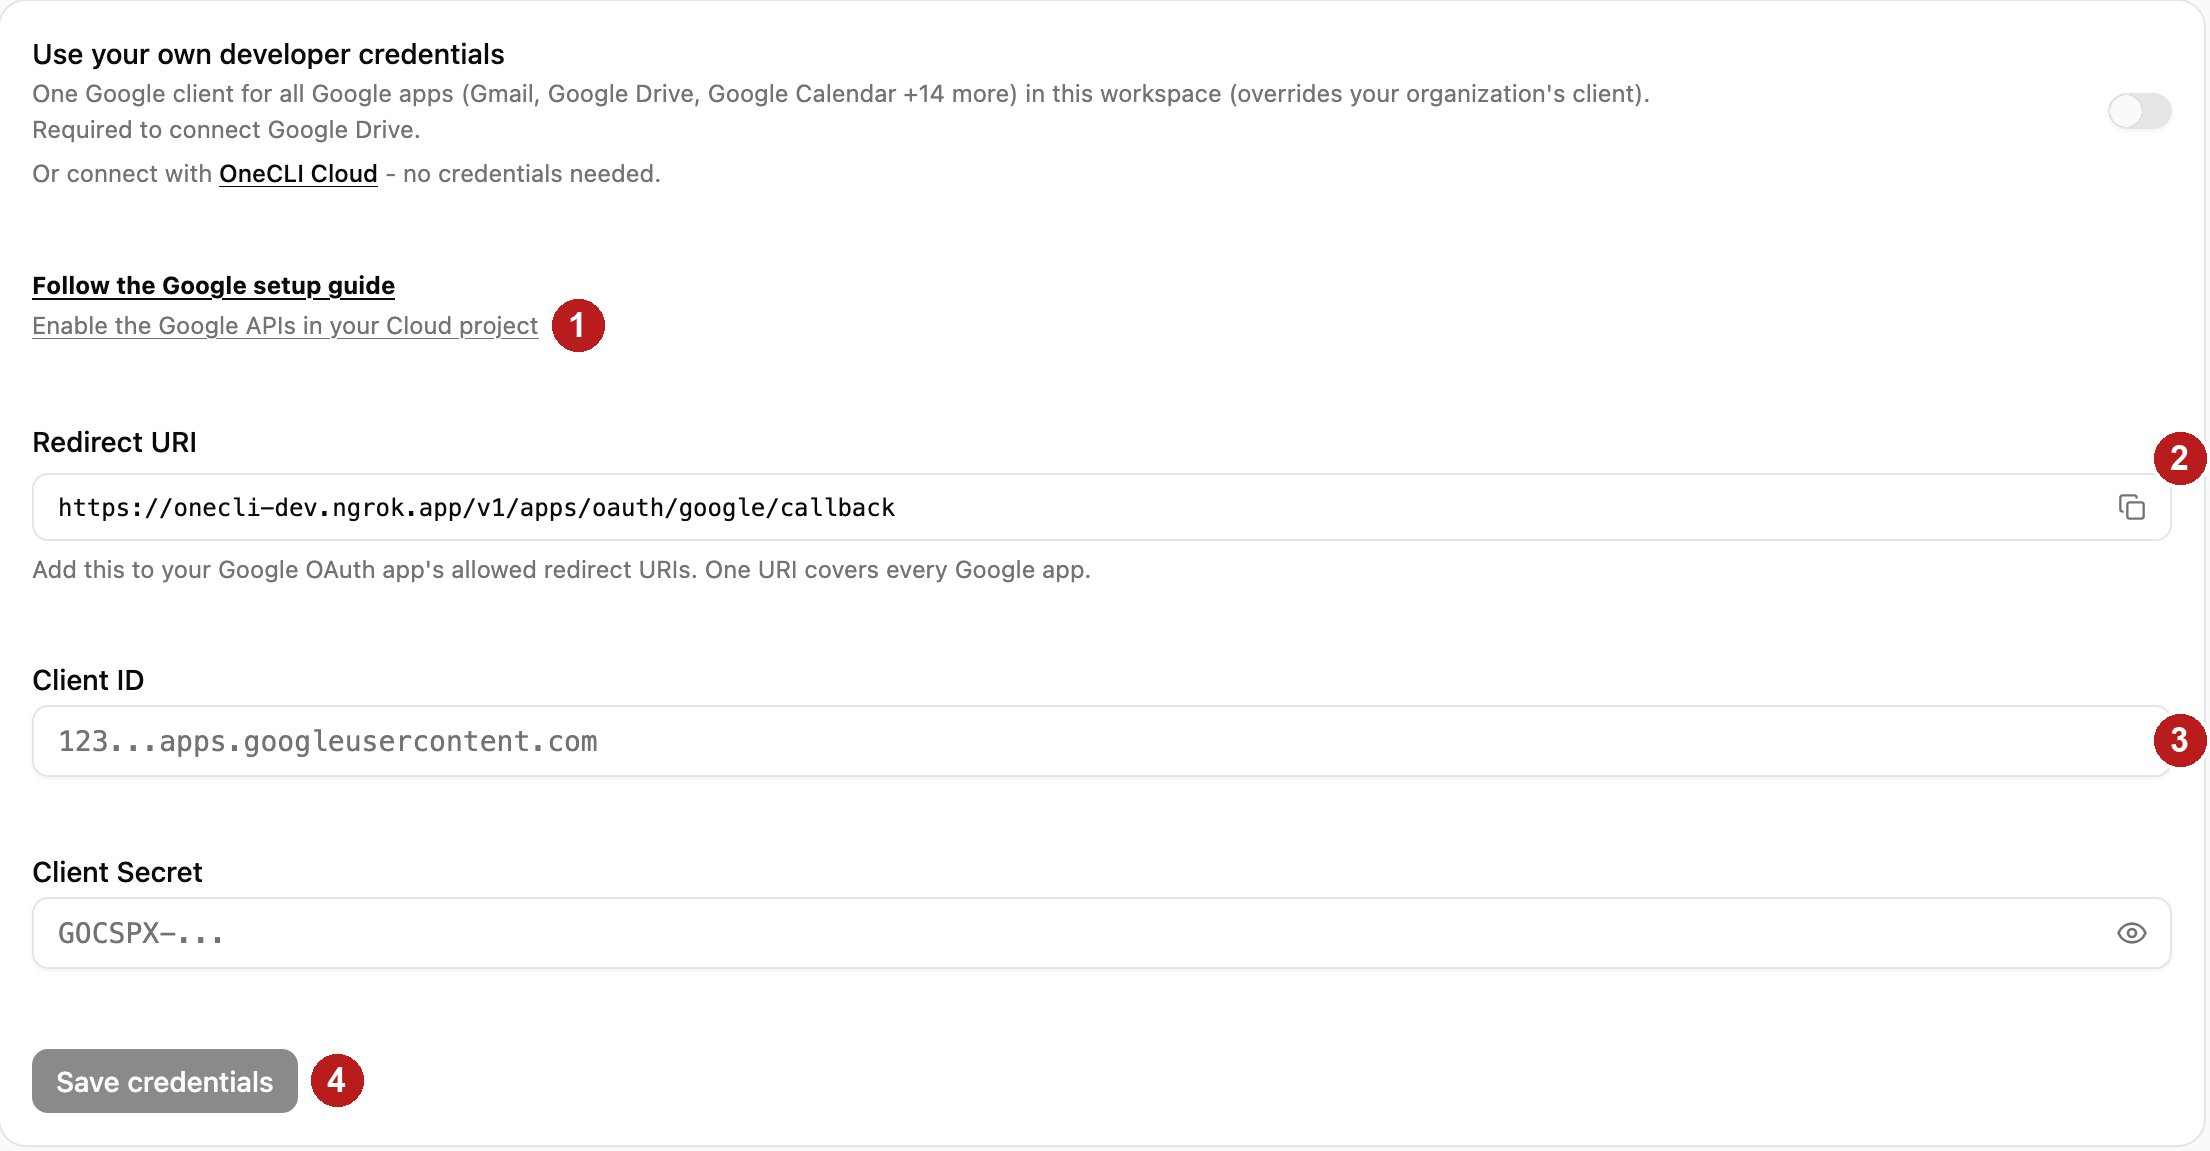
The Google credentials form in OneCLI.
1. Click Enable the Google APIs in your Cloud project. It opens the next step.
2. Copy the Redirect URI. You’ll paste it into Google in step 4.
3. Leave this page open. You’ll paste the Client ID and Client Secret here at the end.
4.Save credentials comes last.
2
Enable the Google APIs
The link from OneCLI enables all the Google APIs at once. To open it directly: enable the Google APIs.
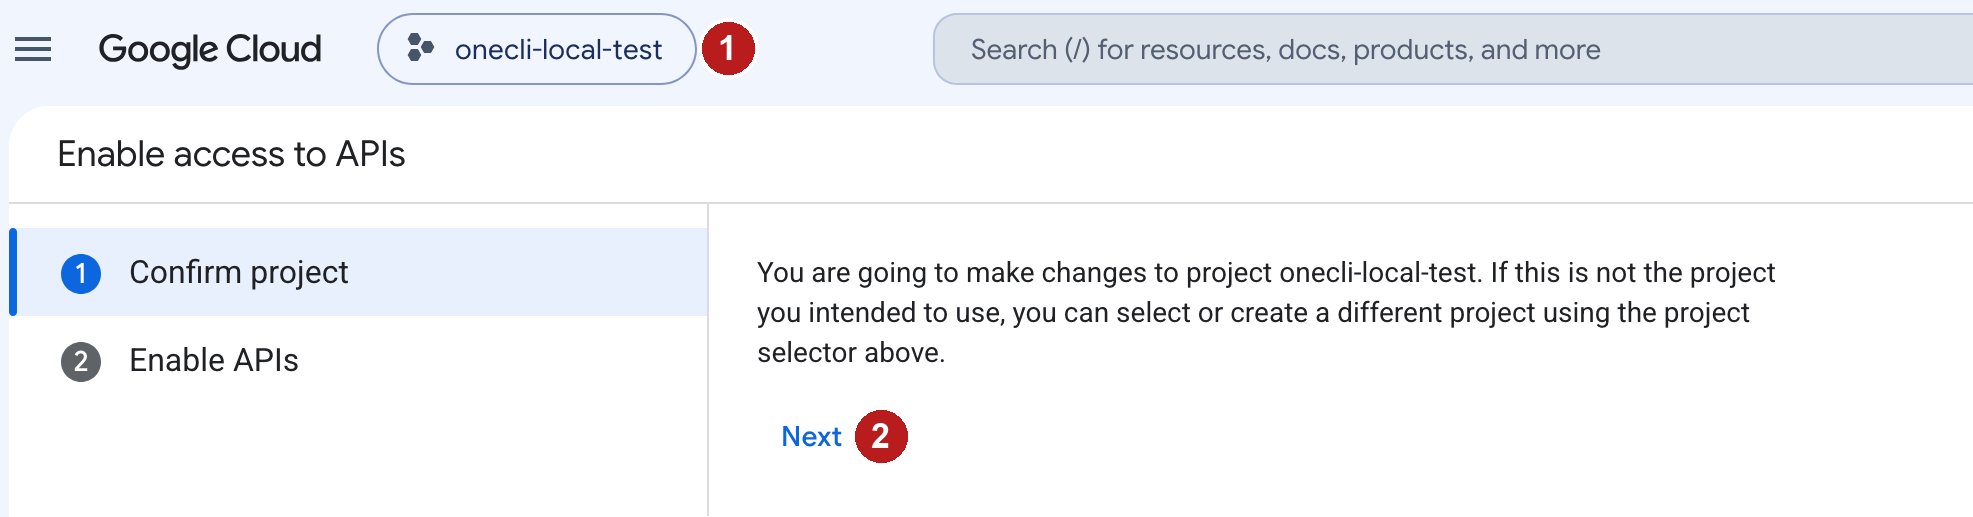
Confirm the project, then enable the APIs.
1. Check the project. Pick or create the project for OneCLI here.
2. Click Next, then Enable.
Don’t skip this step. If an API isn’t enabled, the app connects but every agent request fails with SERVICE_DISABLED.
3
Choose who can sign in
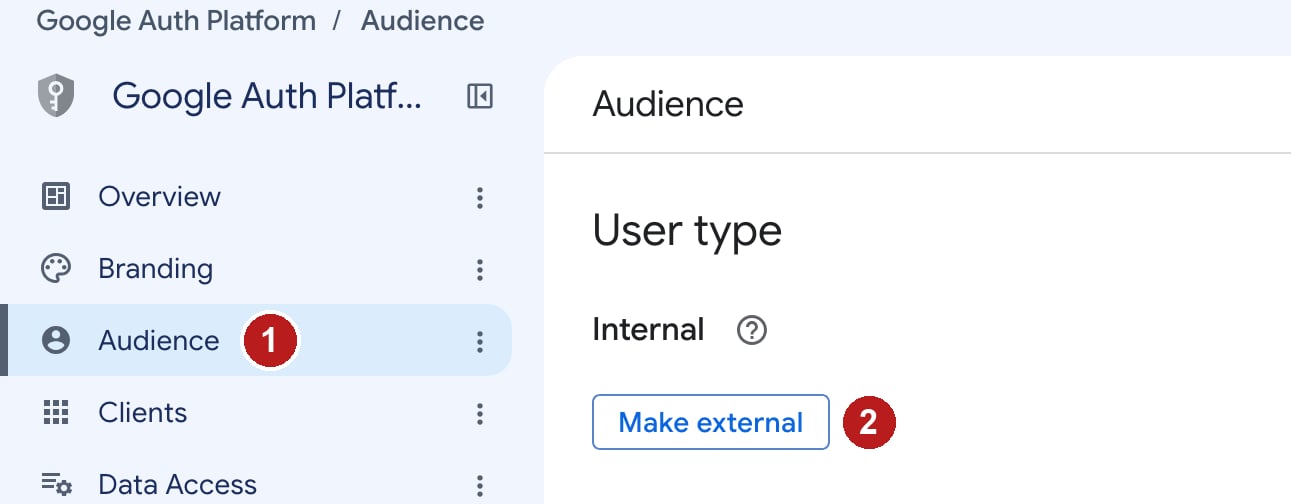
Go to Google Auth Platform → Audience. If Google asks you to set up Google Auth Platform first, click Get started, enter an app name such as OneCLI and your support email, then come back here.
Pick Internal or External.
1. Open Audience.
2. Choose the user type:
User type
Who can connect
Choose it when
Internal (recommended)
Only accounts in the Google Workspace that owns this project
Everyone connecting uses your company Google accounts
External
Accounts you add as Test users while in Testing
People sign in from another Workspace or personal Gmail
For External, click Make external, keep Testing, and add every person who will connect under Test users (up to 100).
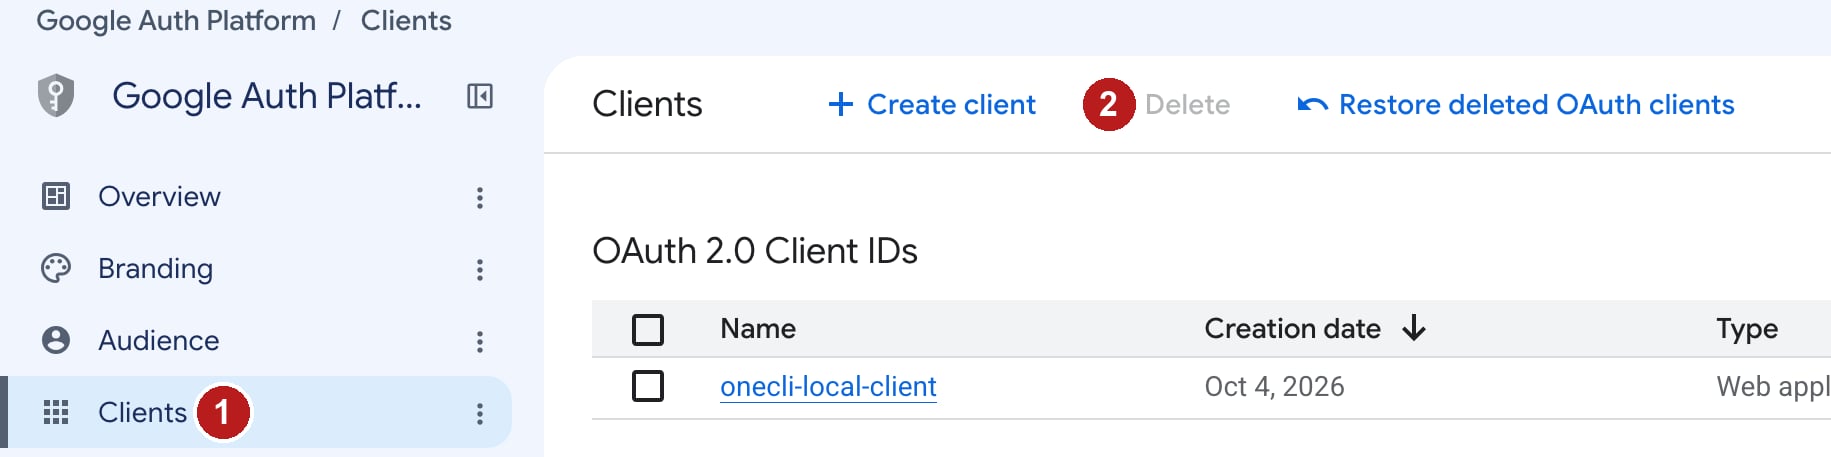
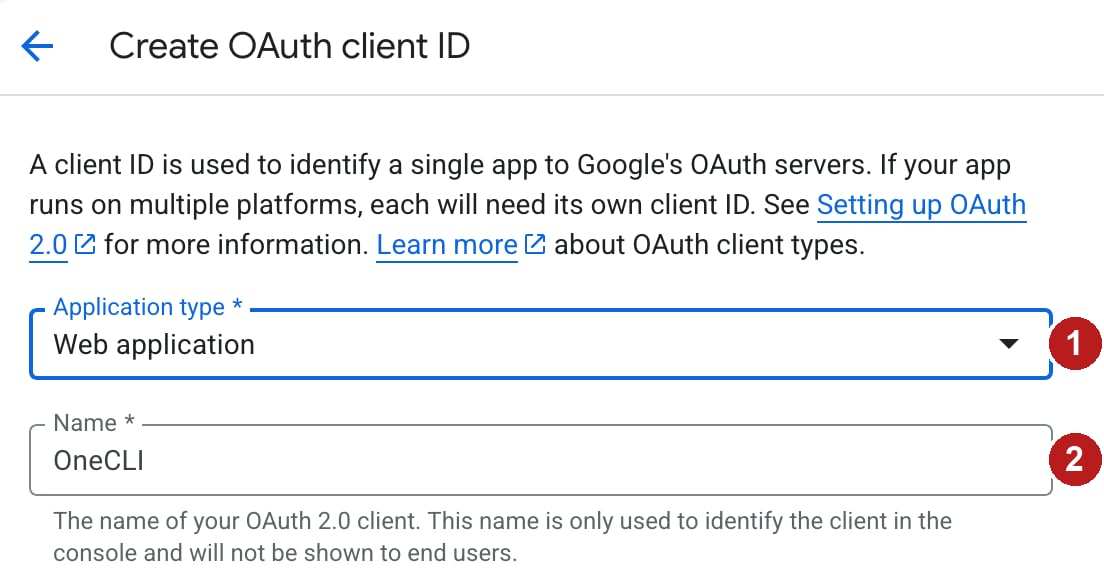
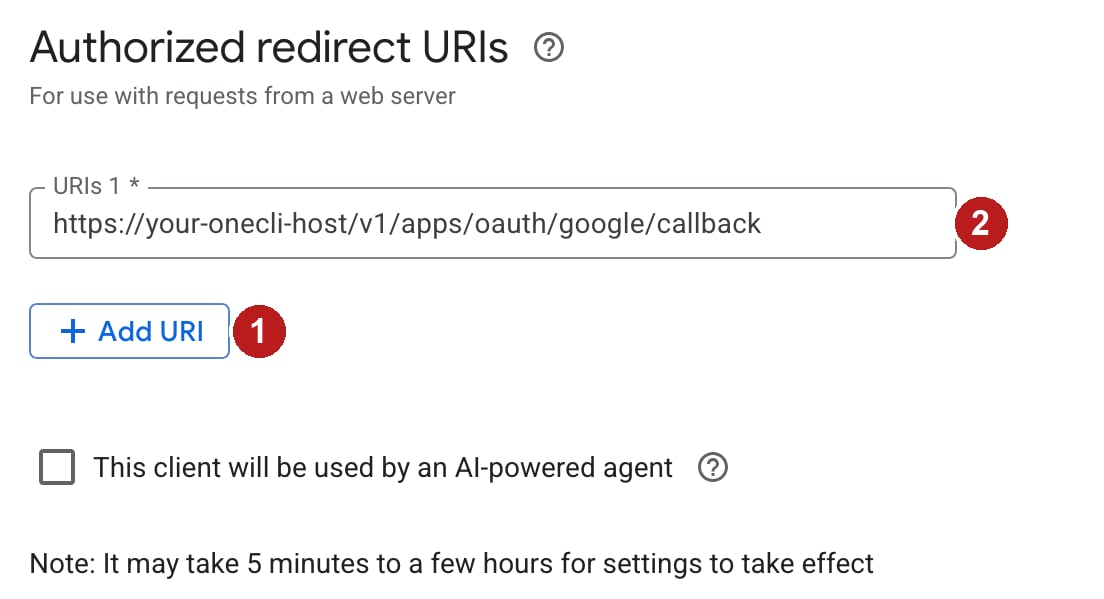
2. Paste the Redirect URI you copied from OneCLI. It ends in /v1/apps/oauth/google/callback. One URI covers every Google app. Google only accepts https URIs, except for localhost.
Leave Authorized JavaScript origins empty. Click Create, then copy the Client ID and Client secret from the dialog.
5
Save in OneCLI and connect
Back in OneCLI, paste the Client ID and Client Secret, then click Save credentials.
Open any Google app, for example Google Drive, and click Connect. You don’t need to enter credentials again for other Google apps.
Sign in with Google and click Allow. With External in Testing, Google first shows Google hasn’t verified this app. Click Continue.
Ask your agent for something simple, such as “List my 5 most recent Drive files.”
Setup complete. Every Google app now uses your client, in every workspace you saved it for.
Every Google app in that workspace only. Overrides the organization’s client.
Removing a workspace’s credentials returns it to the organization’s client. Saving or removing credentials disconnects the Google accounts that used the previous client, so people need to reconnect. Your first organization save also disconnects accounts connected through OneCLI’s built-in Google client.
The app is Internal and the account signing in isn’t in the Google Workspace that owns the project. Either sign in with an account from that Workspace, or switch the app to External and add the account as a test user (step 3).
Error 400: redirect_uri_mismatch
The Redirect URI in Google doesn’t exactly match OneCLI’s. Copy it again from the OneCLI form and paste it into the client’s Authorized redirect URIs. Check https, the host, and that it ends in /v1/apps/oauth/google/callback. Changes can take a few minutes.
SERVICE_DISABLED or API has not been used in project
The Google API for that app isn’t enabled in this project. Repeat step 2 in the same project as the client, wait a minute, and retry. You don’t need to reconnect.
Error 403: access_denied
The app is External in Testing and this account isn’t a test user. Add it under Audience → Test users.
Error 400: admin_policy_enforced or Access blocked
Your Google Workspace admin restricts third-party apps. In the Google Admin console, go to Security → Access and data control → API controls → Manage third-party app access, and mark the OneCLI client as Trusted using its Client ID.
Error 401: invalid_client
The Client ID or secret is wrong, or the client was deleted. Copy both again from Clients and save them in OneCLI.
Connections stop working after 7 days
Google expires refresh tokens after 7 days for External apps in Testing. Use Internal, or publish the app under Audience → Publish app. Publishing an app that uses Gmail or Drive scopes may require Google verification.