

Before you start
- You need a Salesforce administrator who can create External Client Apps and manage permission sets, and permission to configure connections in the intended OneCLI workspace or organization.
- Confirm the Salesforce user who will authorize the connection has API access and only the CRM permissions you want the agent to inherit. The api OAuth scope permits writes when that user can write. It is not a read-only scope.
- Use a Salesforce My Domain host such as your-company.my.salesforce.com, or your-company.sandbox.my.salesforce.com for a sandbox. Arbitrary login hosts and legacy instance-only hosts are not supported by this integration.
- In OneCLI, open Connections → Apps → Salesforce → Connect. Keep the setup dialog open and copy its Redirect URI. Use the exact value from the environment and scope you are configuring, not a guessed URL.
Set up Salesforce OAuth
Create the External Client App
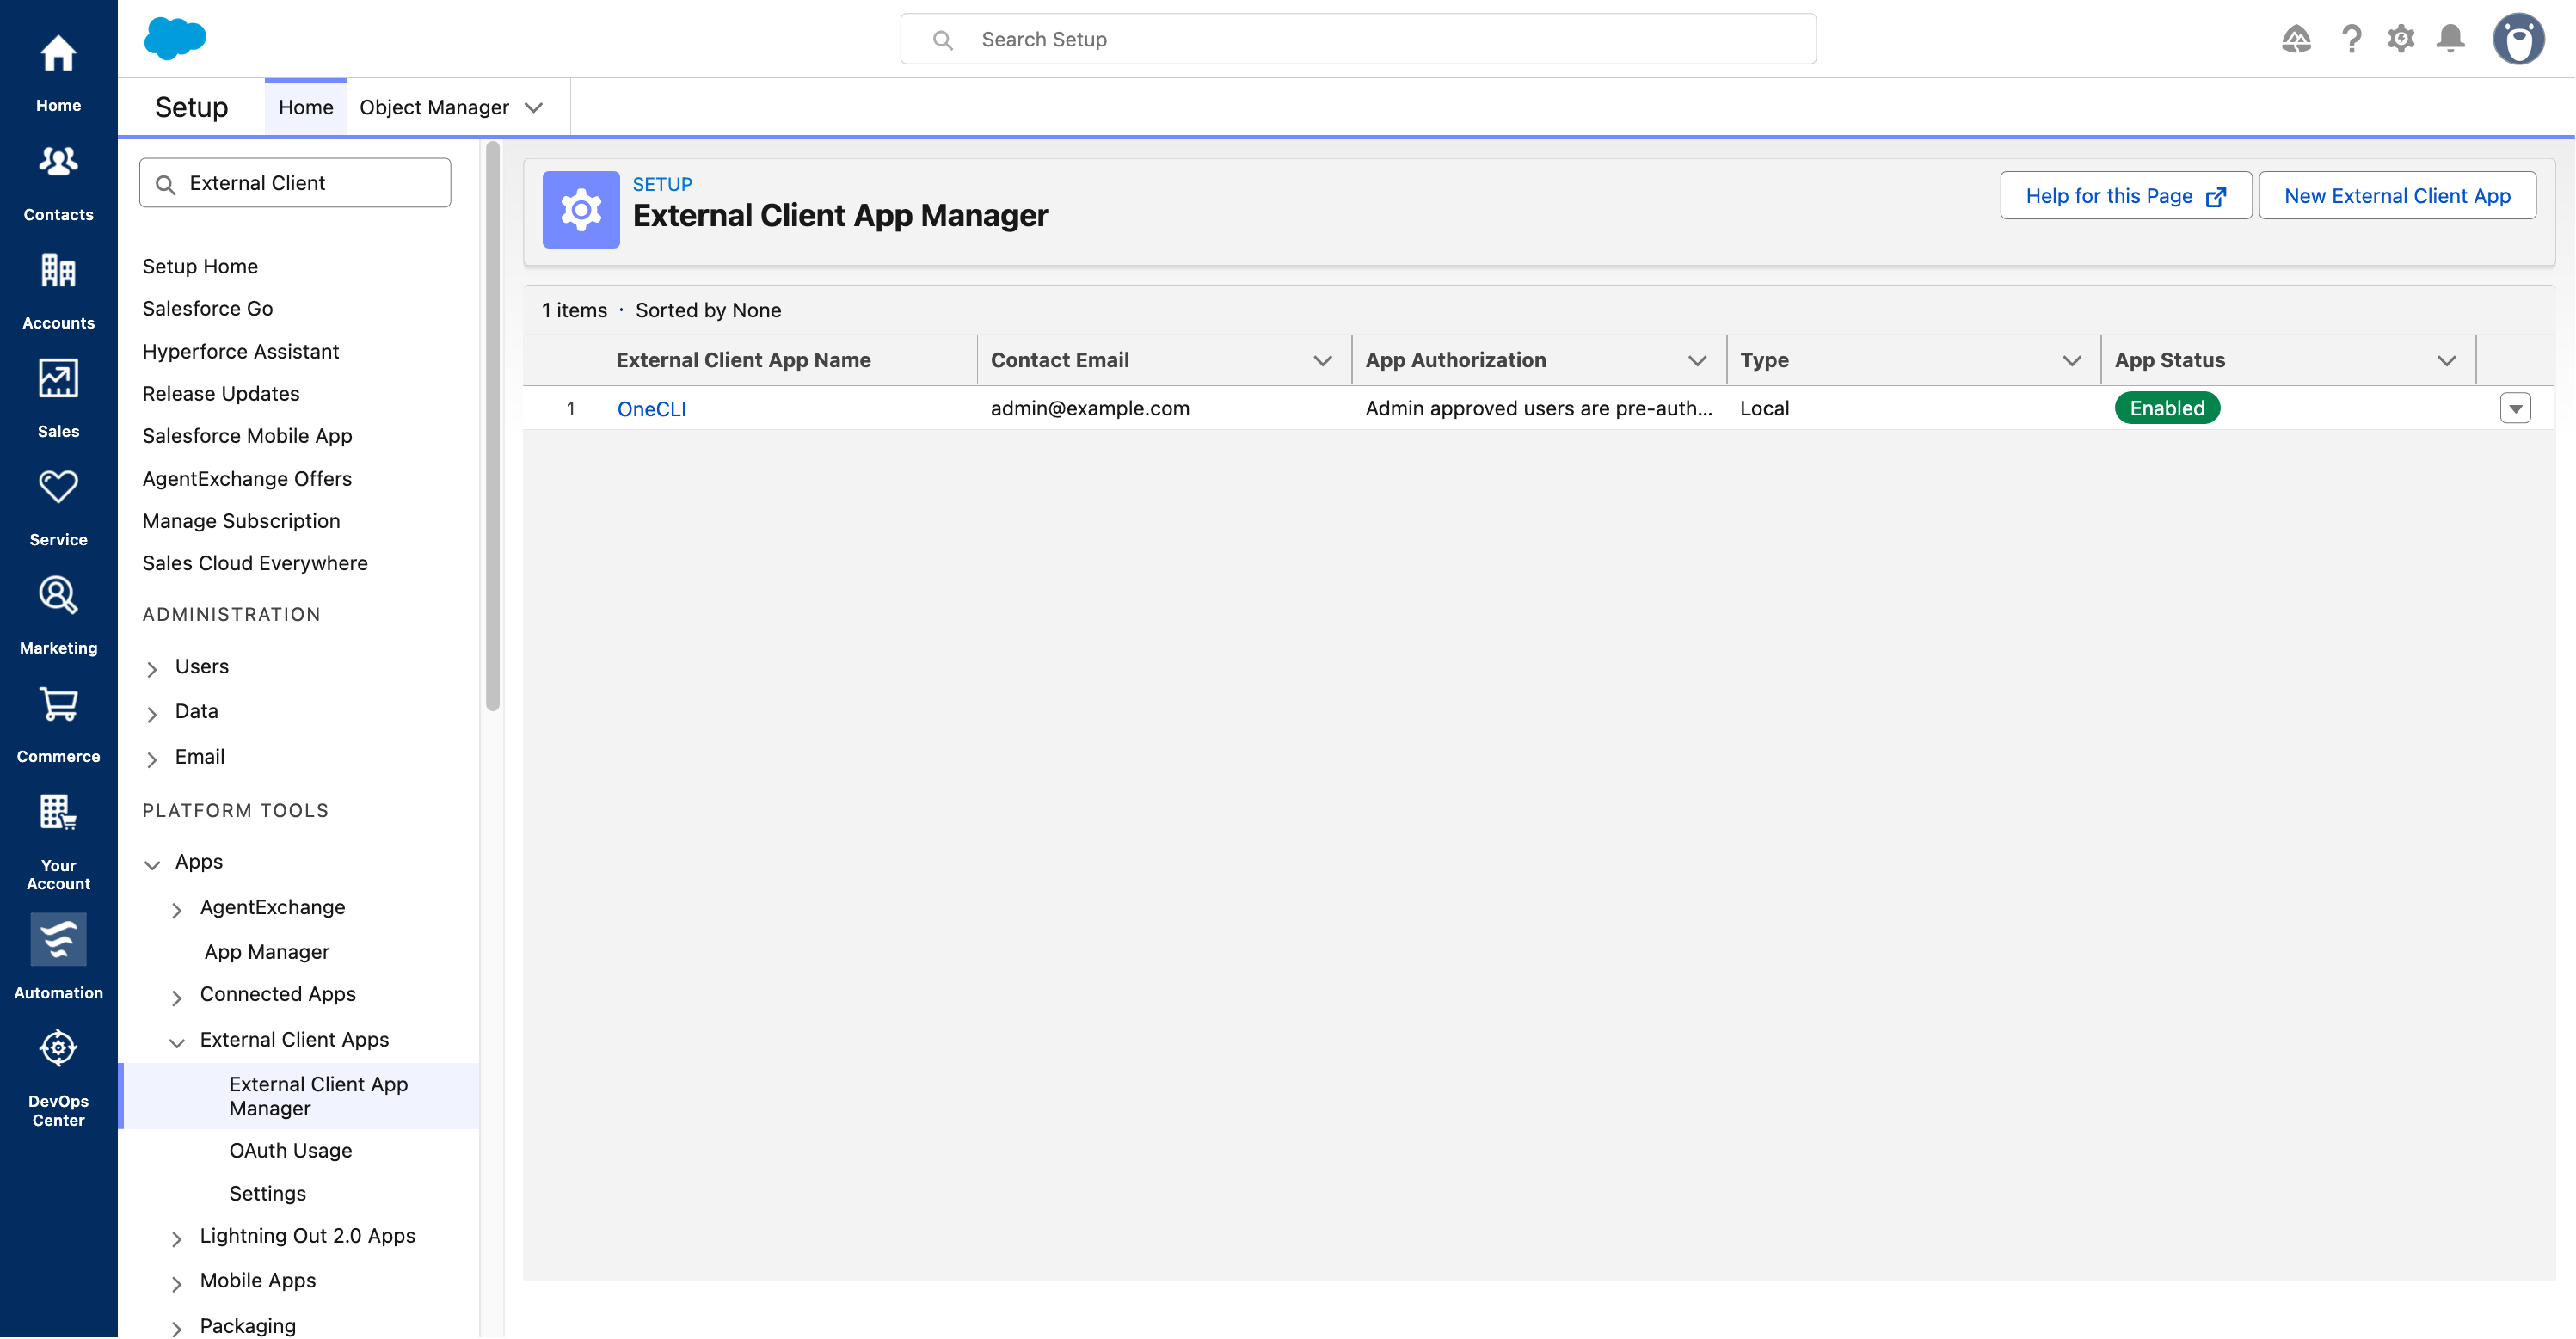
- Sign in to the Salesforce organization where your CRM data lives. Open the gear menu → Setup. In Quick Find, search for External Client App Manager under Apps → External Client Apps.
- Open External Client App Manager and choose New External Client App. If the creation action is missing, ask your Salesforce administrator to check your permissions and organization support. Do not create a generic API token instead.
- Set External Client App Name to OneCLI. Let API Name populate automatically. Enter an administrator contact email. Description and logo fields are optional.
- Keep Distribution State = Local for an app used by this Salesforce organization. Local does not mean a localhost callback. Onboarding a different Salesforce organization requires its own app/configuration or a separately designed distribution setup.
- Expand API (Enable OAuth Settings) and check Enable OAuth. Leave SAML, Canvas, Mobile and Push disabled for this integration.
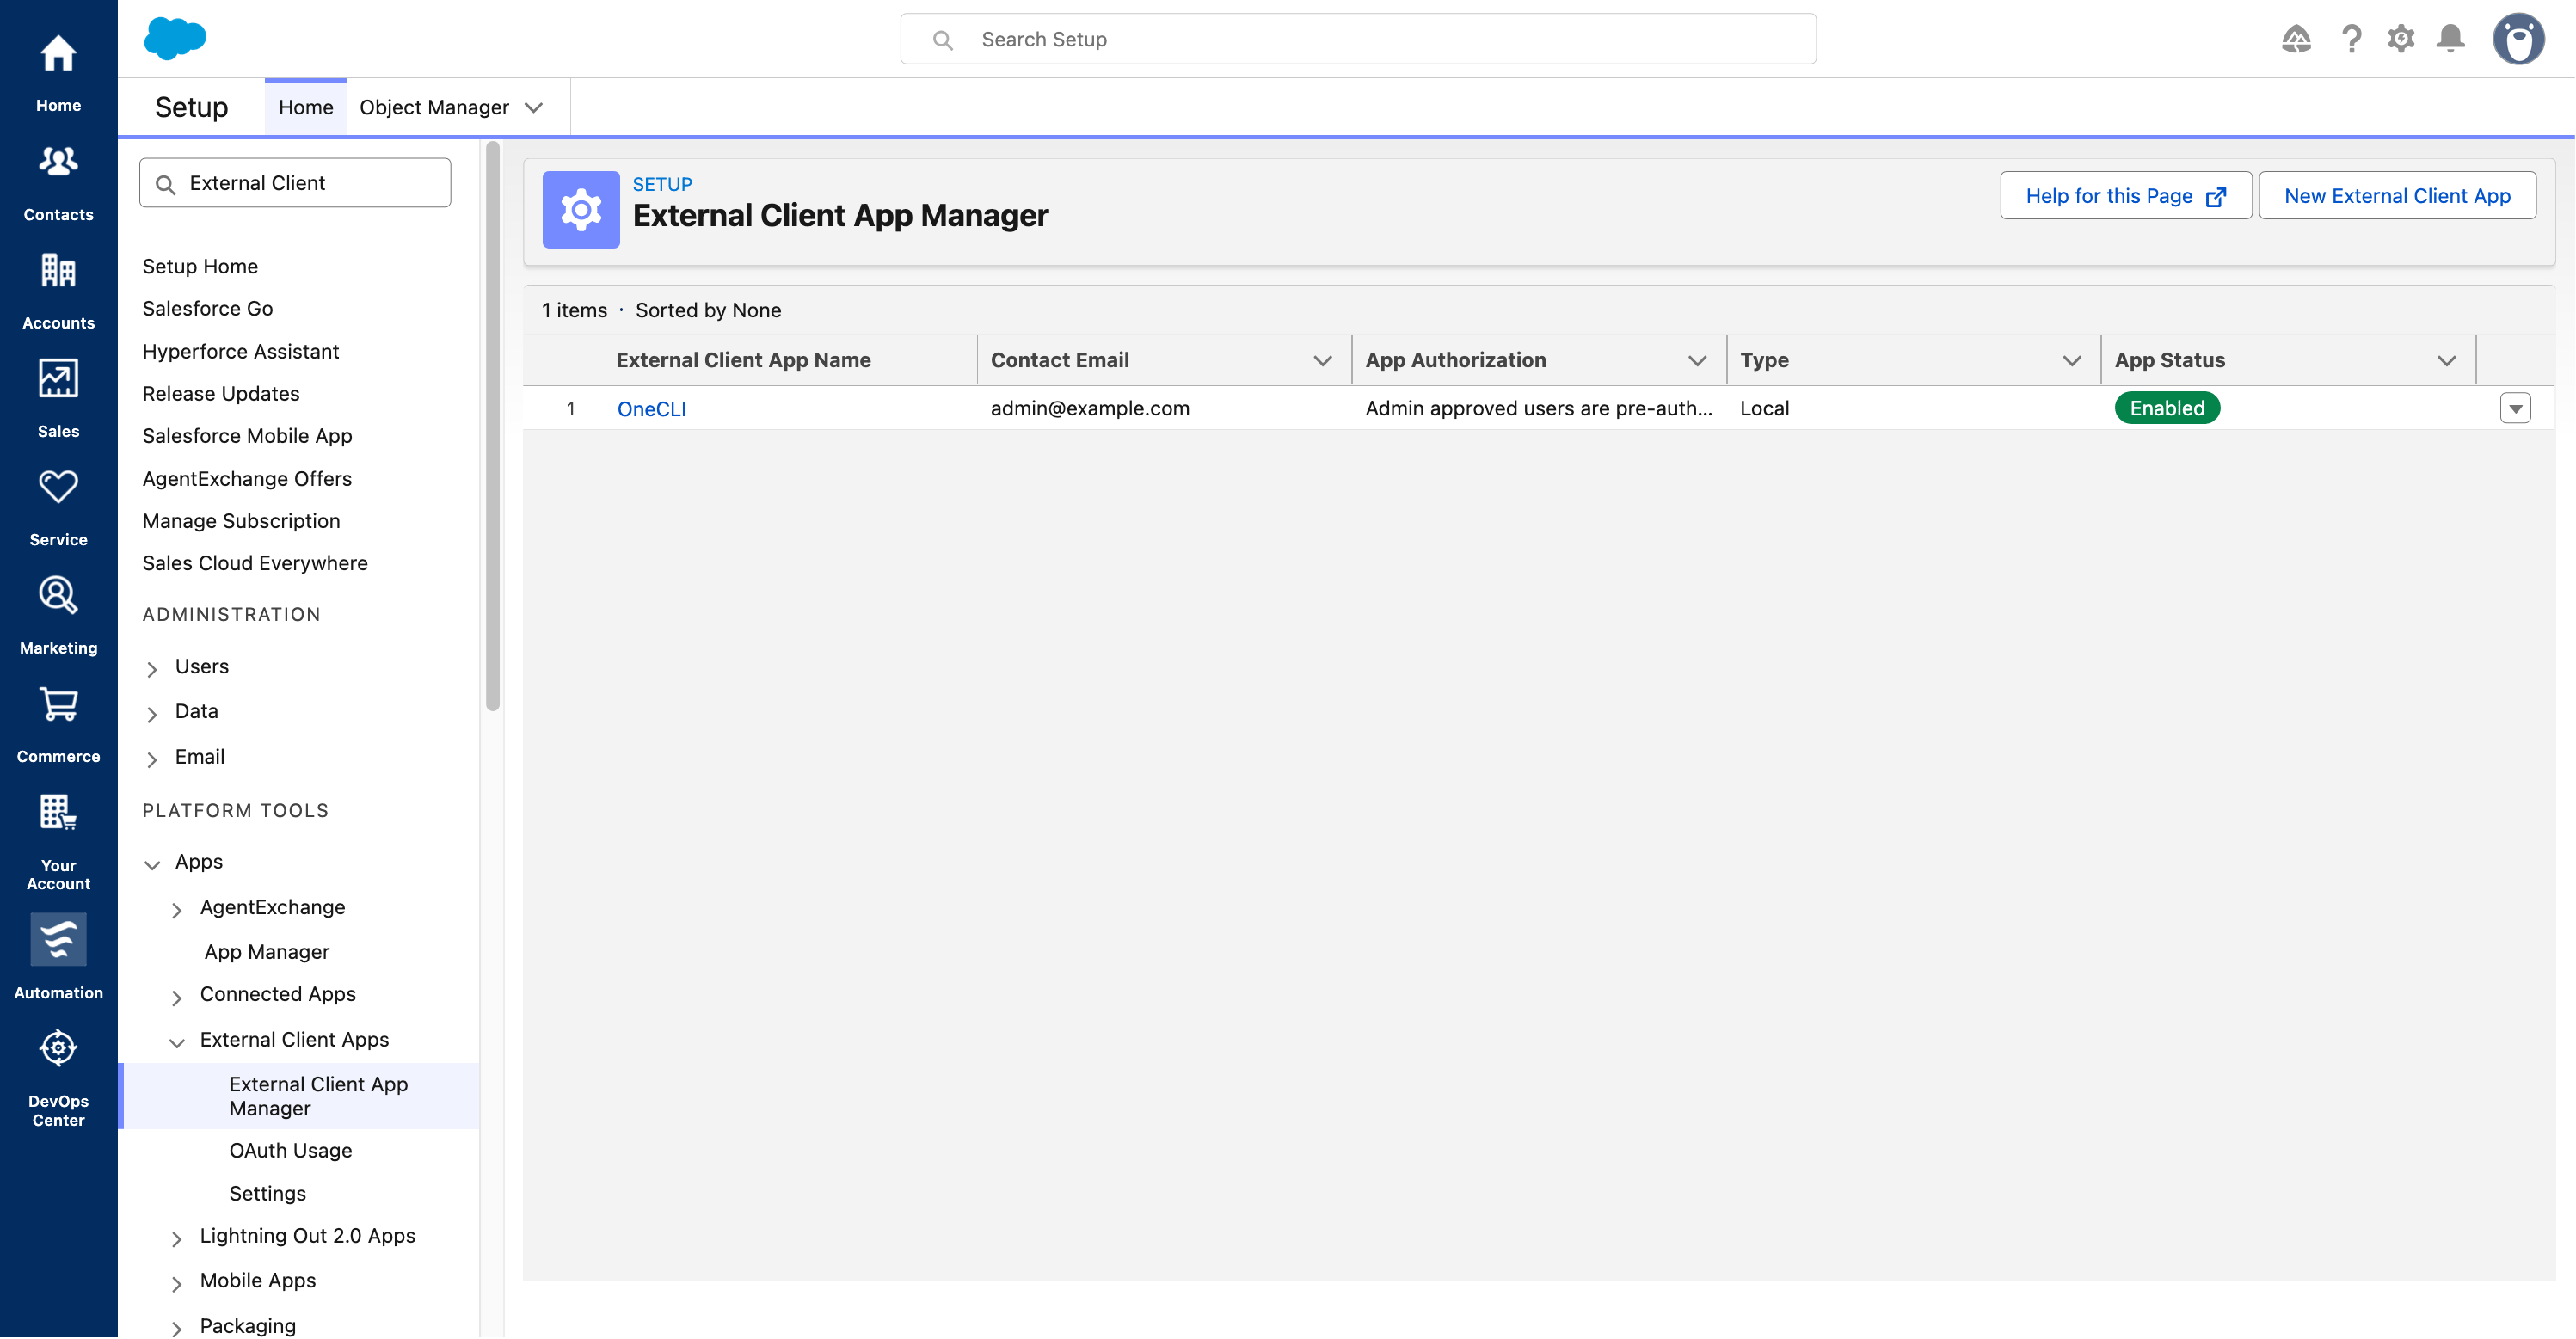
Open the External Client App Manager.
- 1. Choose New External Client App. For an existing app, open OneCLI instead.
Register callback URLs and scopes
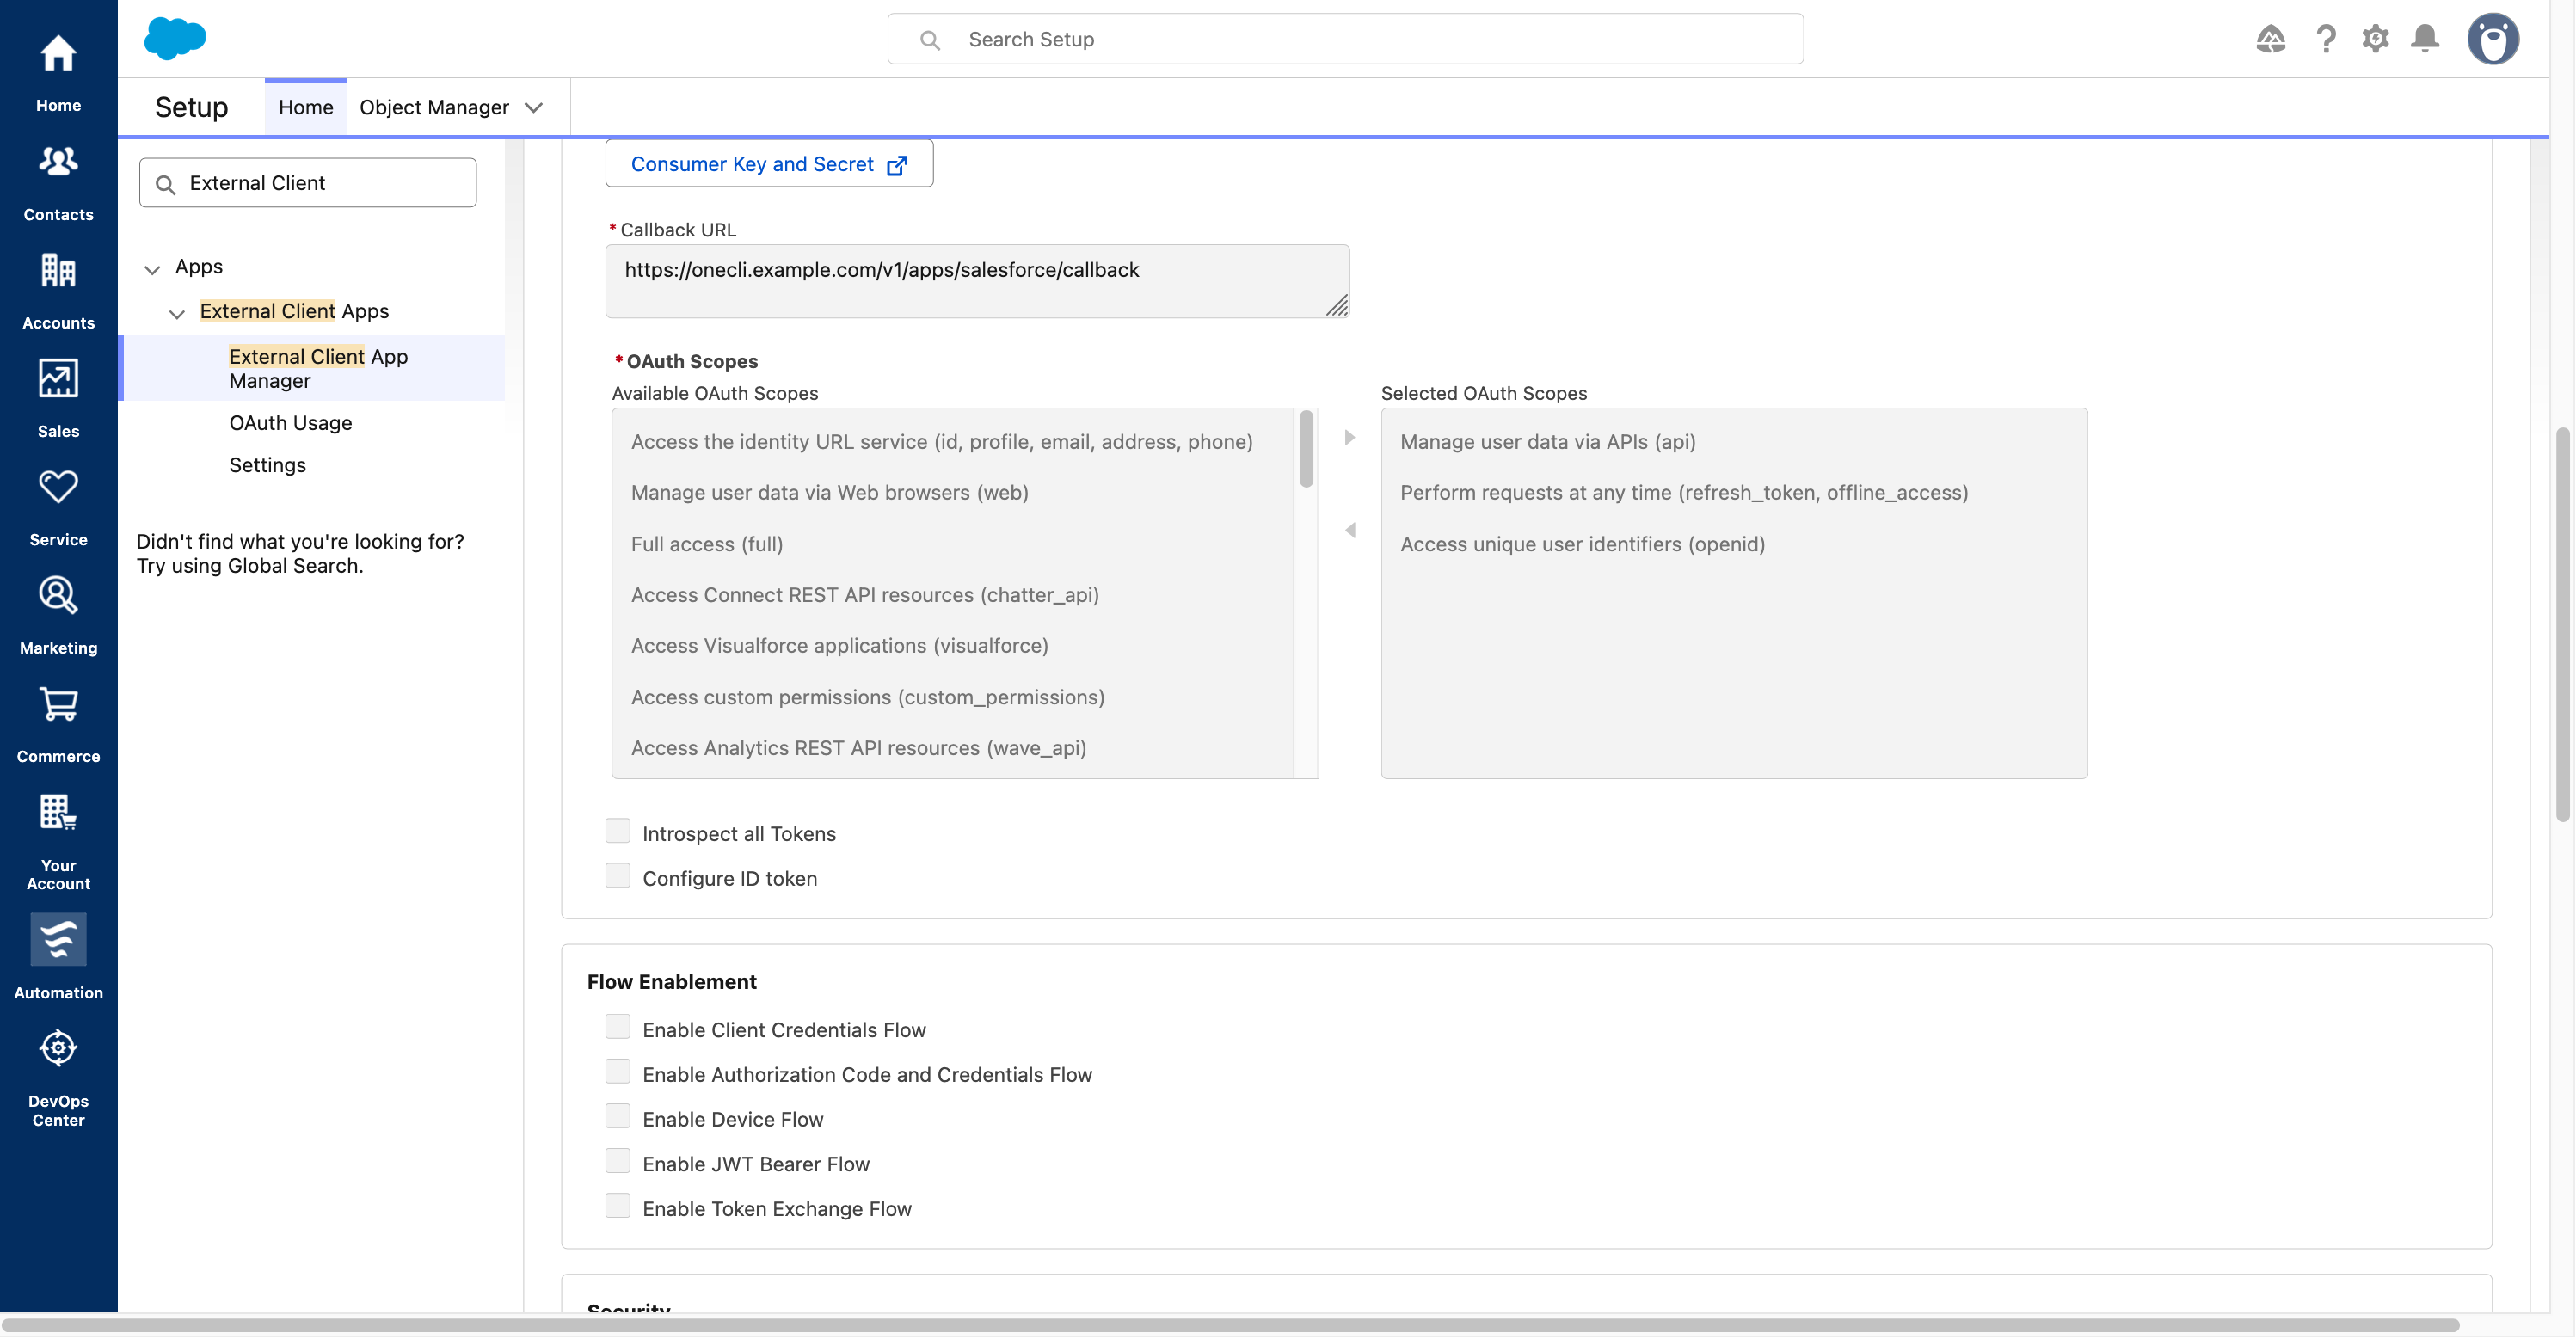
- Paste the Redirect URI copied from OneCLI into Callback URL. Salesforce supports multiple callback URLs, one per line. Add only URLs for environments you actually control and use.
- The standard workspace callback path is /v1/apps/salesforce/callback. For organization-level setup, copy the URI shown there instead of assuming the workspace path. The authorization redirect must match a registered URL exactly, including scheme, host, path and trailing slash.
- For a self-hosted or local setup, use your own public HTTPS domain or active tunnel. Do not copy OneCLI development domains into a new installation. A callback URL does not start a tunnel or deploy the integration.
- If you use dev and production, copy each environment’s actual Redirect URI and register both, one per line. Separate External Client Apps and secrets for dev and production provide stronger isolation.
- Move these three entries into Selected OAuth Scopes: Manage user data via APIs (api); Perform requests at any time (refresh_token, offline_access); Access unique user identifiers (openid).
- Do not add Full access (full), web, Data Cloud, custom_permissions or other scopes for basic CRM integration. Leave Introspect all Tokens and Configure ID token off.
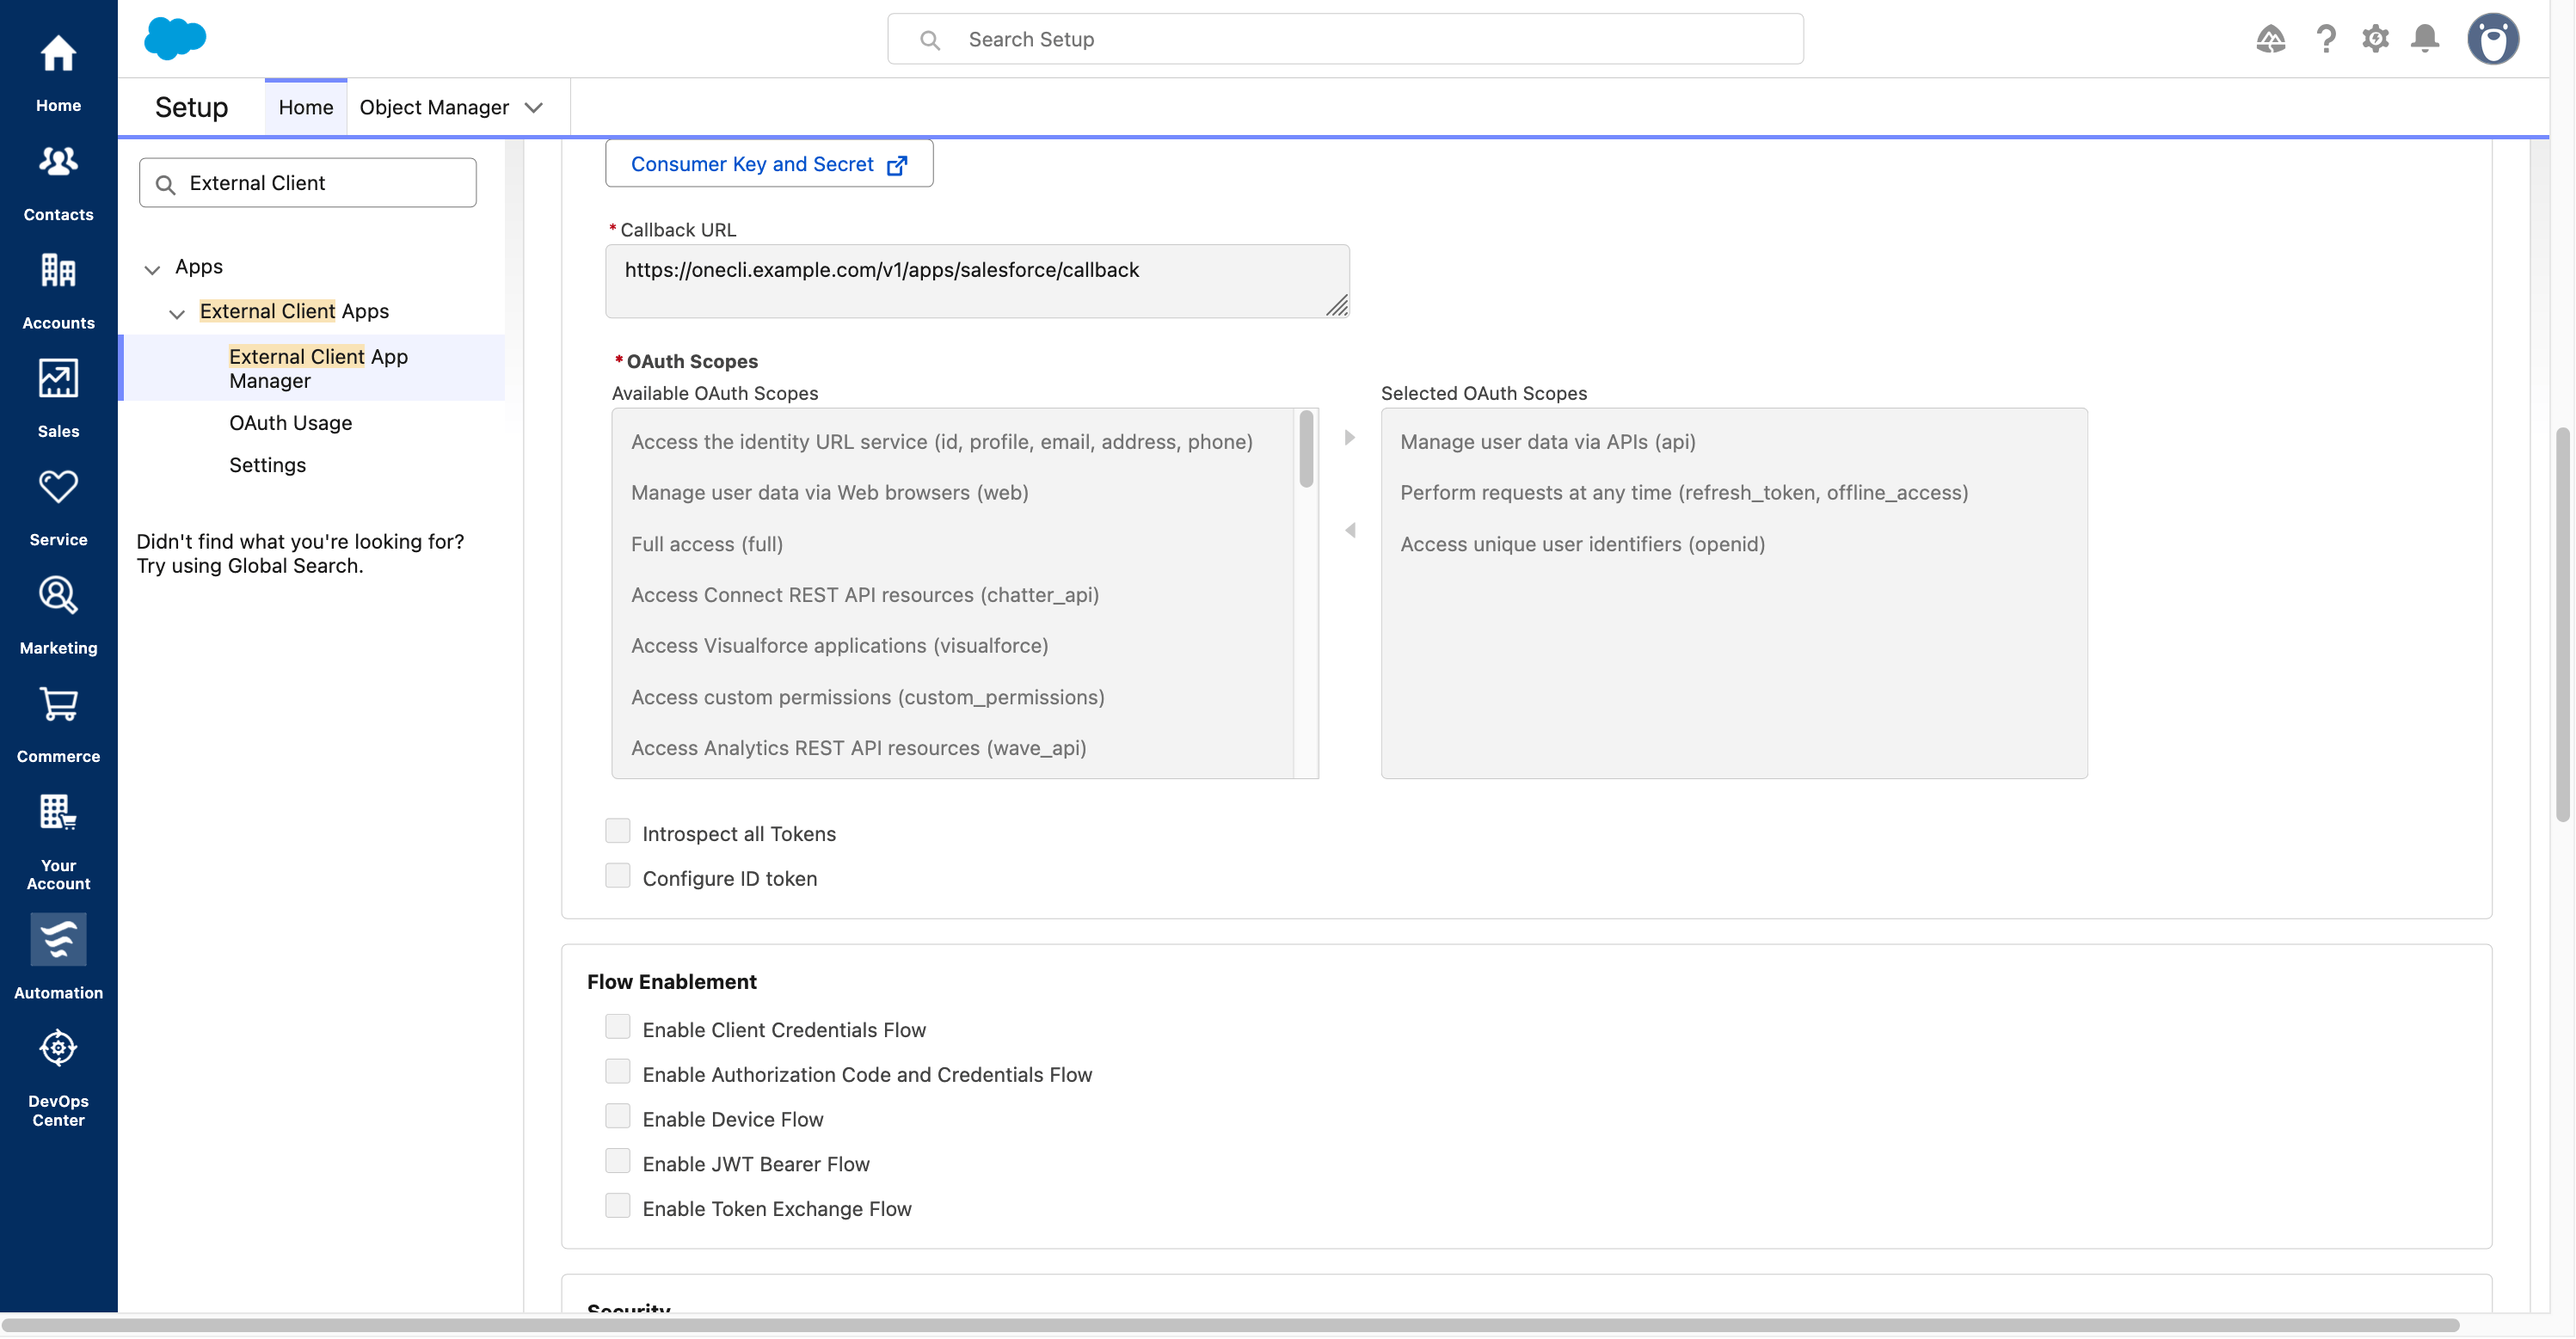
Register your callback and select only the three required scopes.
- 1. Paste the exact Redirect URI from OneCLI into Callback URL. The domain pictured is an example.
- 2. Move api, refresh_token / offline_access, and openid into Selected OAuth Scopes.
Keep OAuth security protections enabled
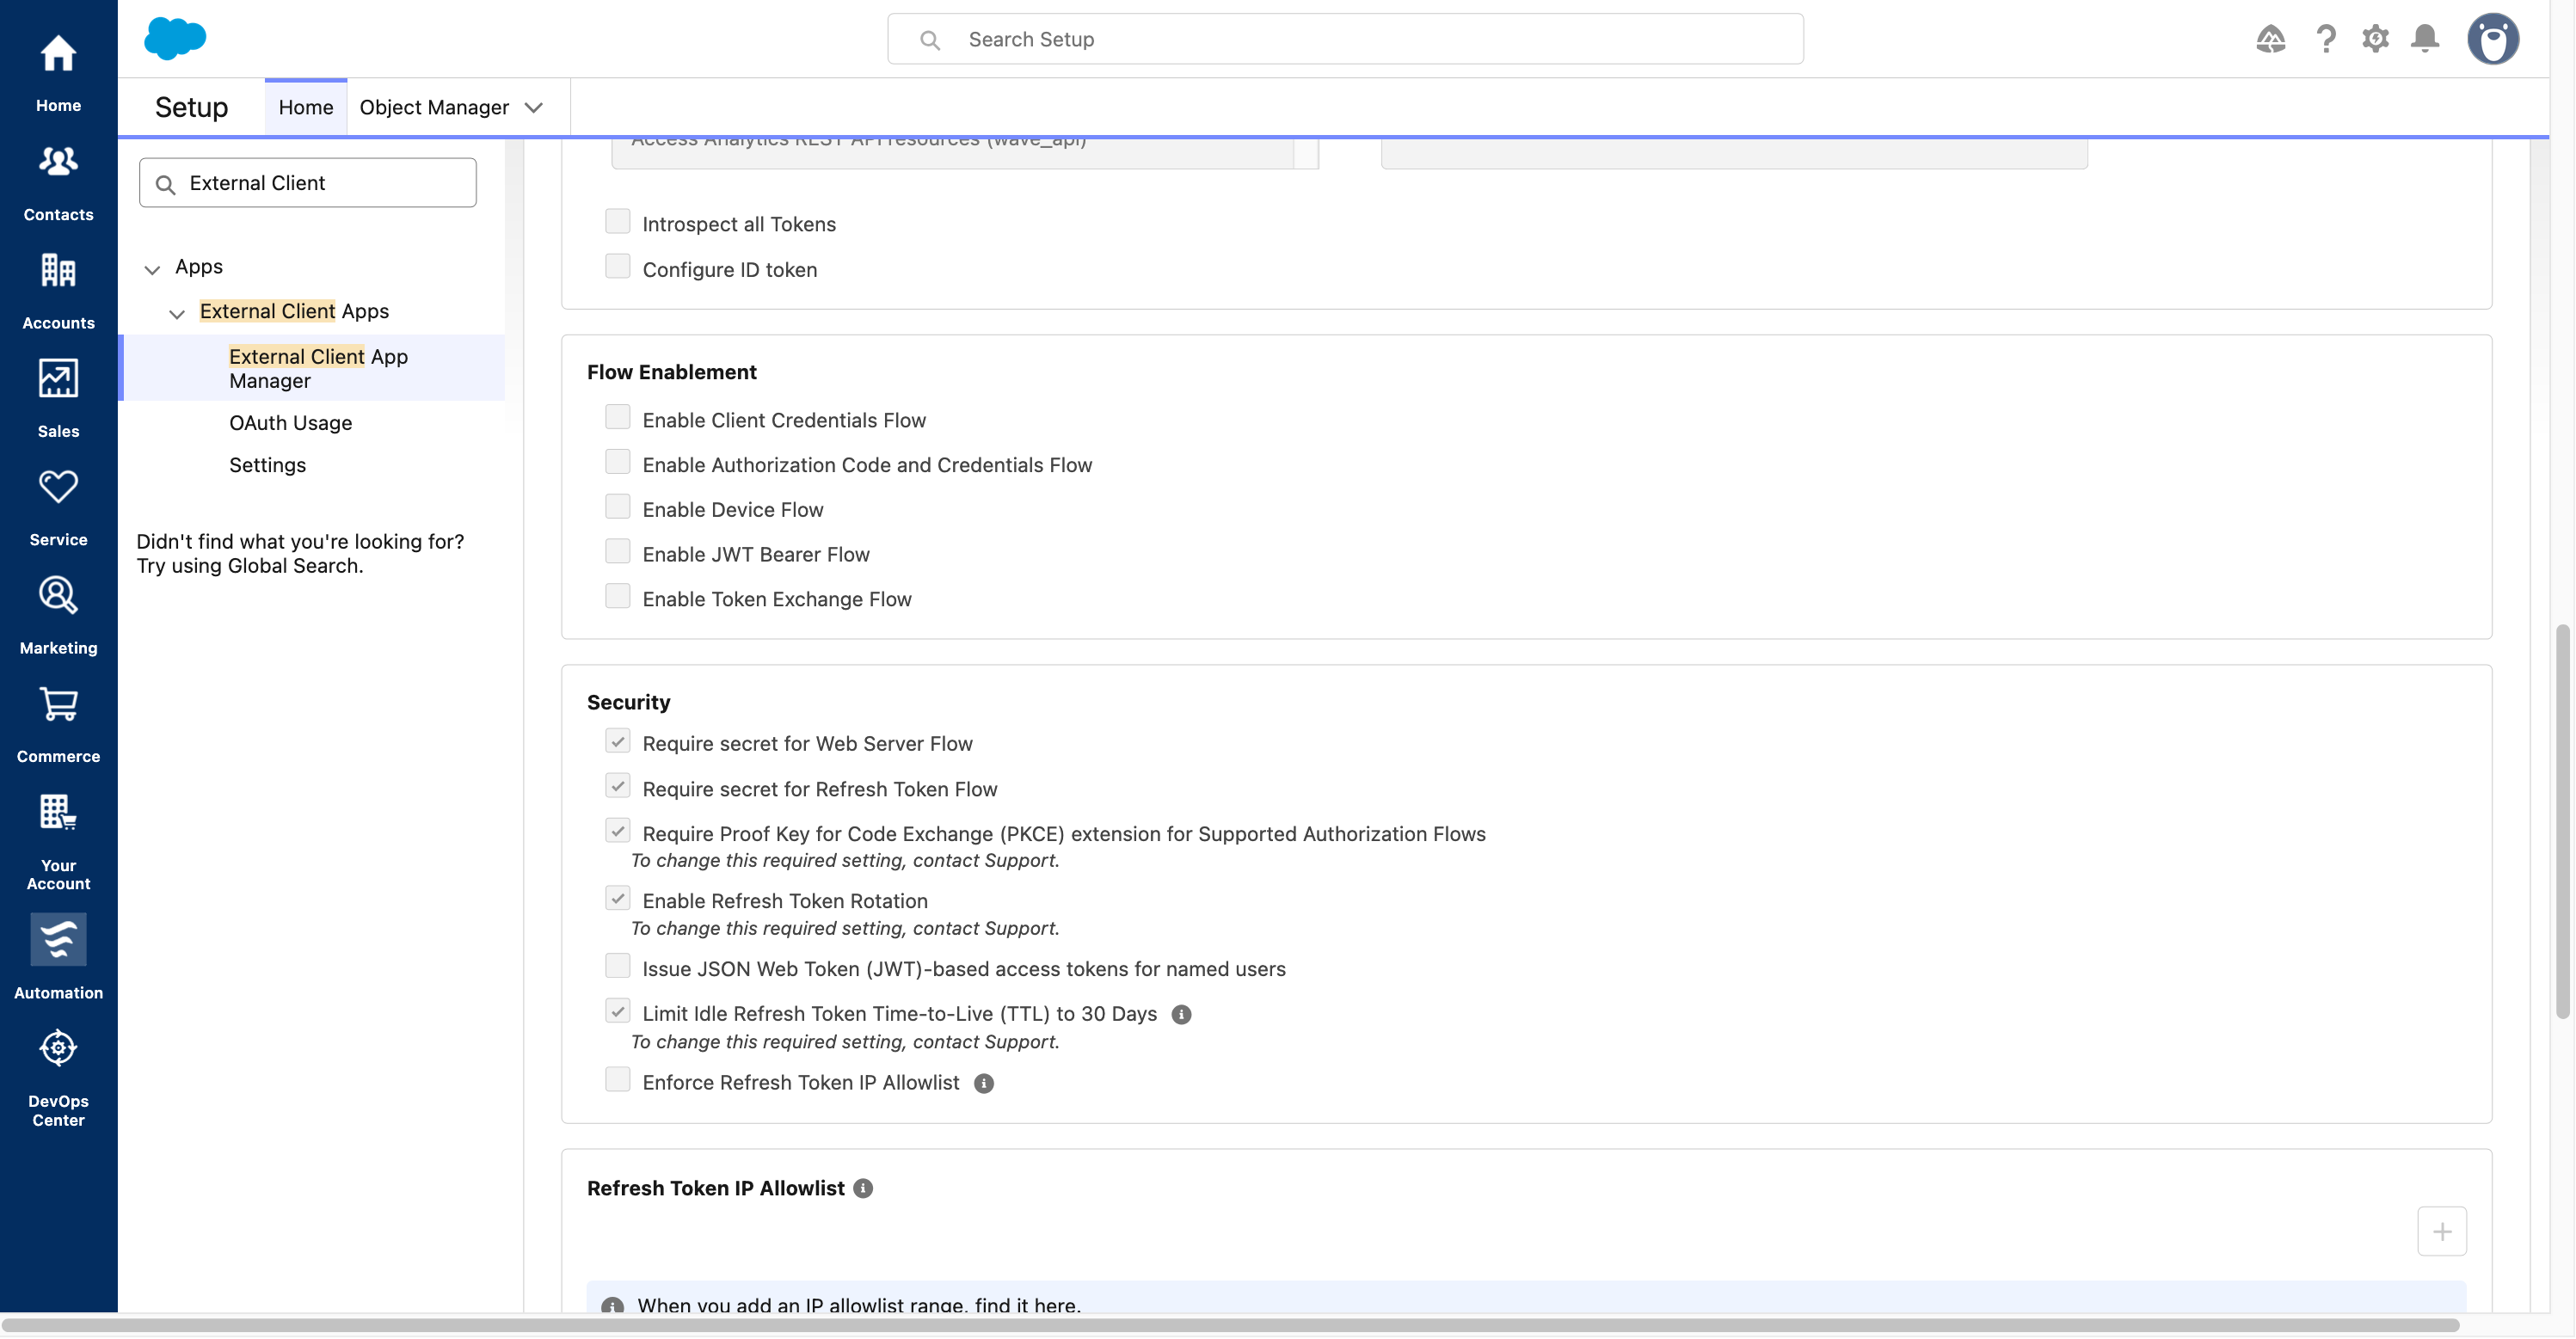
- Under Security, enable Require secret for Web Server Flow and Require secret for Refresh Token Flow. OneCLI performs the authorization-code exchange on its server using the Consumer Secret.
- Keep Require Proof Key for Code Exchange (PKCE) extension for Supported Authorization Flows enabled. OneCLI uses S256 PKCE. Keep Enable Refresh Token Rotation enabled. Salesforce may make these mandatory and read-only.
- Leave optional Flow Enablement choices off: Client Credentials, Authorization Code and Credentials Flow, Device, JWT Bearer and Token Exchange. The specially named Authorization Code and Credentials Flow is not required for this integration’s standard web-server authorization-code flow.
- Leave JWT-based access tokens, SAML, Canvas, mobile and push features off. Do not add an IP allowlist unless you have verified the relevant OneCLI server egress IPs and your organization requires it.
- Click Create or Save. The app should appear in External Client App Manager with App Status = Enabled. Salesforce labels can vary slightly by release.
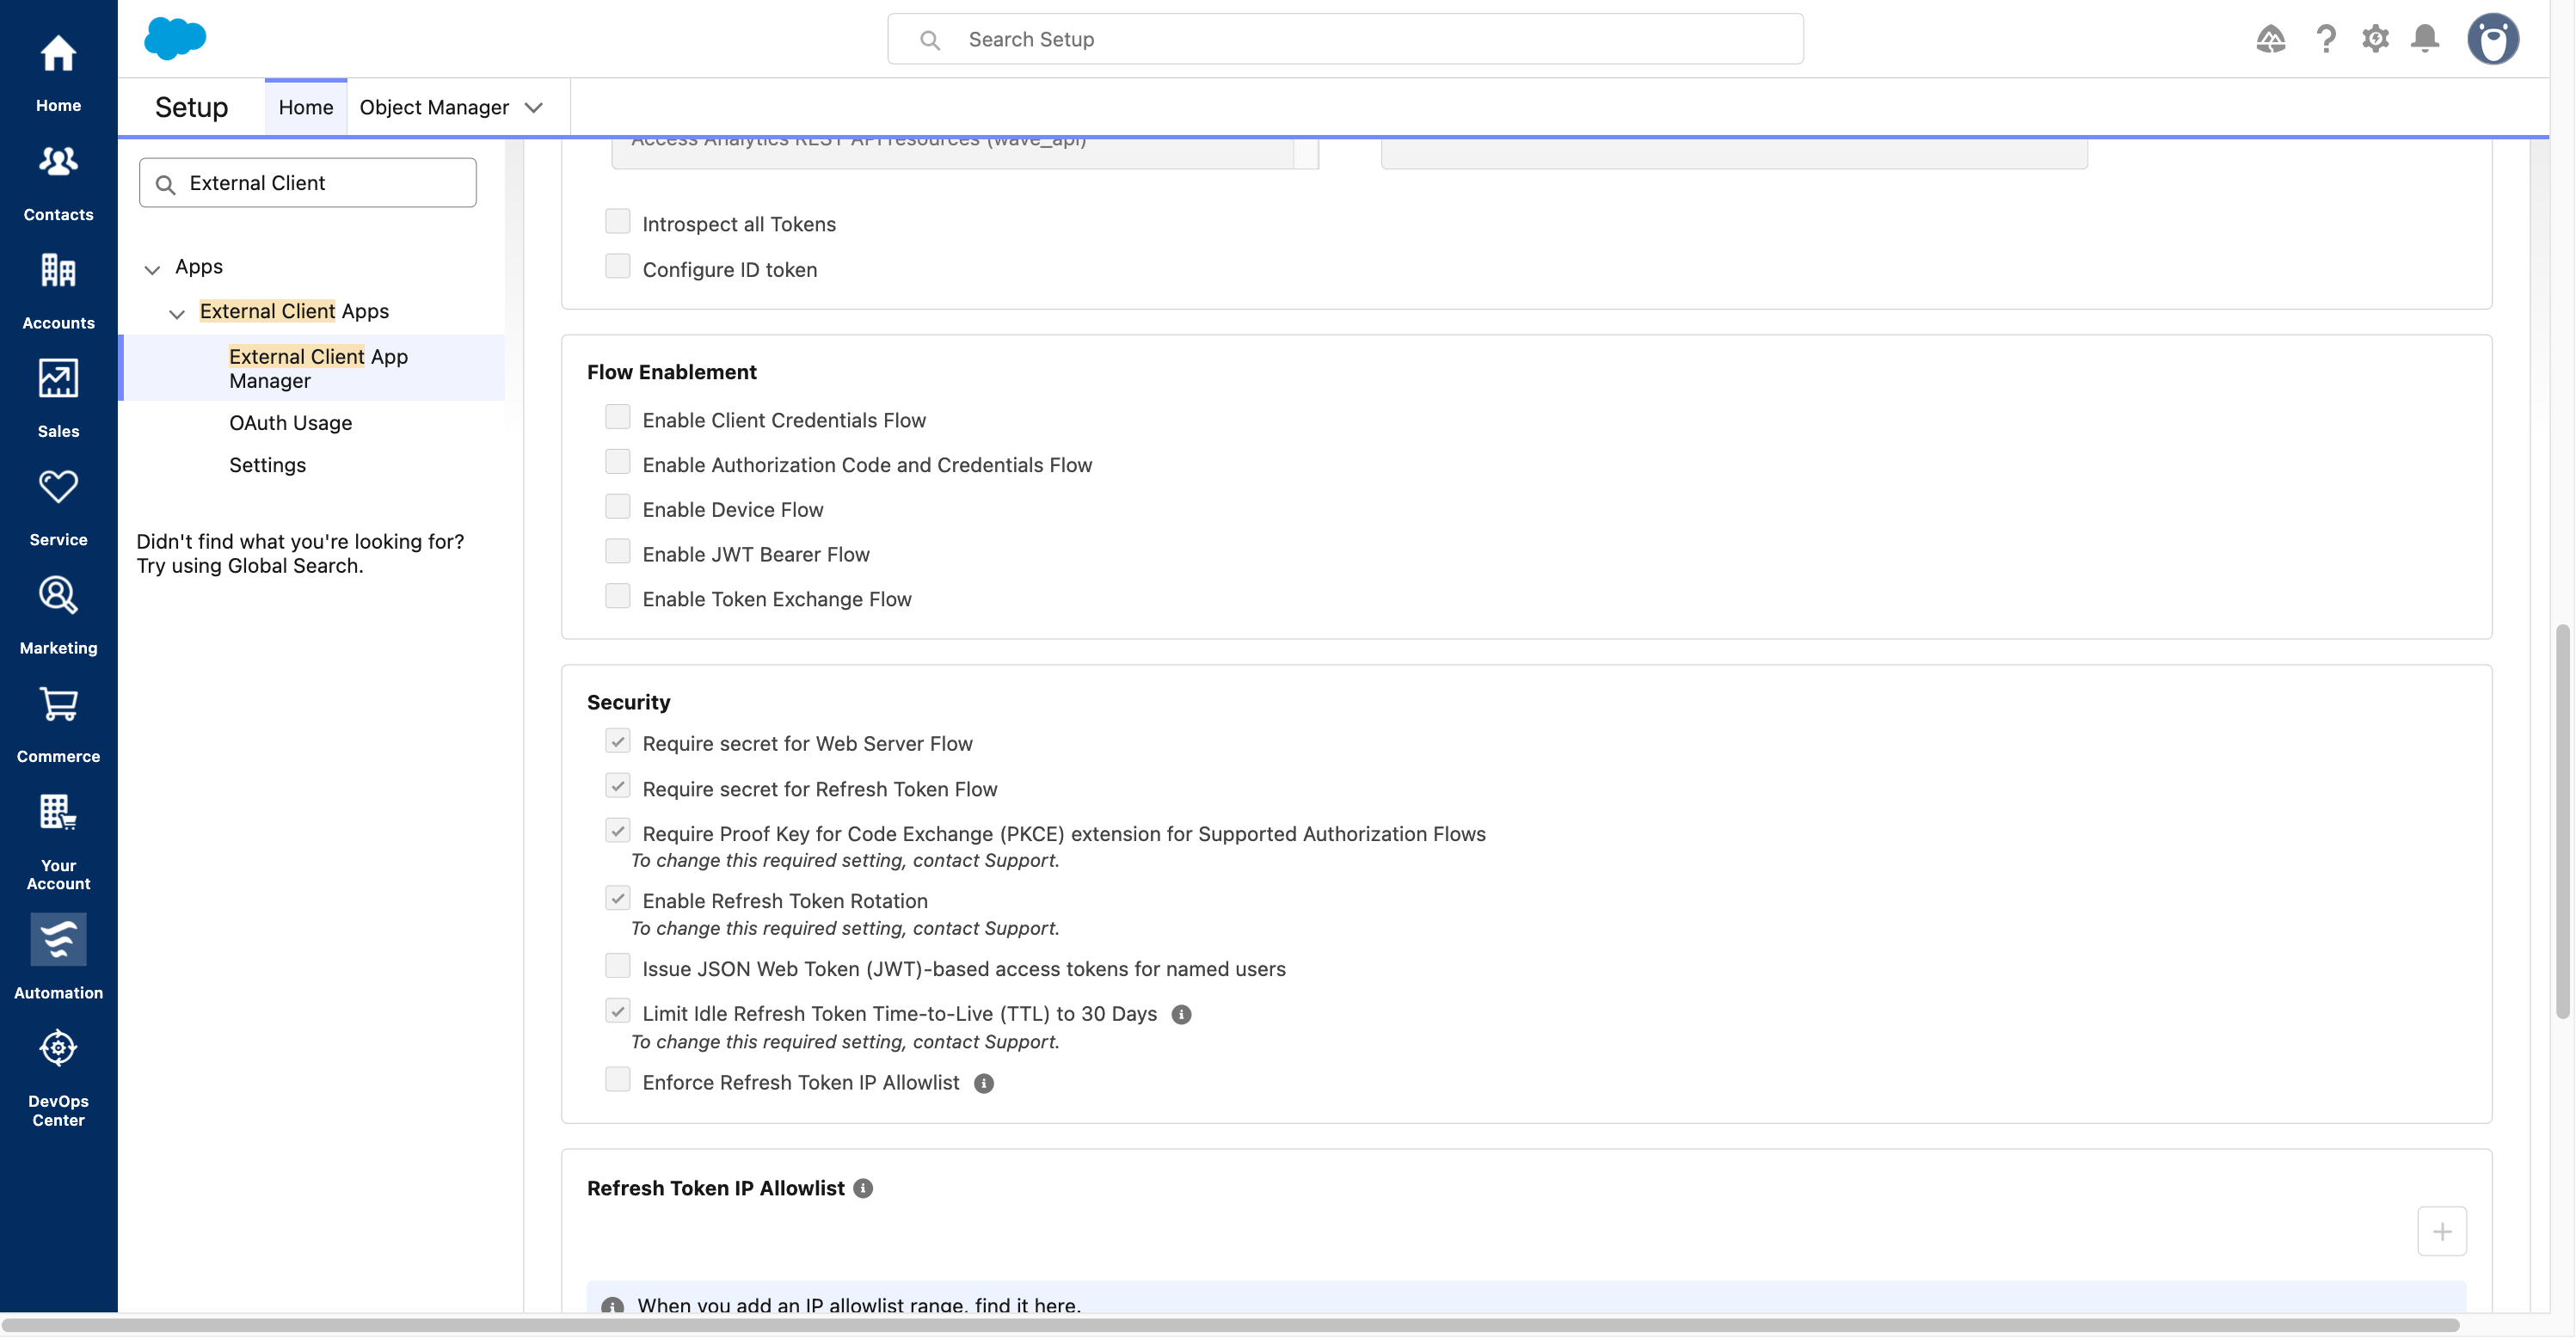
Keep client-secret requirements, PKCE, and refresh-token rotation enabled.
- 1. Keep both Require secret options checked.
- 2. Keep PKCE enabled.
- 3. Keep Refresh Token Rotation enabled. Required settings may be read-only.
Find the Consumer Key and Consumer Secret
- Open External Client App Manager → OneCLI → Settings. Expand OAuth Settings and look for Consumer Key and Secret or the control to view consumer details. Complete any Salesforce identity verification prompt.
- On the Consumer Details screen, Consumer Key is the OAuth client ID and Consumer Secret is the OAuth client secret. Copy each using its Copy button.
- Paste them only into OneCLI’s Consumer Key and Consumer Secret fields. Do not paste the secret into an agent chat, screenshots, support tickets, source code or a generic custom connection.
- If a secret is exposed, use Salesforce’s secret regeneration/rotation control, then update the OneCLI app configuration privately and reconnect affected accounts. Do not reset your Salesforce account password for this.
- For OneCLI’s Environment field, enter exactly production for a regular Salesforce organization or sandbox for a Salesforce sandbox. This refers to Salesforce, not whether OneCLI itself runs locally or in production.
Open consumer details without exposing credentials in this guide.
- 1. Choose Consumer Key and Secret, complete identity verification, and copy the values privately into OneCLI.
Create a dedicated permission set
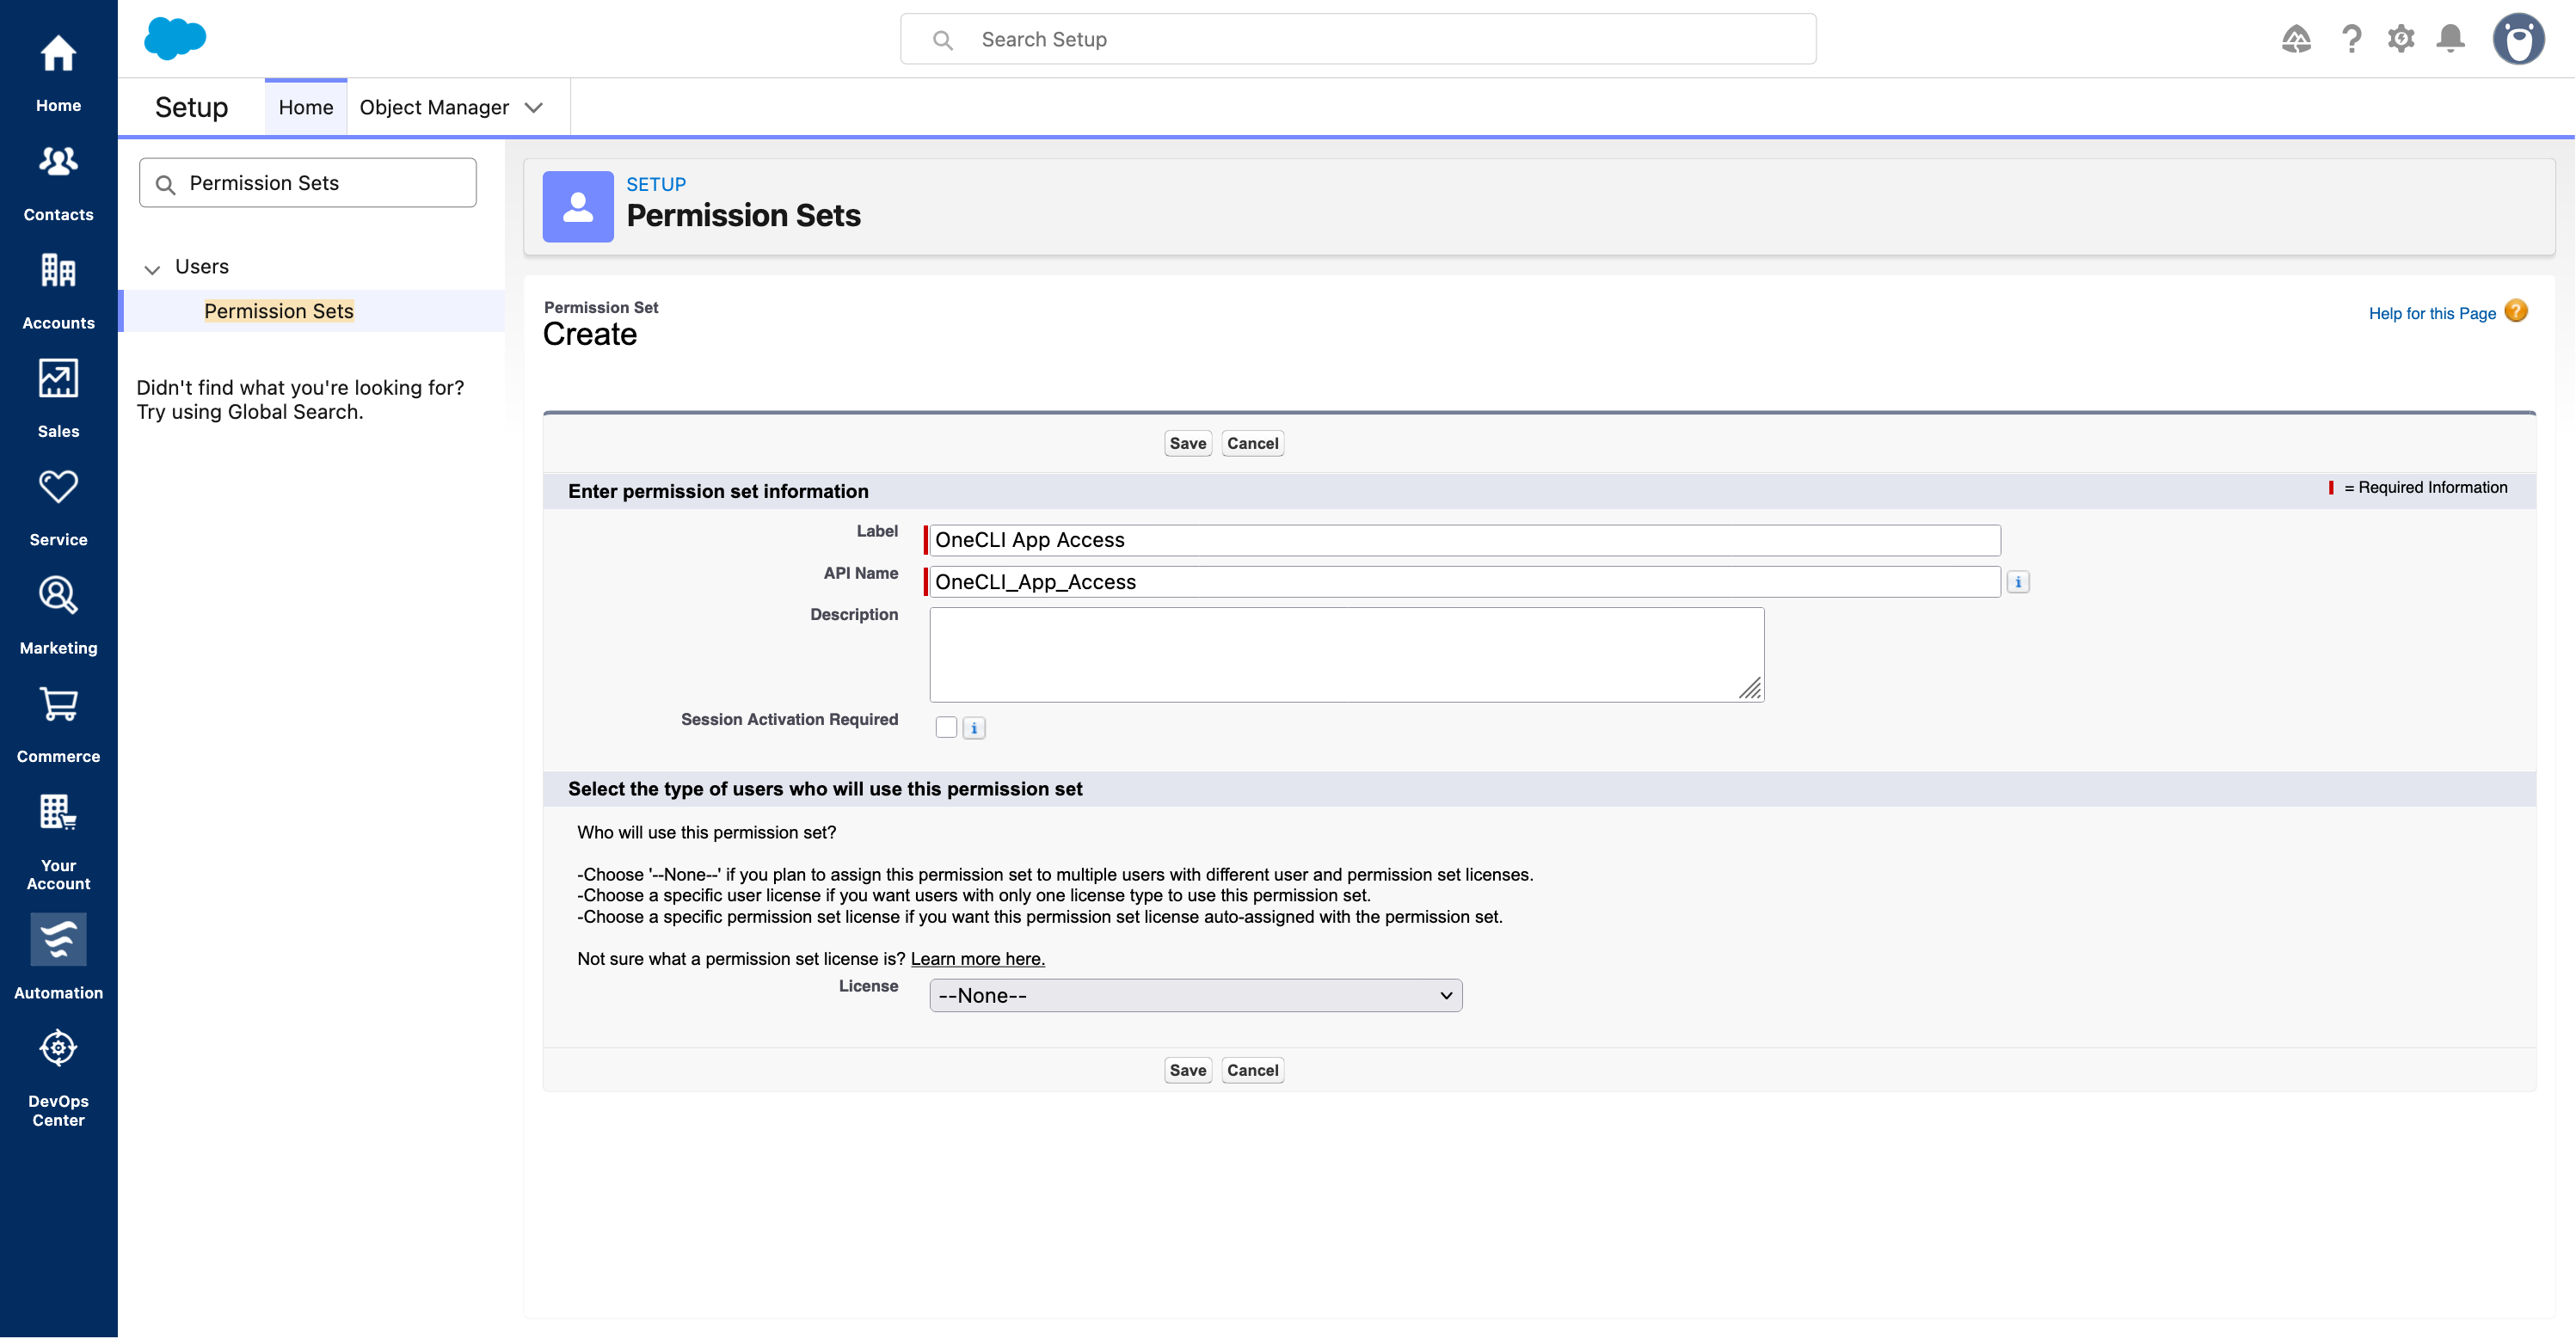
- In Salesforce Setup, search for Permission Sets. Choose New.
-
Set Label = OneCLI App Access. Accept the generated API Name, such as OneCLI_App_Access. Description is optional. Leave Session Activation Required unchecked and License =
--None--, then Save. - This permission set will authorize access to the External Client App. Do not grant unrelated System Administrator, Modify All Data or broad object permissions just to make OAuth work. Existing user permissions still determine accessible CRM data.
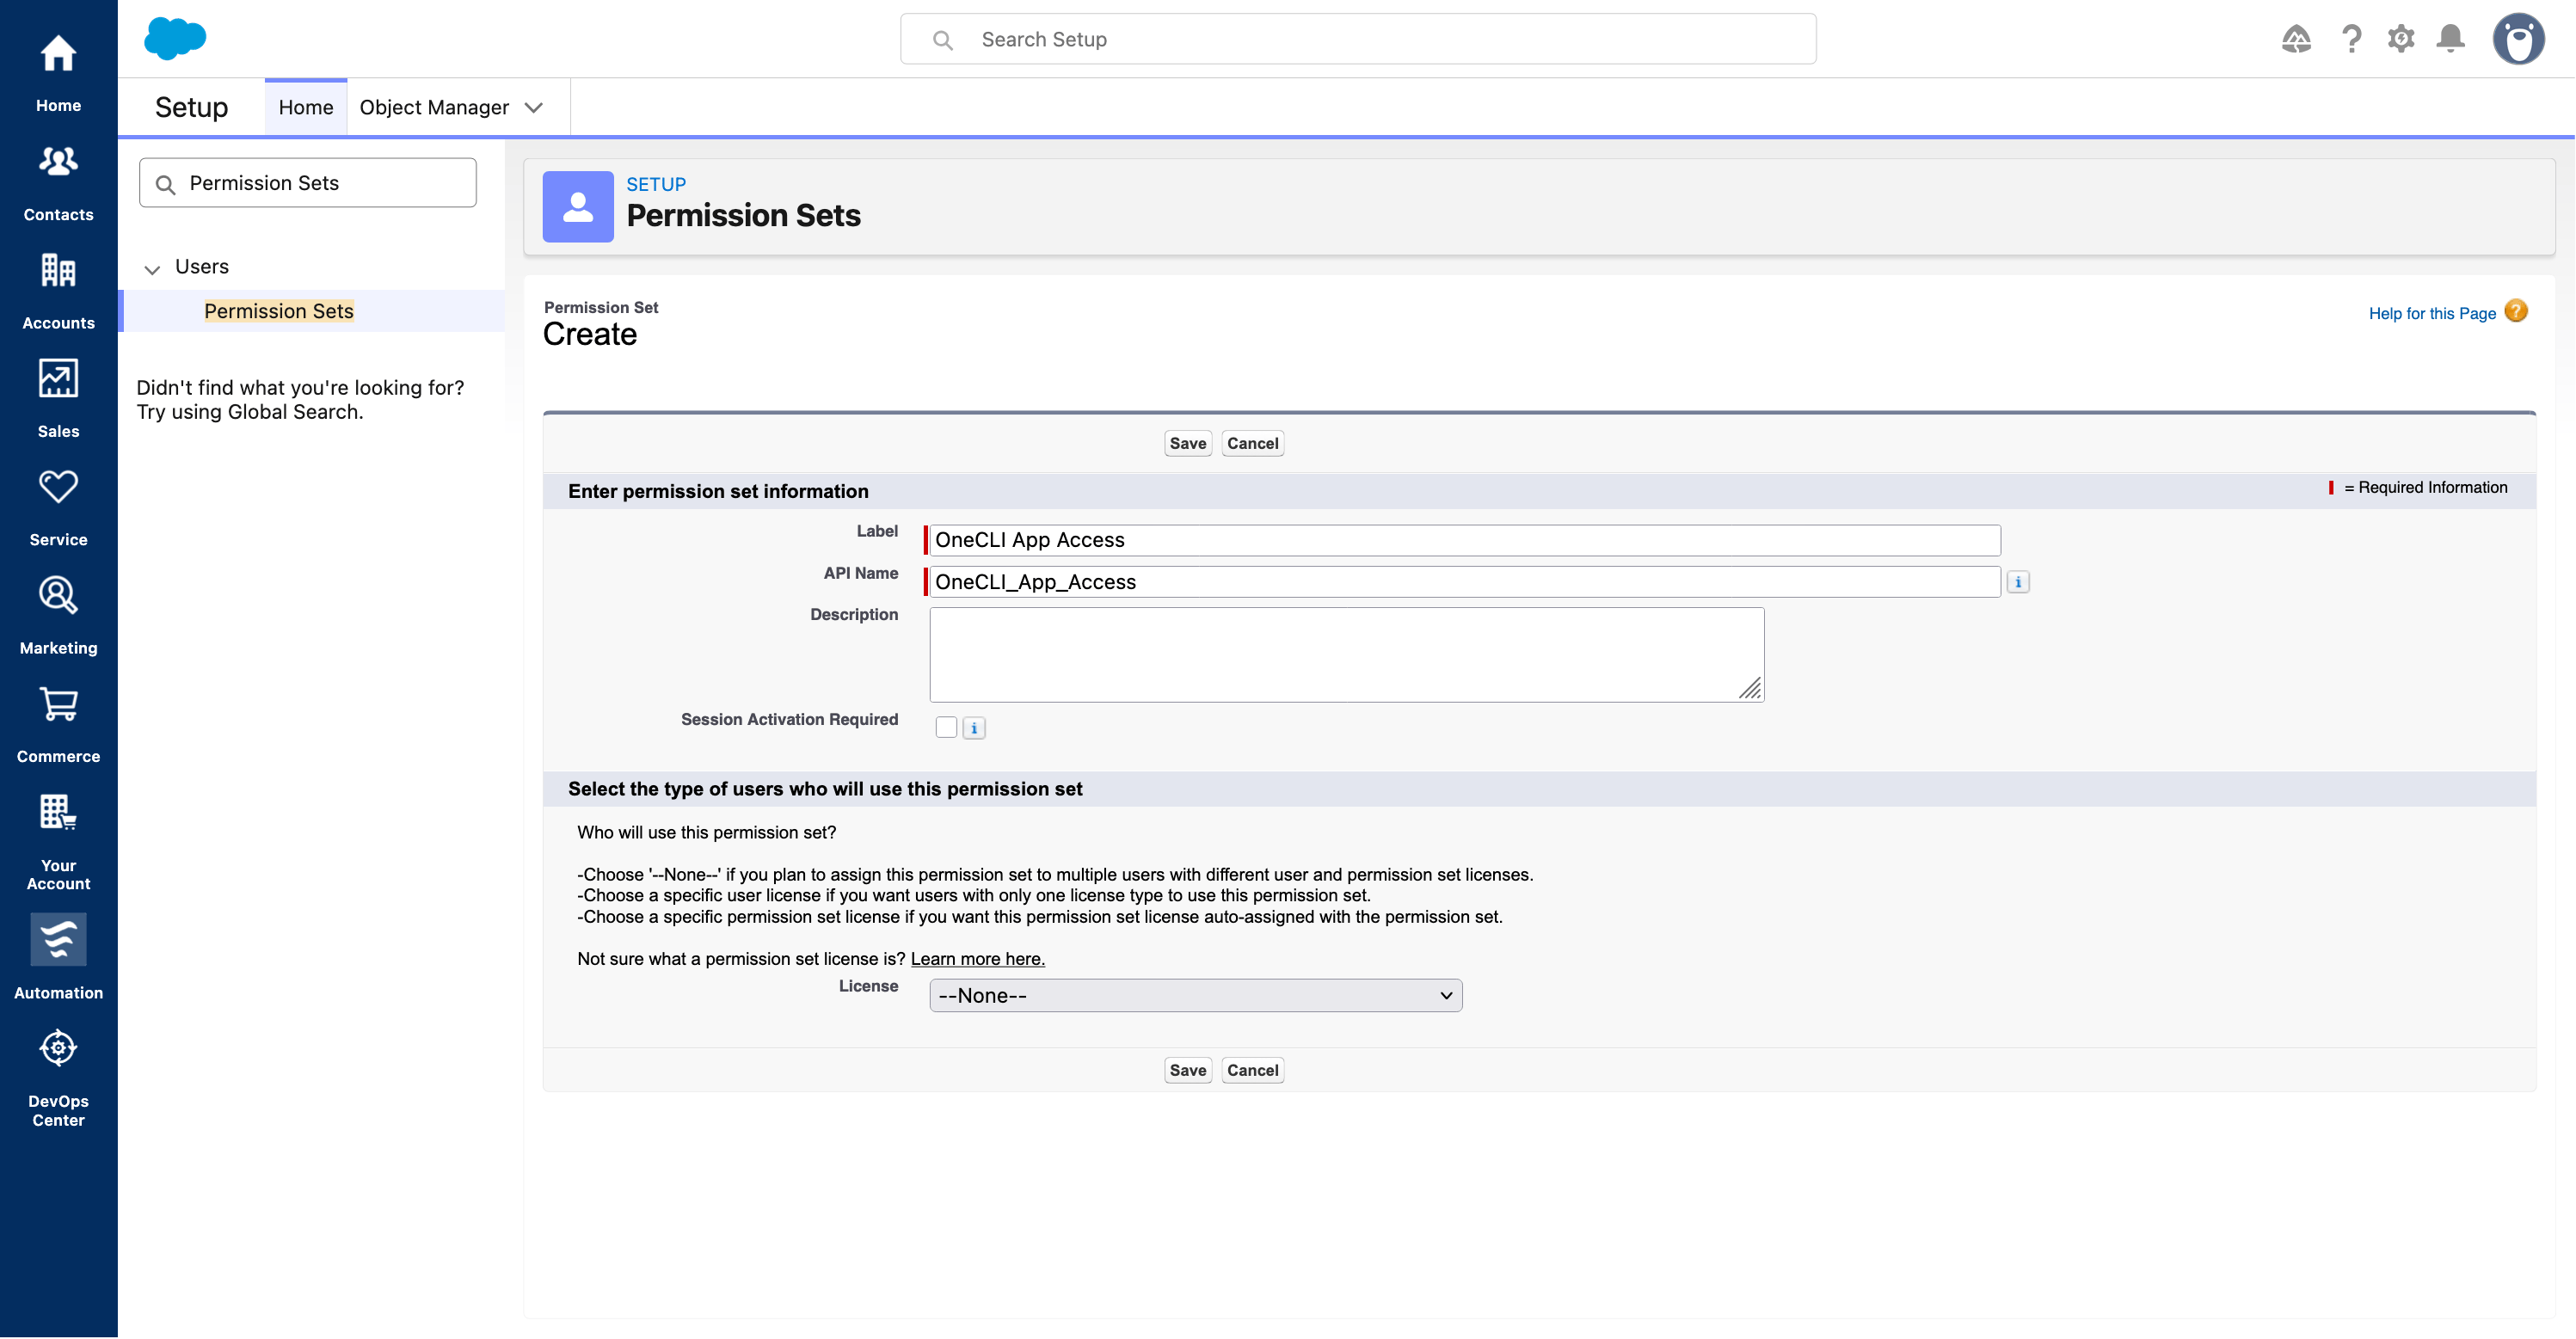
Create a dedicated permission set without adding unrelated privileges.
- 1. Enter OneCLI App Access and accept the generated API name.
- 2. Leave Session Activation Required unchecked.
- 3. Keep License set to —None—.
- 4. Click Save.
Link the permission set to the app
- Return to External Client App Manager → OneCLI → Policies → Edit.
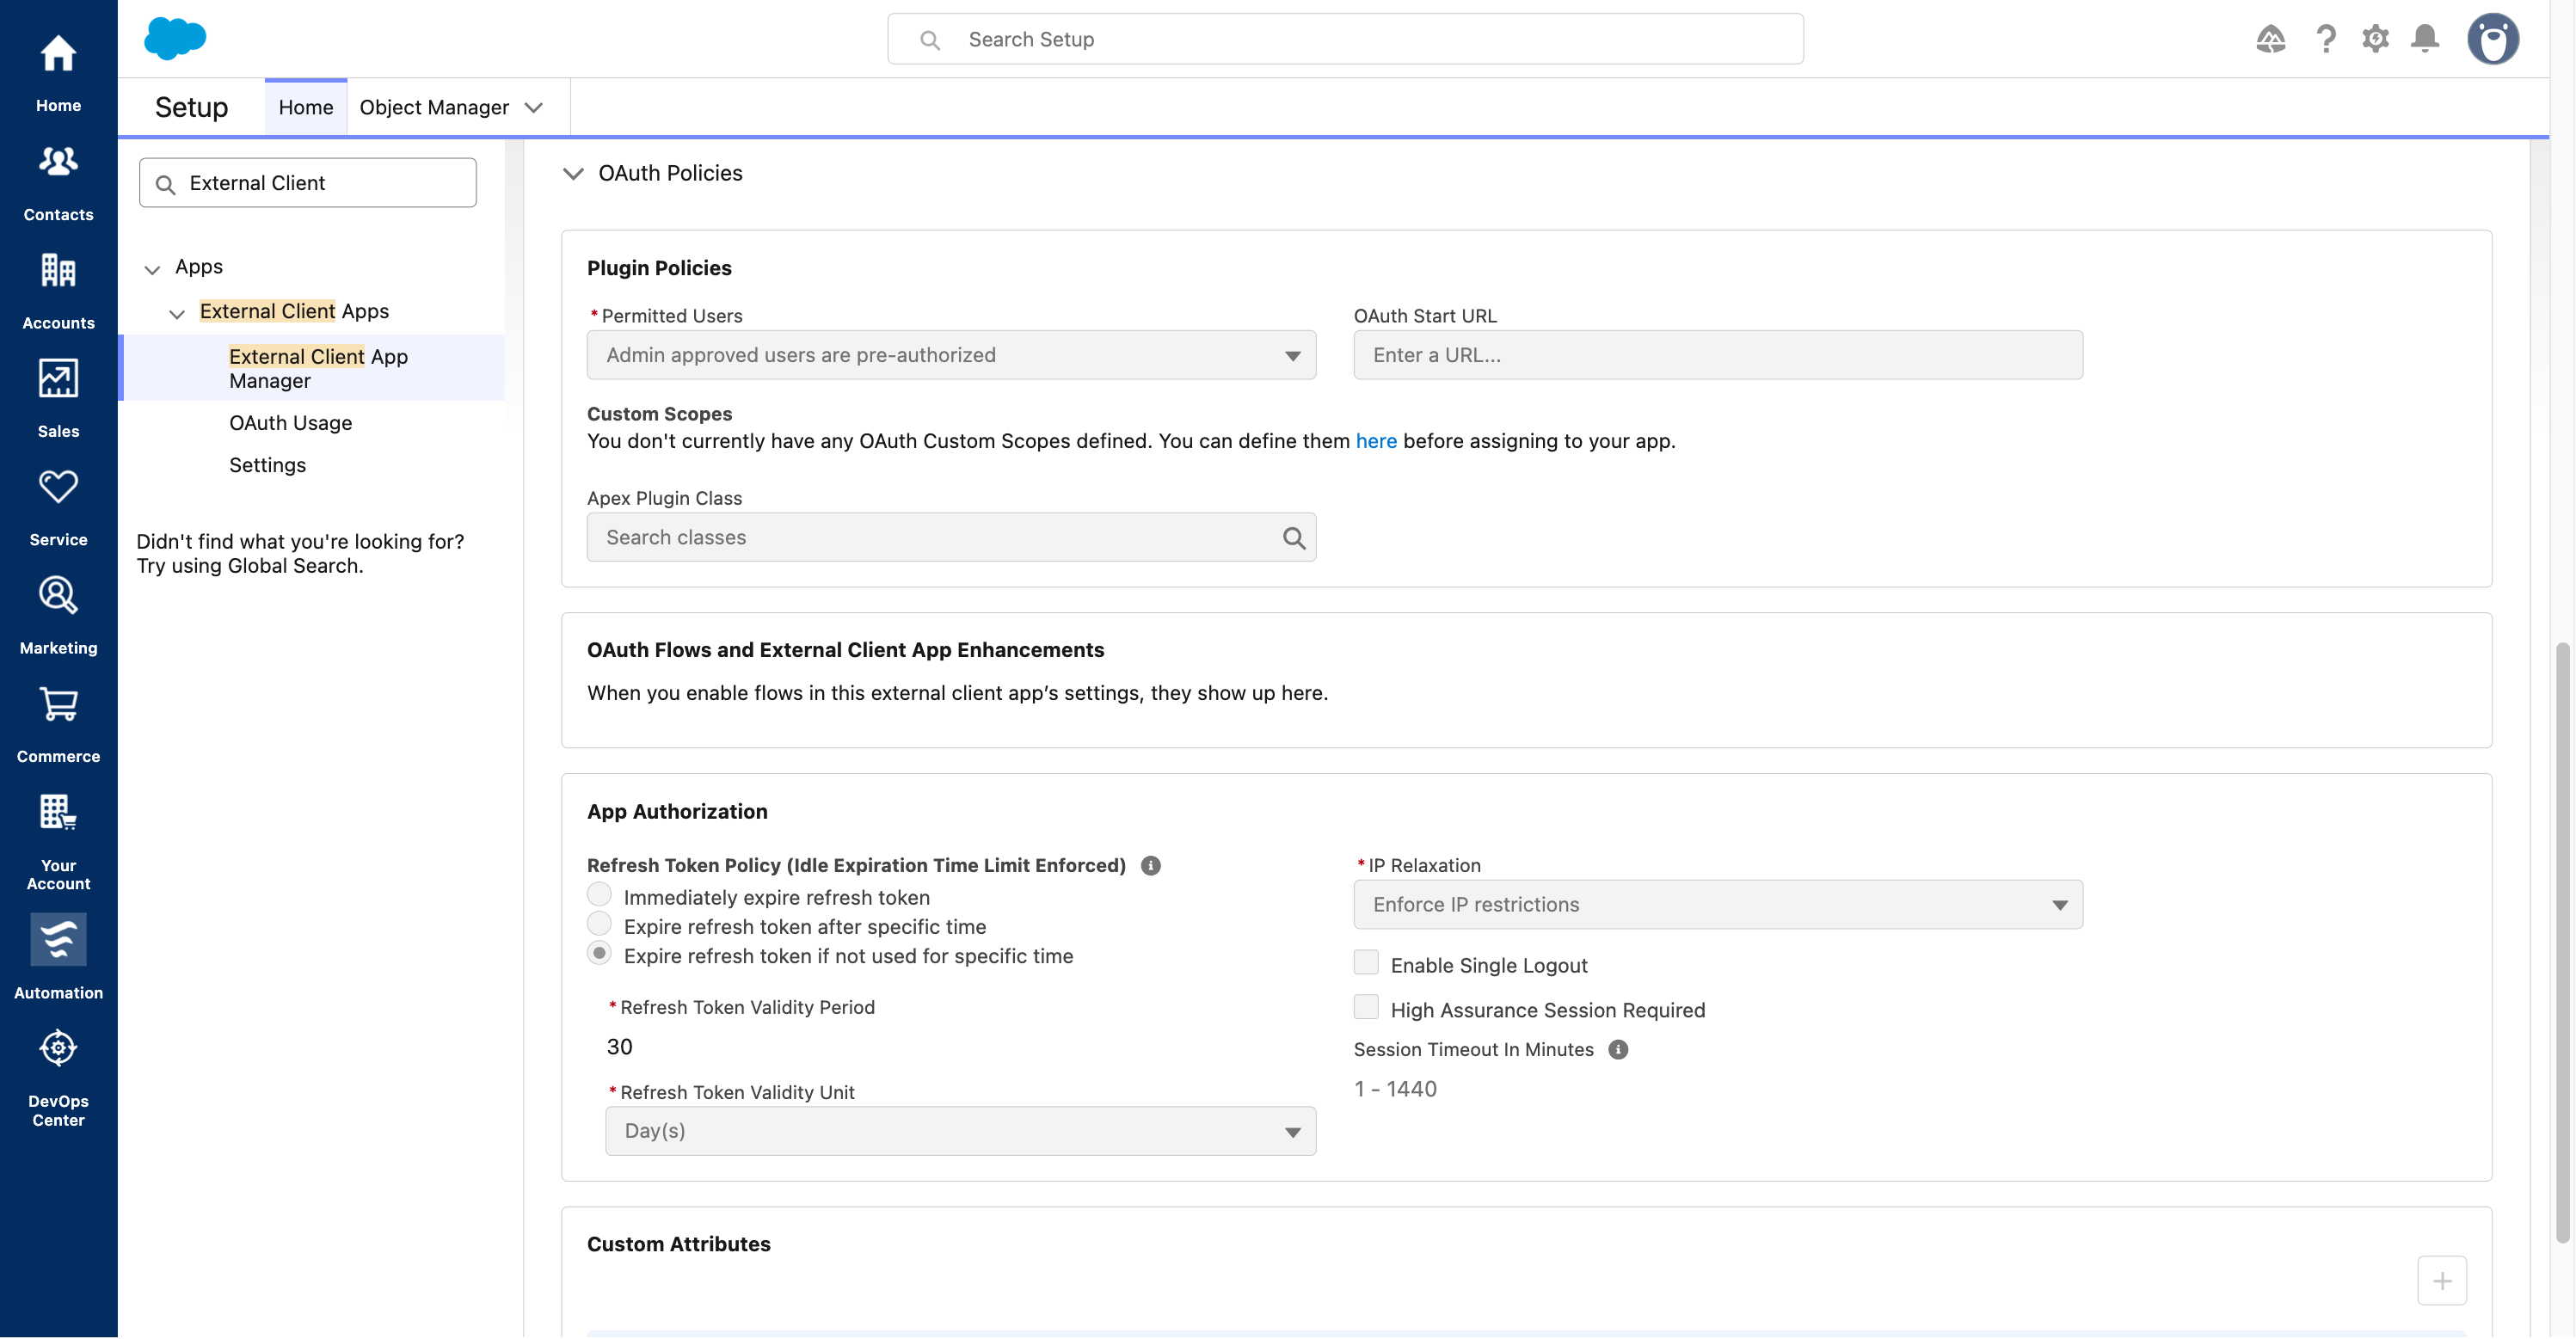
- Keep Start Page = None. Under OAuth Policies → Plugin Policies, set Permitted Users = Admin approved users are pre-authorized.
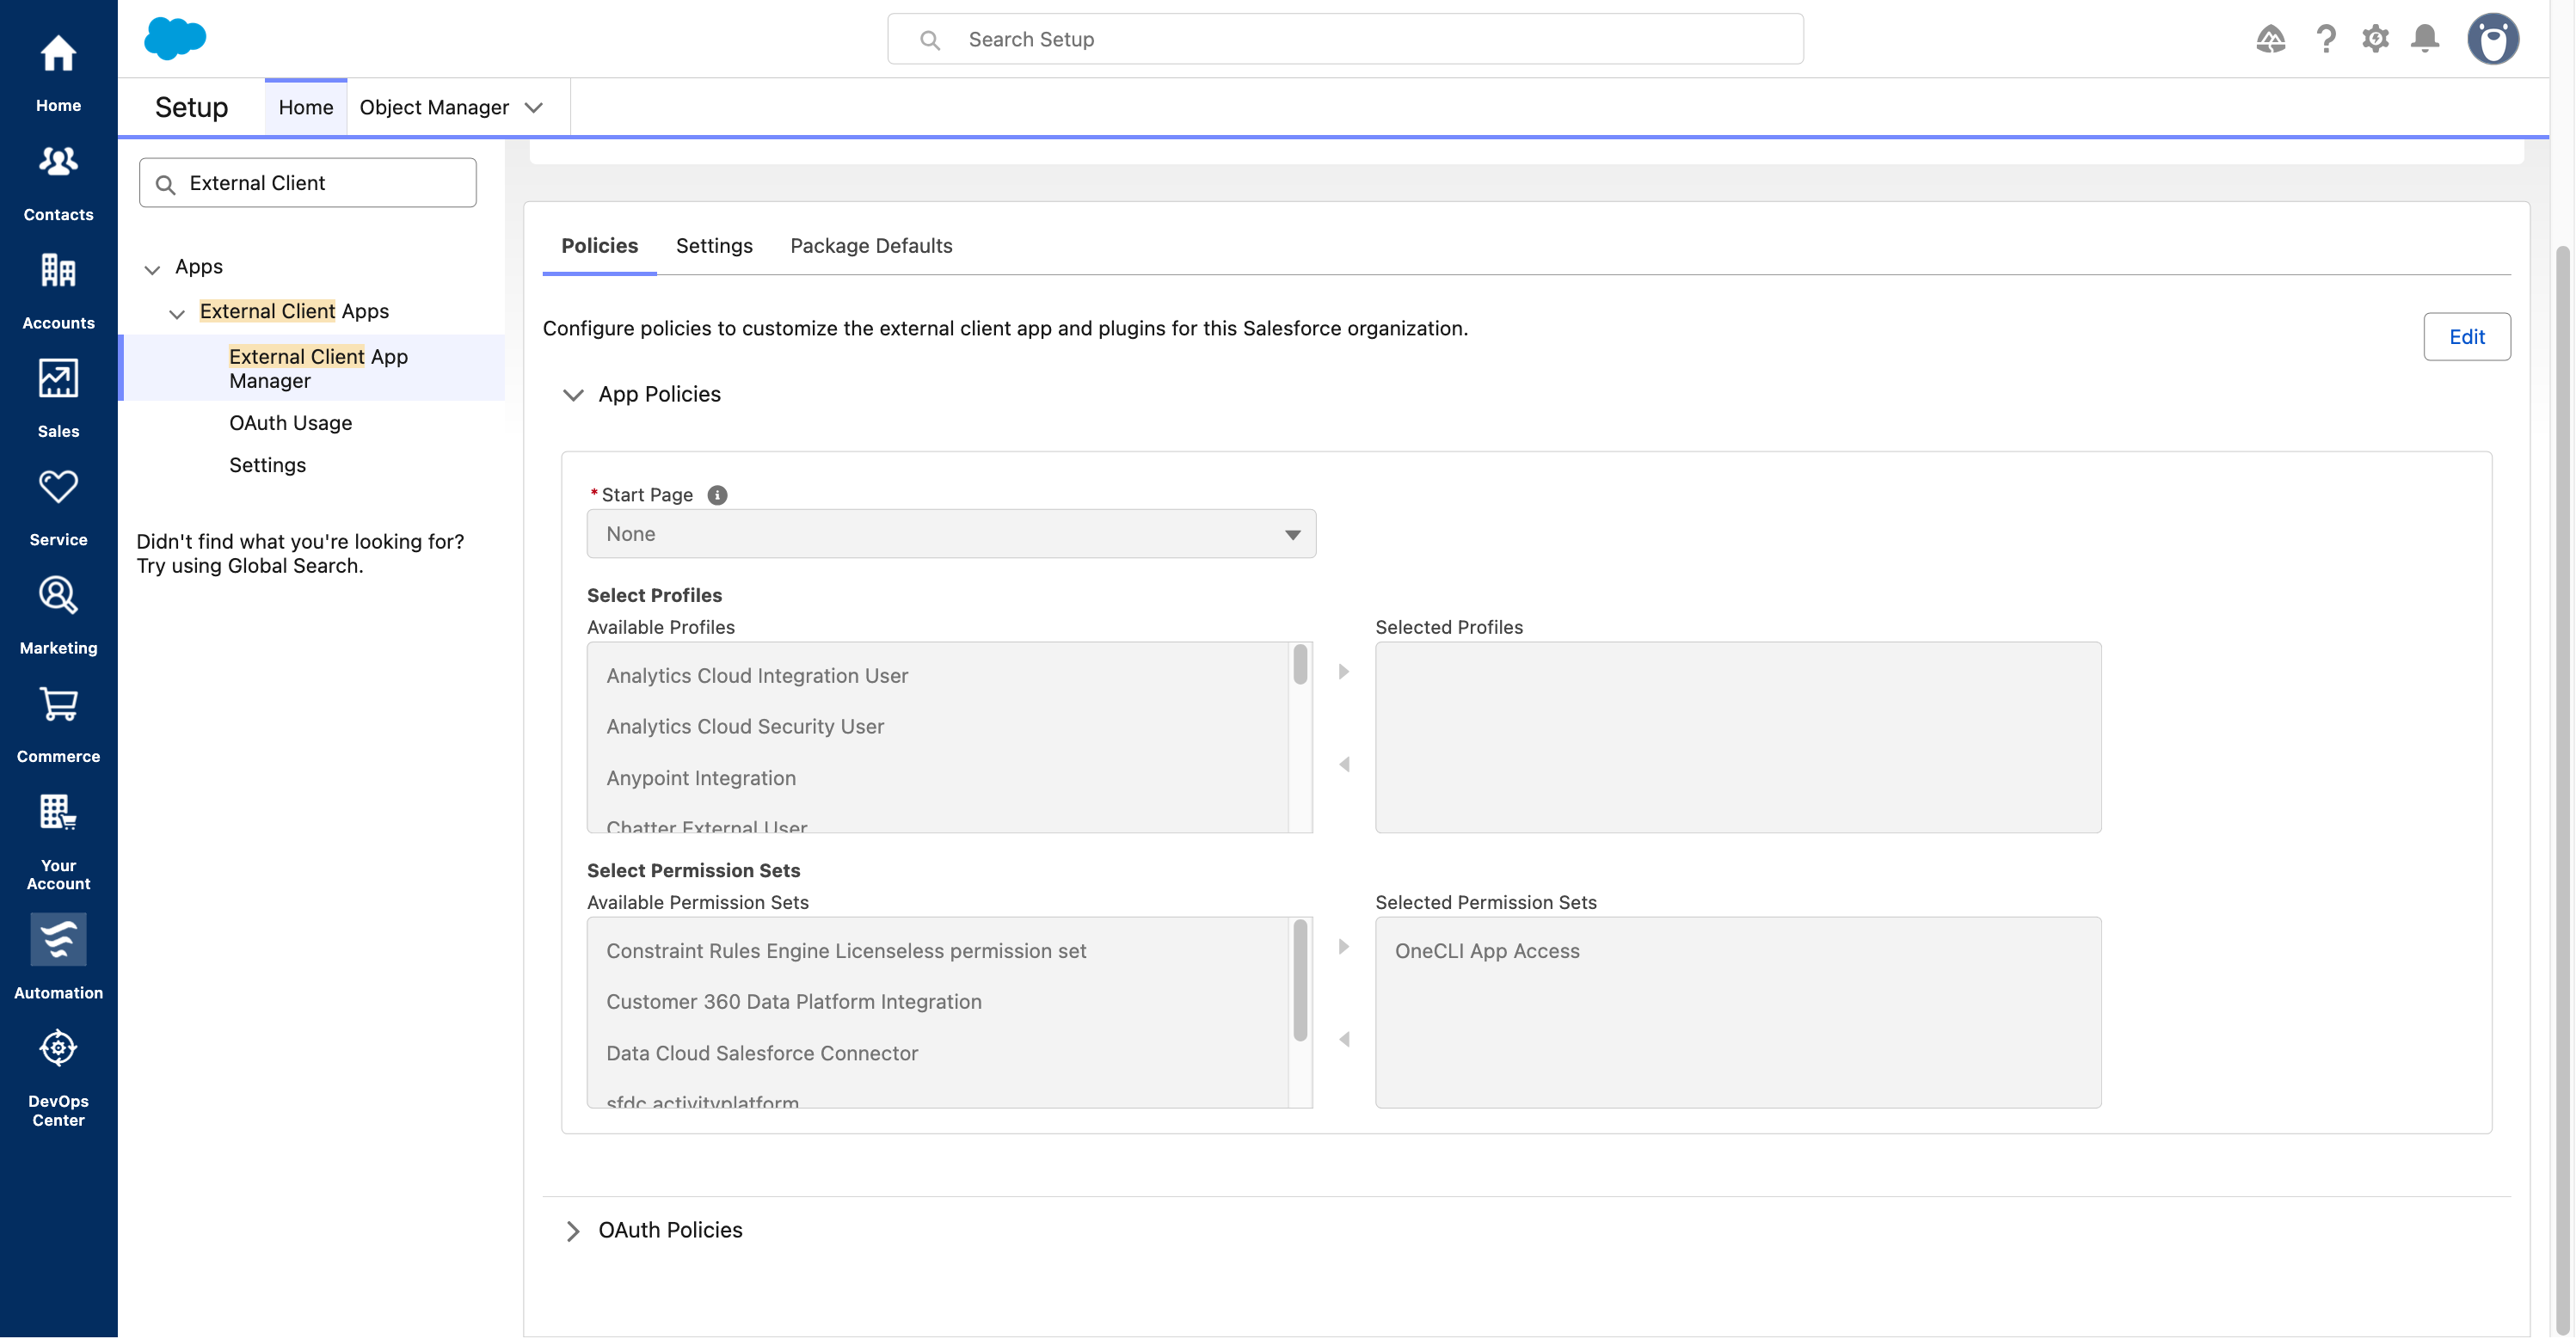
- Under App Policies → Select Permission Sets, select OneCLI App Access in the left Available Permission Sets list and click the right arrow to move it into Selected Permission Sets. Save. Creating the permission set alone is not enough.
- Leave Selected Profiles empty unless your administrator intentionally authorizes a whole profile. You do not need to add the System Administrator profile when the permission set is linked.
- Leave OAuth Start URL, custom scopes and Apex Plugin Class empty. Under App Authorization, keep the required refresh-token idle-expiration policy, typically Expire refresh token if not used for specific time → 30 Day(s). Do not select Immediately expire refresh token.
- Keep your organization’s IP restrictions. If they prevent authorization, ask an administrator to permit the required OneCLI egress IPs rather than blindly relaxing security. Leave optional Single Logout and High Assurance Session Required unchanged unless your organization requires them.
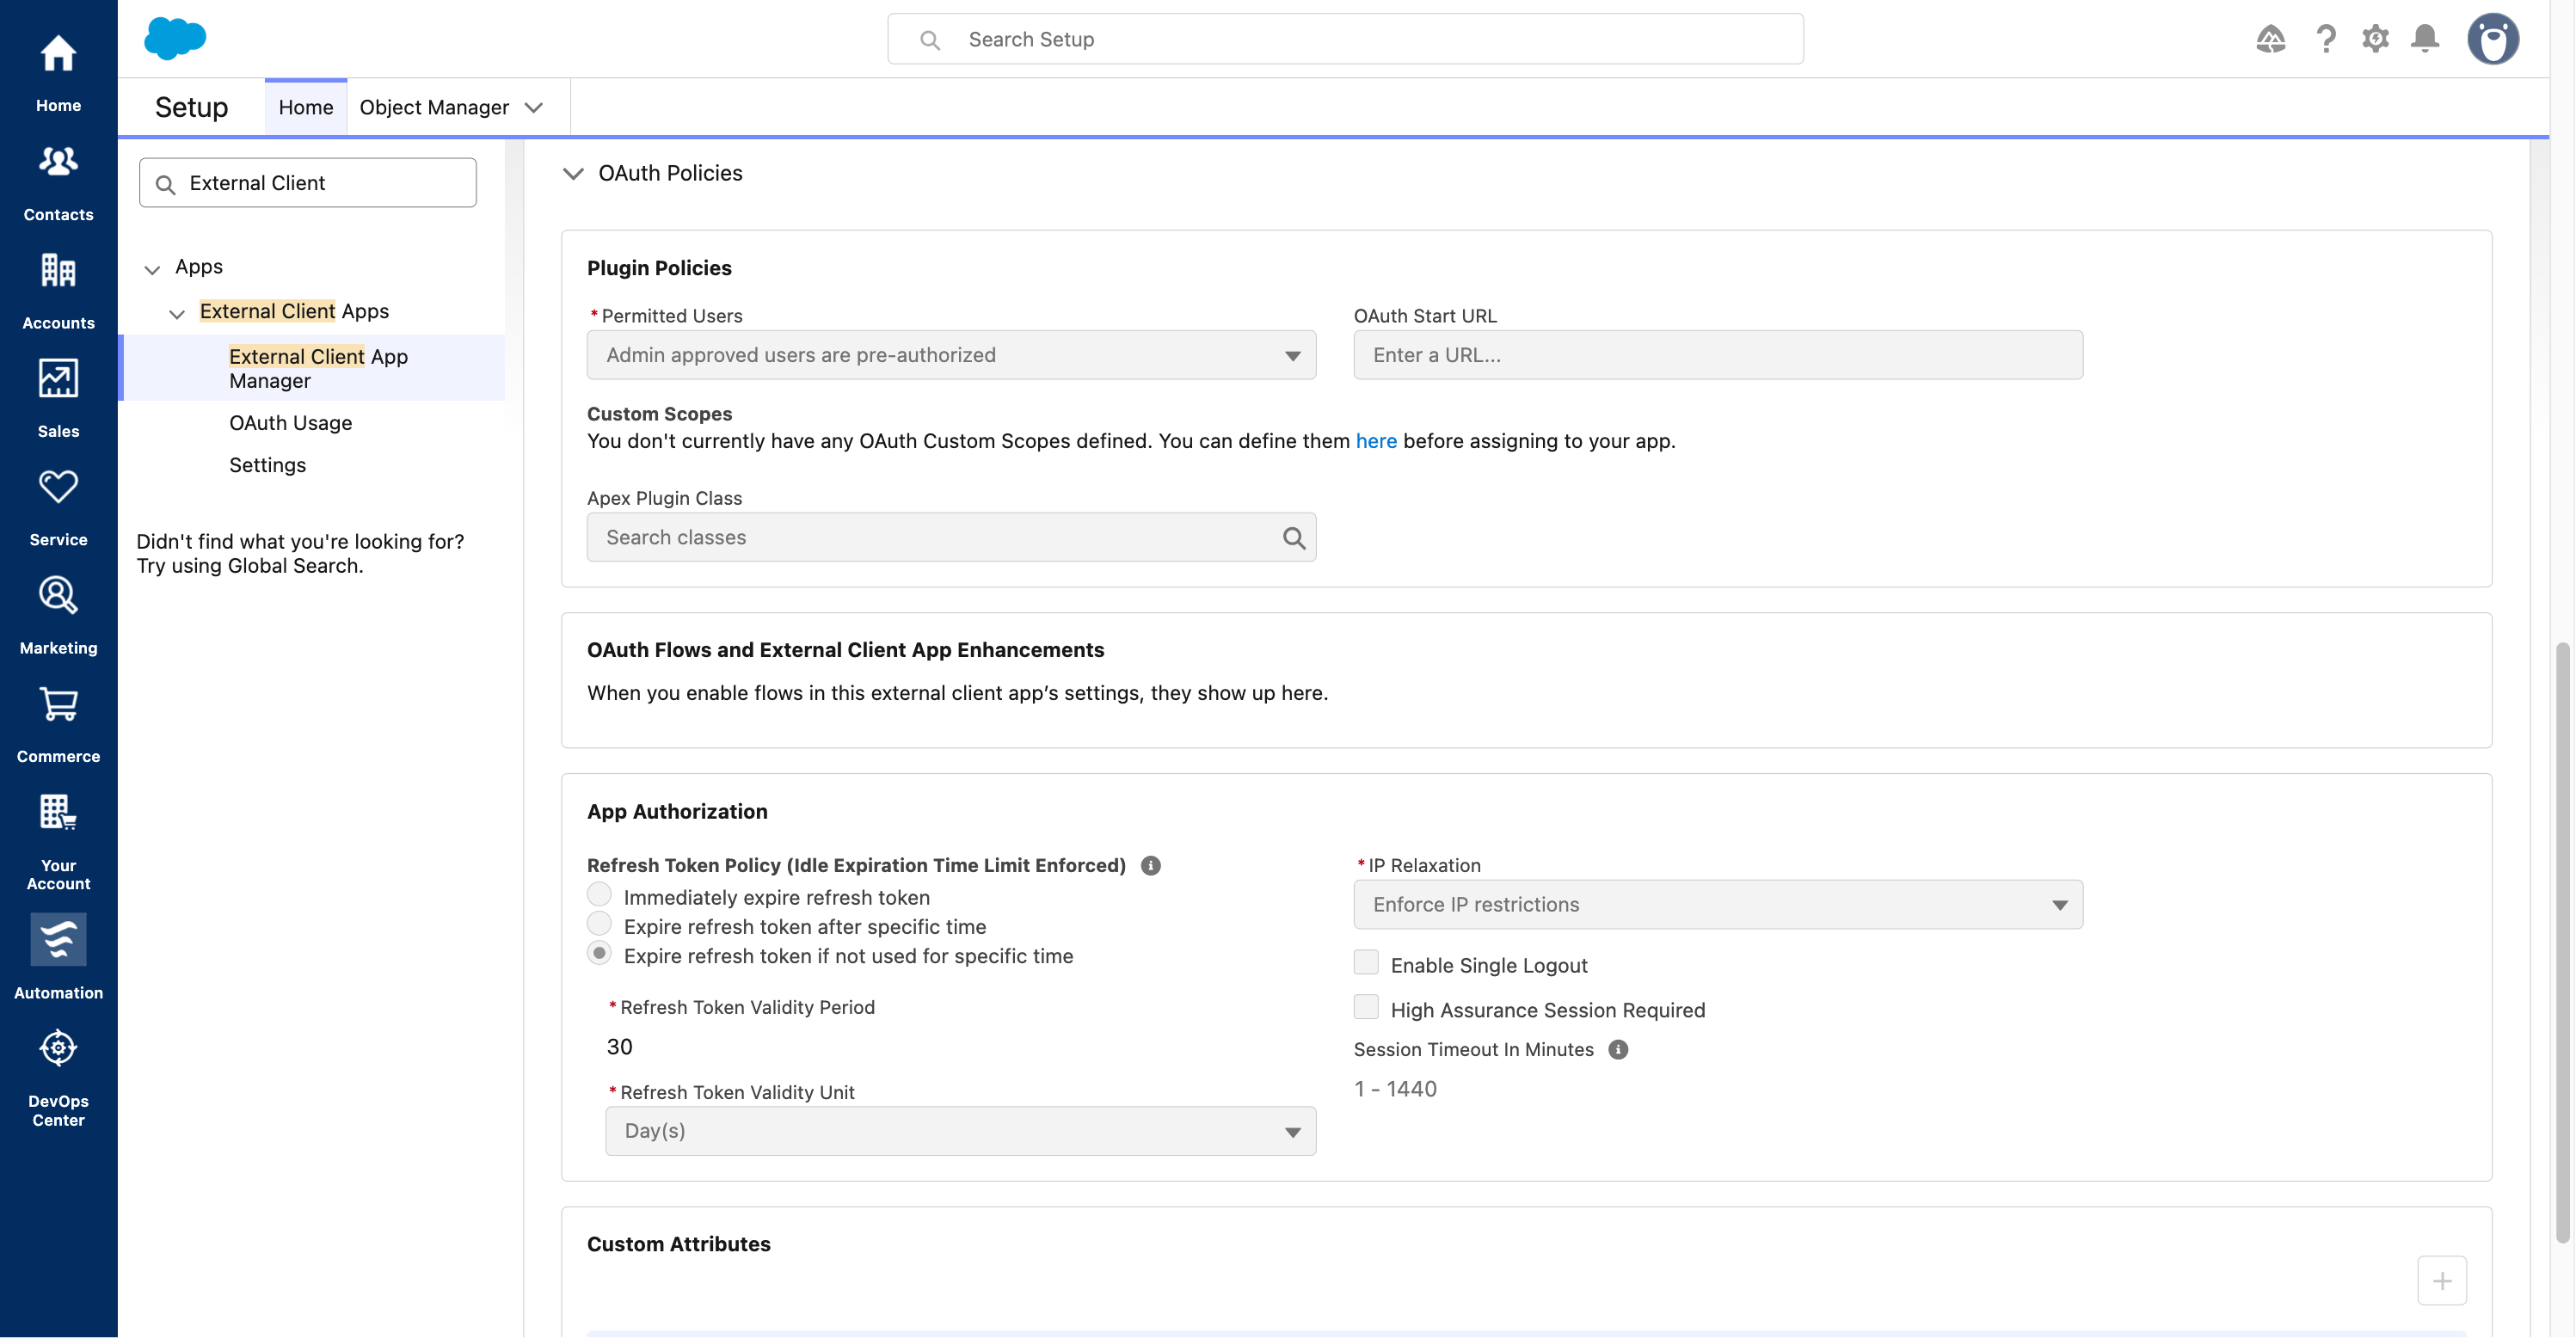
Require administrator-approved users.
- 1. In Policies → Edit → OAuth Policies, set Permitted Users to Admin approved users are pre-authorized.
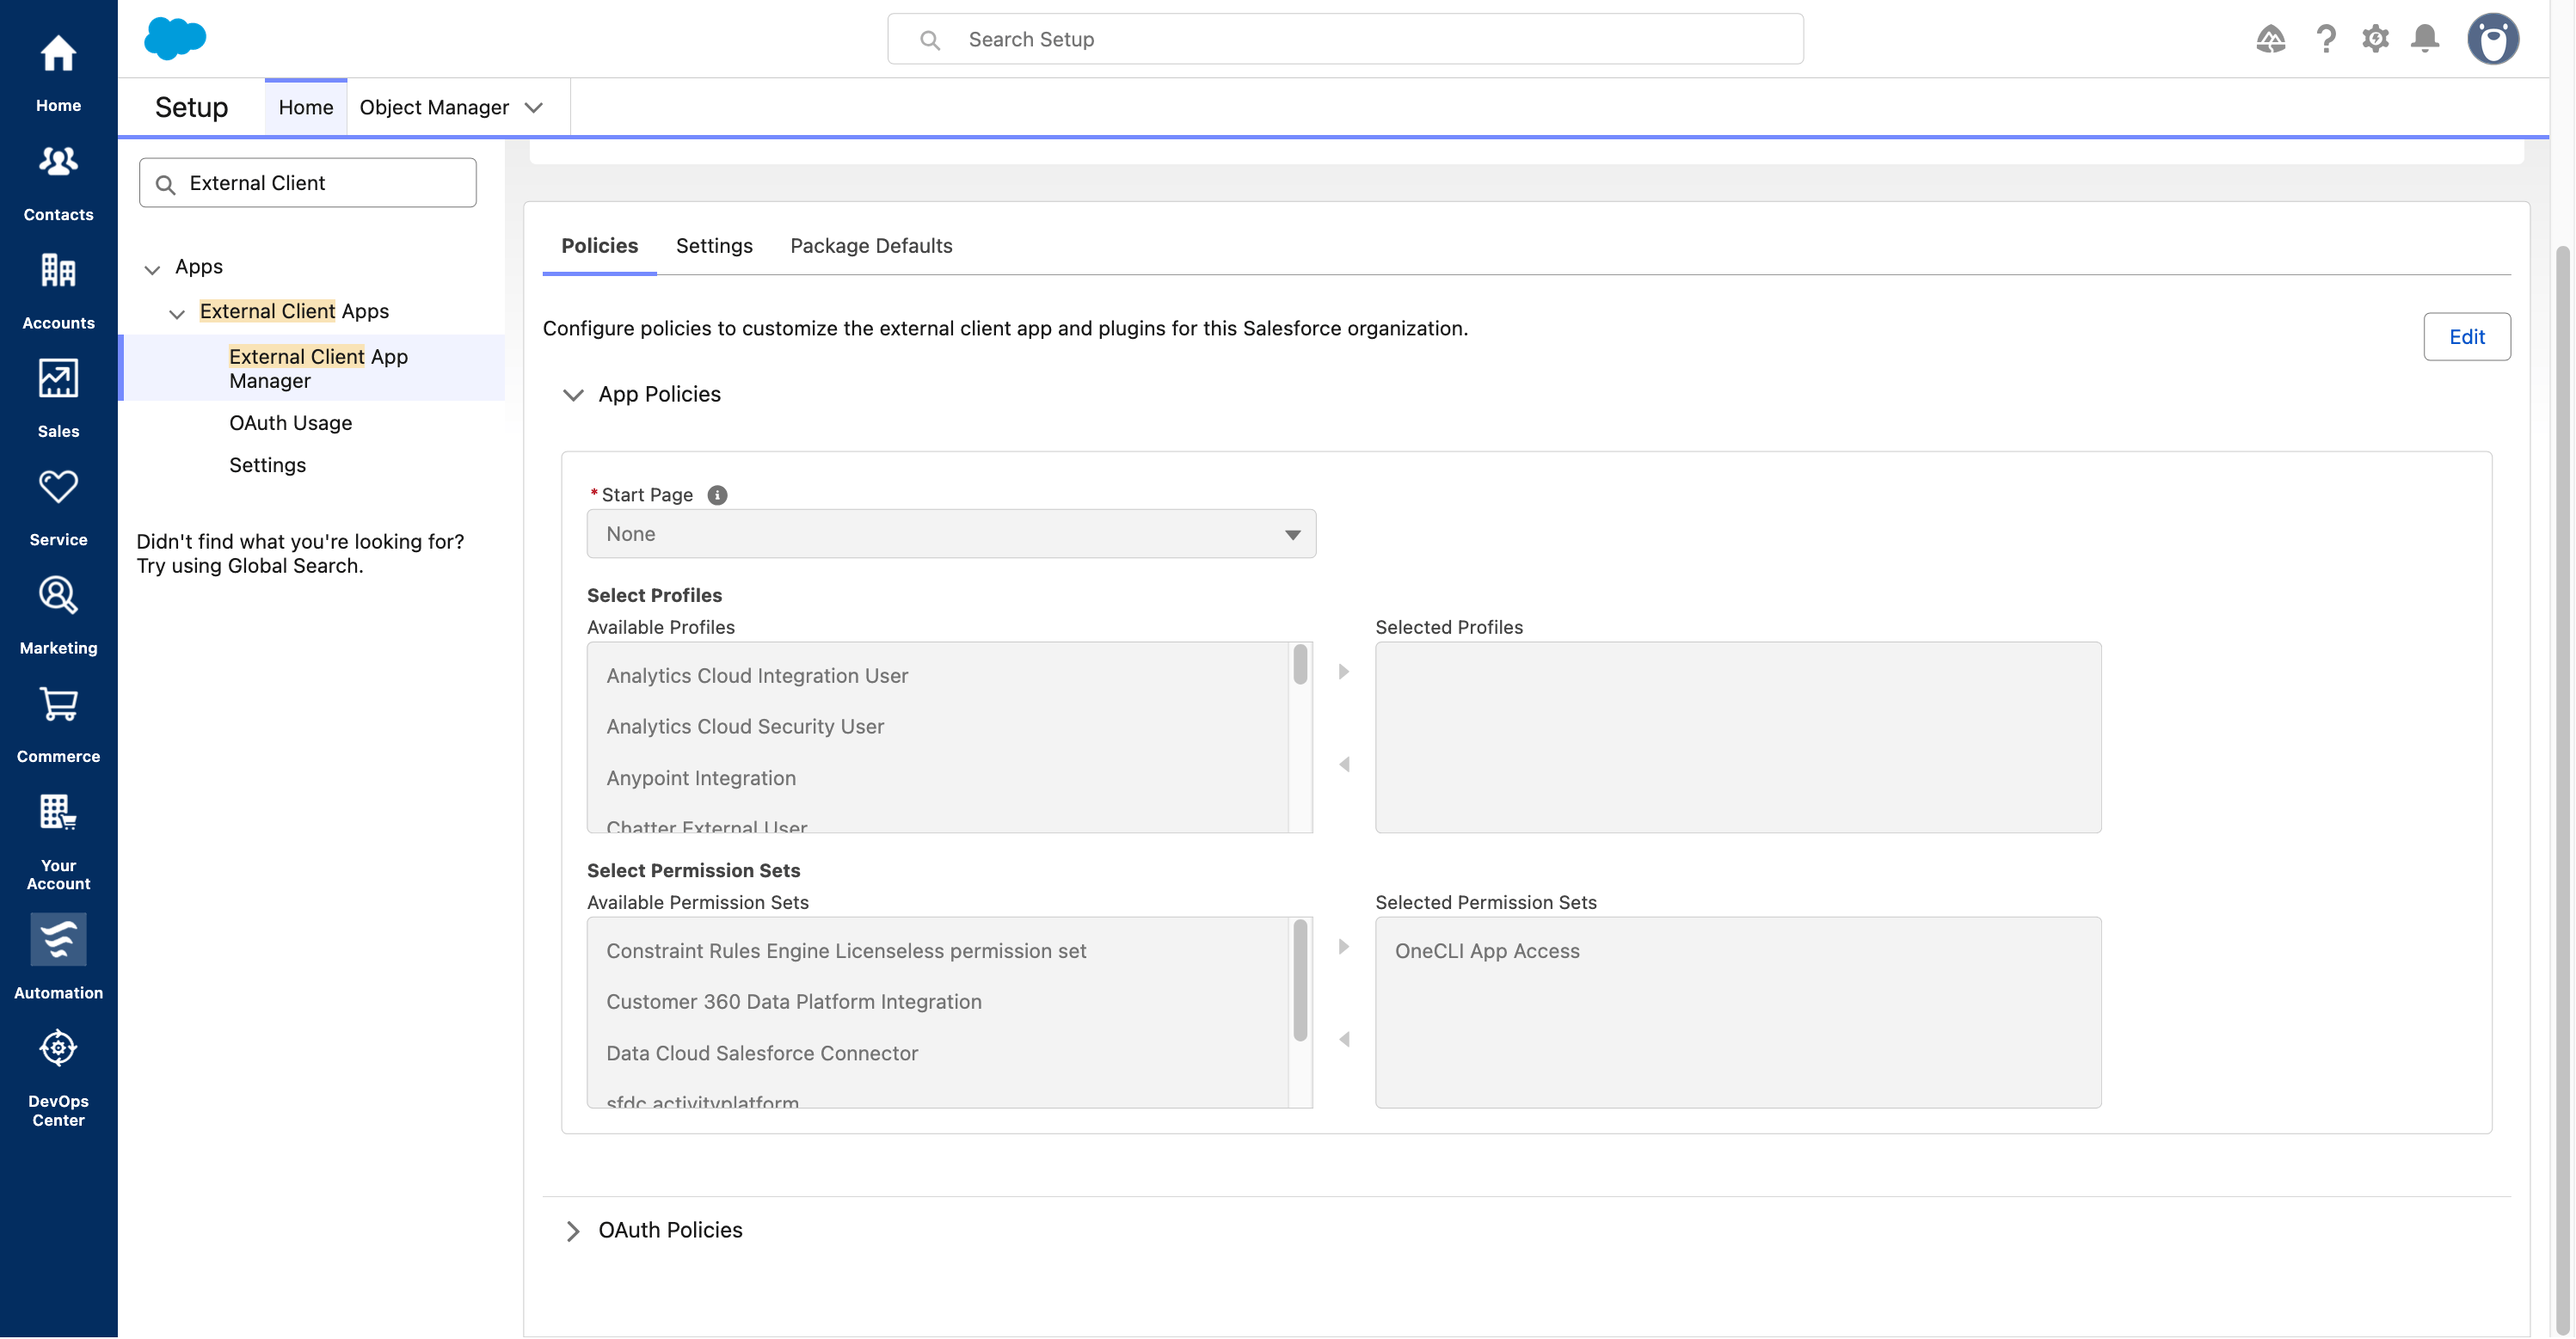
Link OneCLI App Access to the External Client App.
- 1. In Policies → Edit, select OneCLI App Access on the left and use the right arrow.
- 2. Confirm OneCLI App Access appears under Selected Permission Sets, then save. This screenshot shows the saved result.
Assign users and set assignment expiration
- Go to Setup → Permission Sets → OneCLI App Access → Manage Assignments → Add Assignments.
- Select the checkbox beside the exact Salesforce username that will sign in during OneCLI authorization, then click Next. A display name or an administrator profile alone does not grant access to this app. Leave unrelated users and service accounts unselected.
- On Manage Assignment Expiration, follow your organization’s access policy. Choose no expiration if ongoing integration access is approved, or select the required expiration date for temporary access. UI wording may vary. Do not unintentionally set an already-expired or very short assignment.
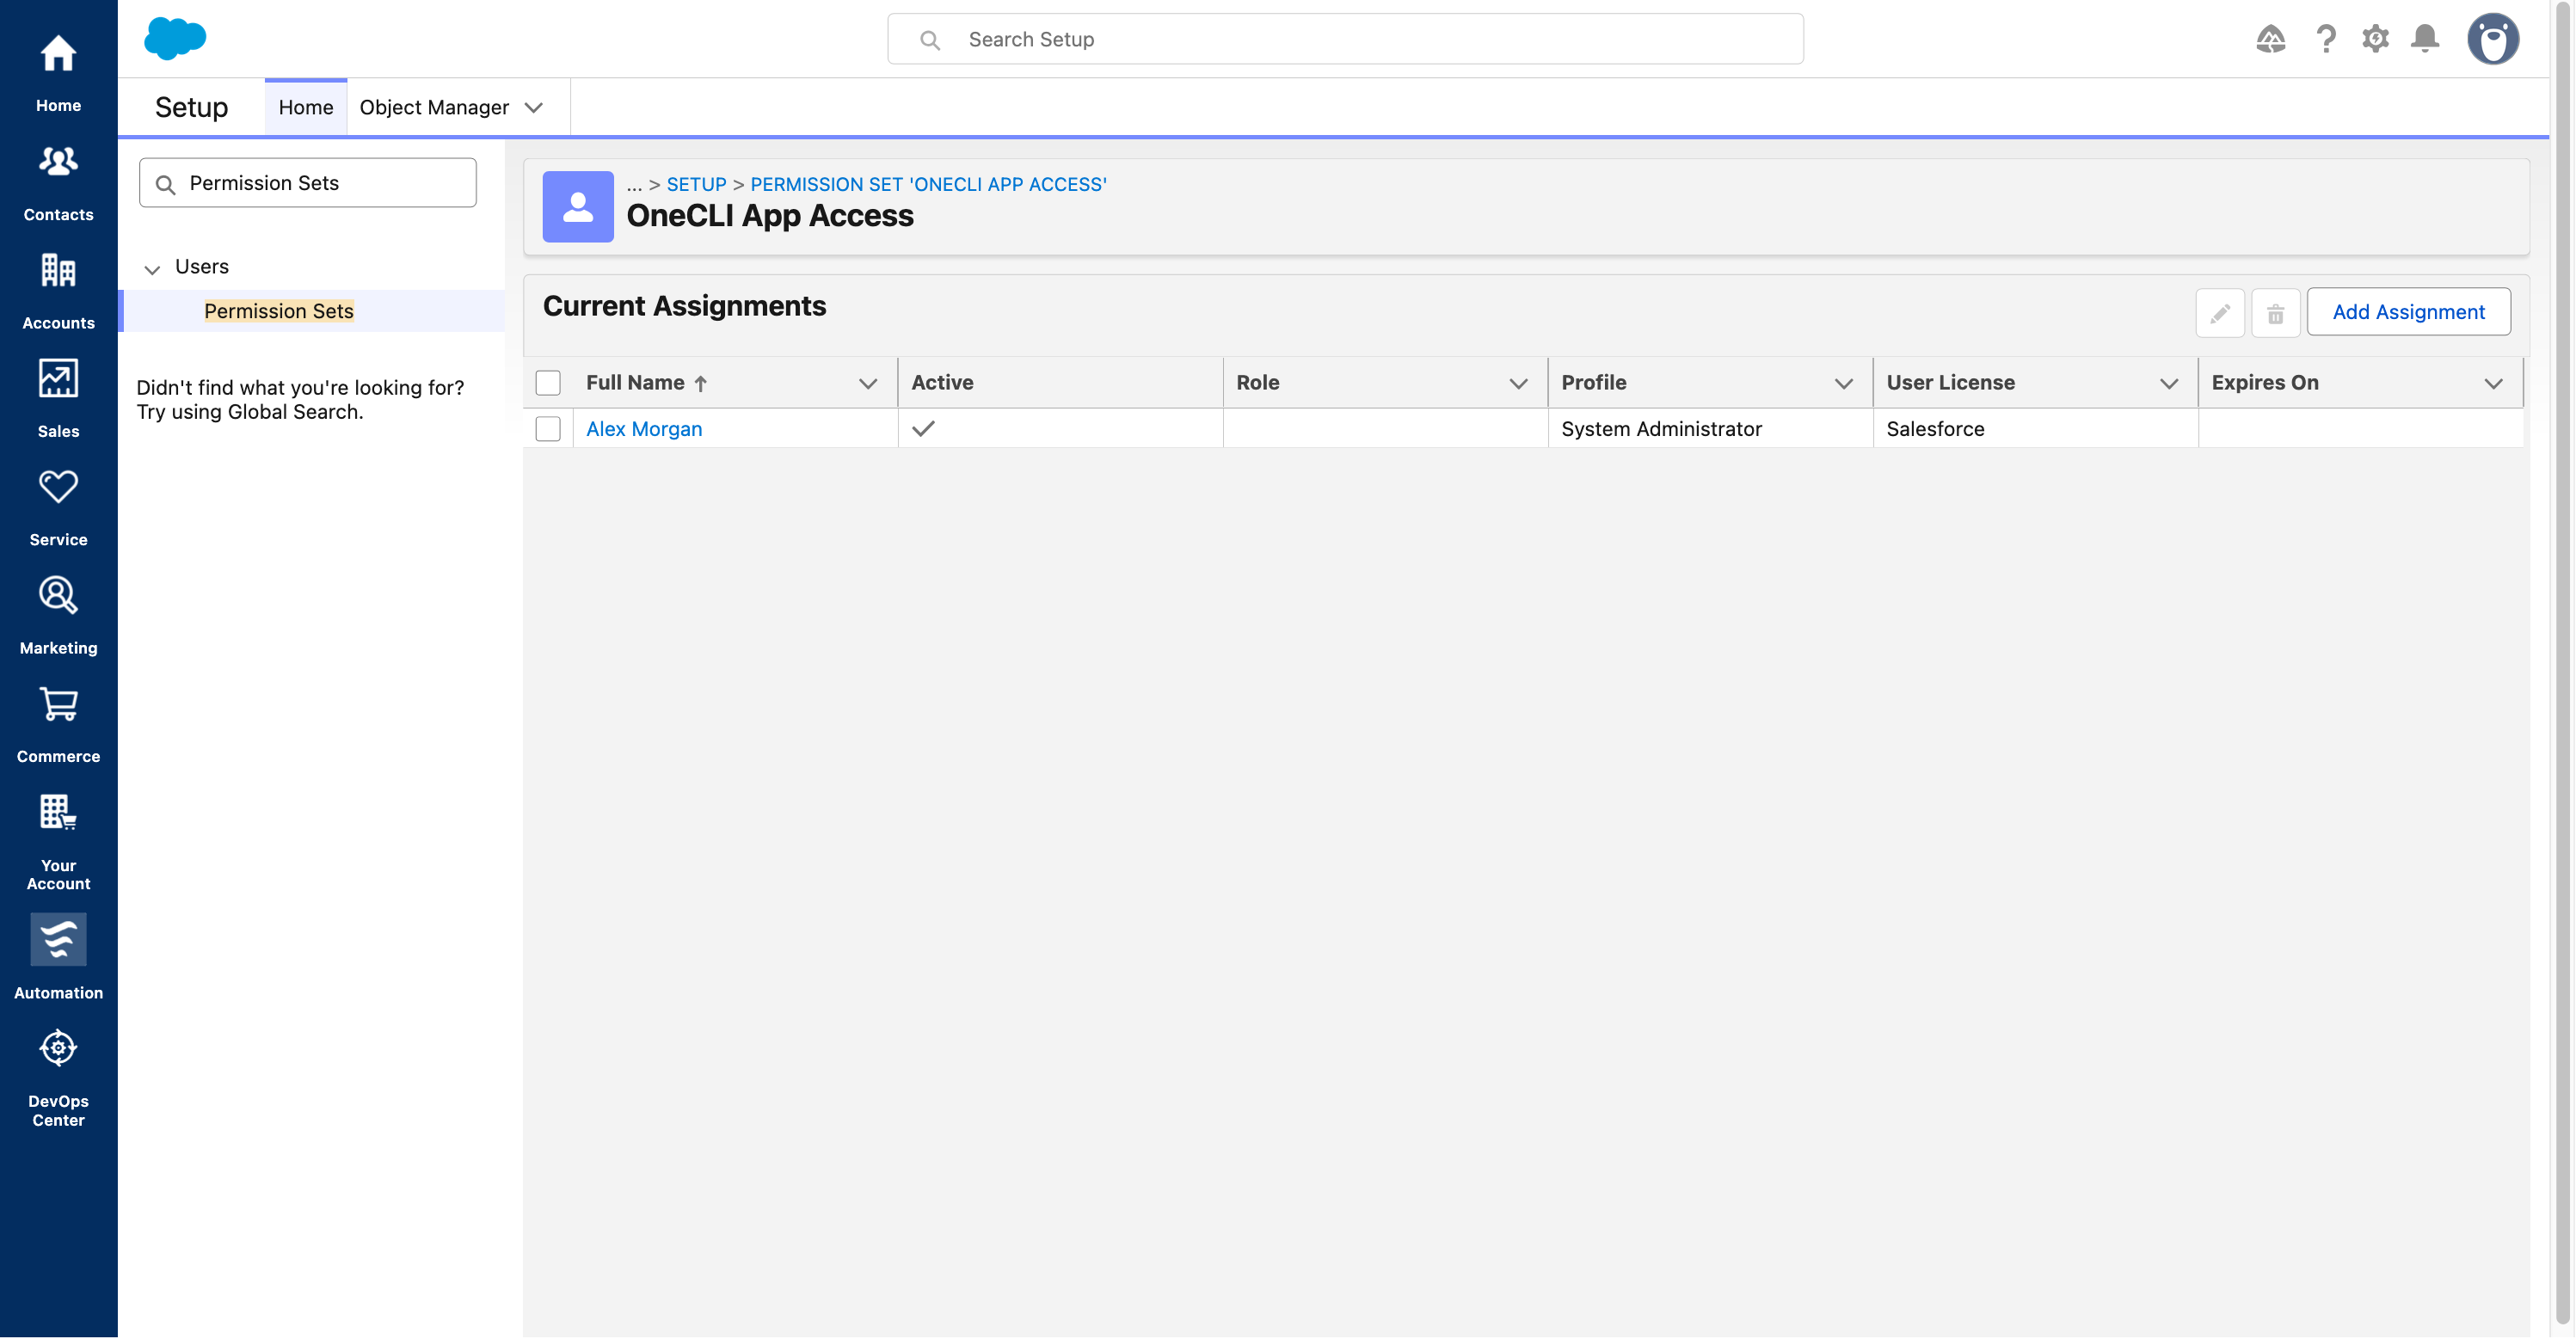
- Click Assign, review the success result, then Done. Return to Manage Assignments and confirm the intended user is listed and the assignment is not expired. You can adjust expiration later from that assignment’s management controls.
- Both links are required: the app must list OneCLI App Access under Selected Permission Sets, and the signing-in user must have that permission set assigned. Every additional Salesforce user must be assigned separately.
- Assignment expiration is different from refresh-token idle expiration. An expired assignment can block future authorization even when the OAuth app and its secret still exist. Renewal must follow your administrator’s policy.
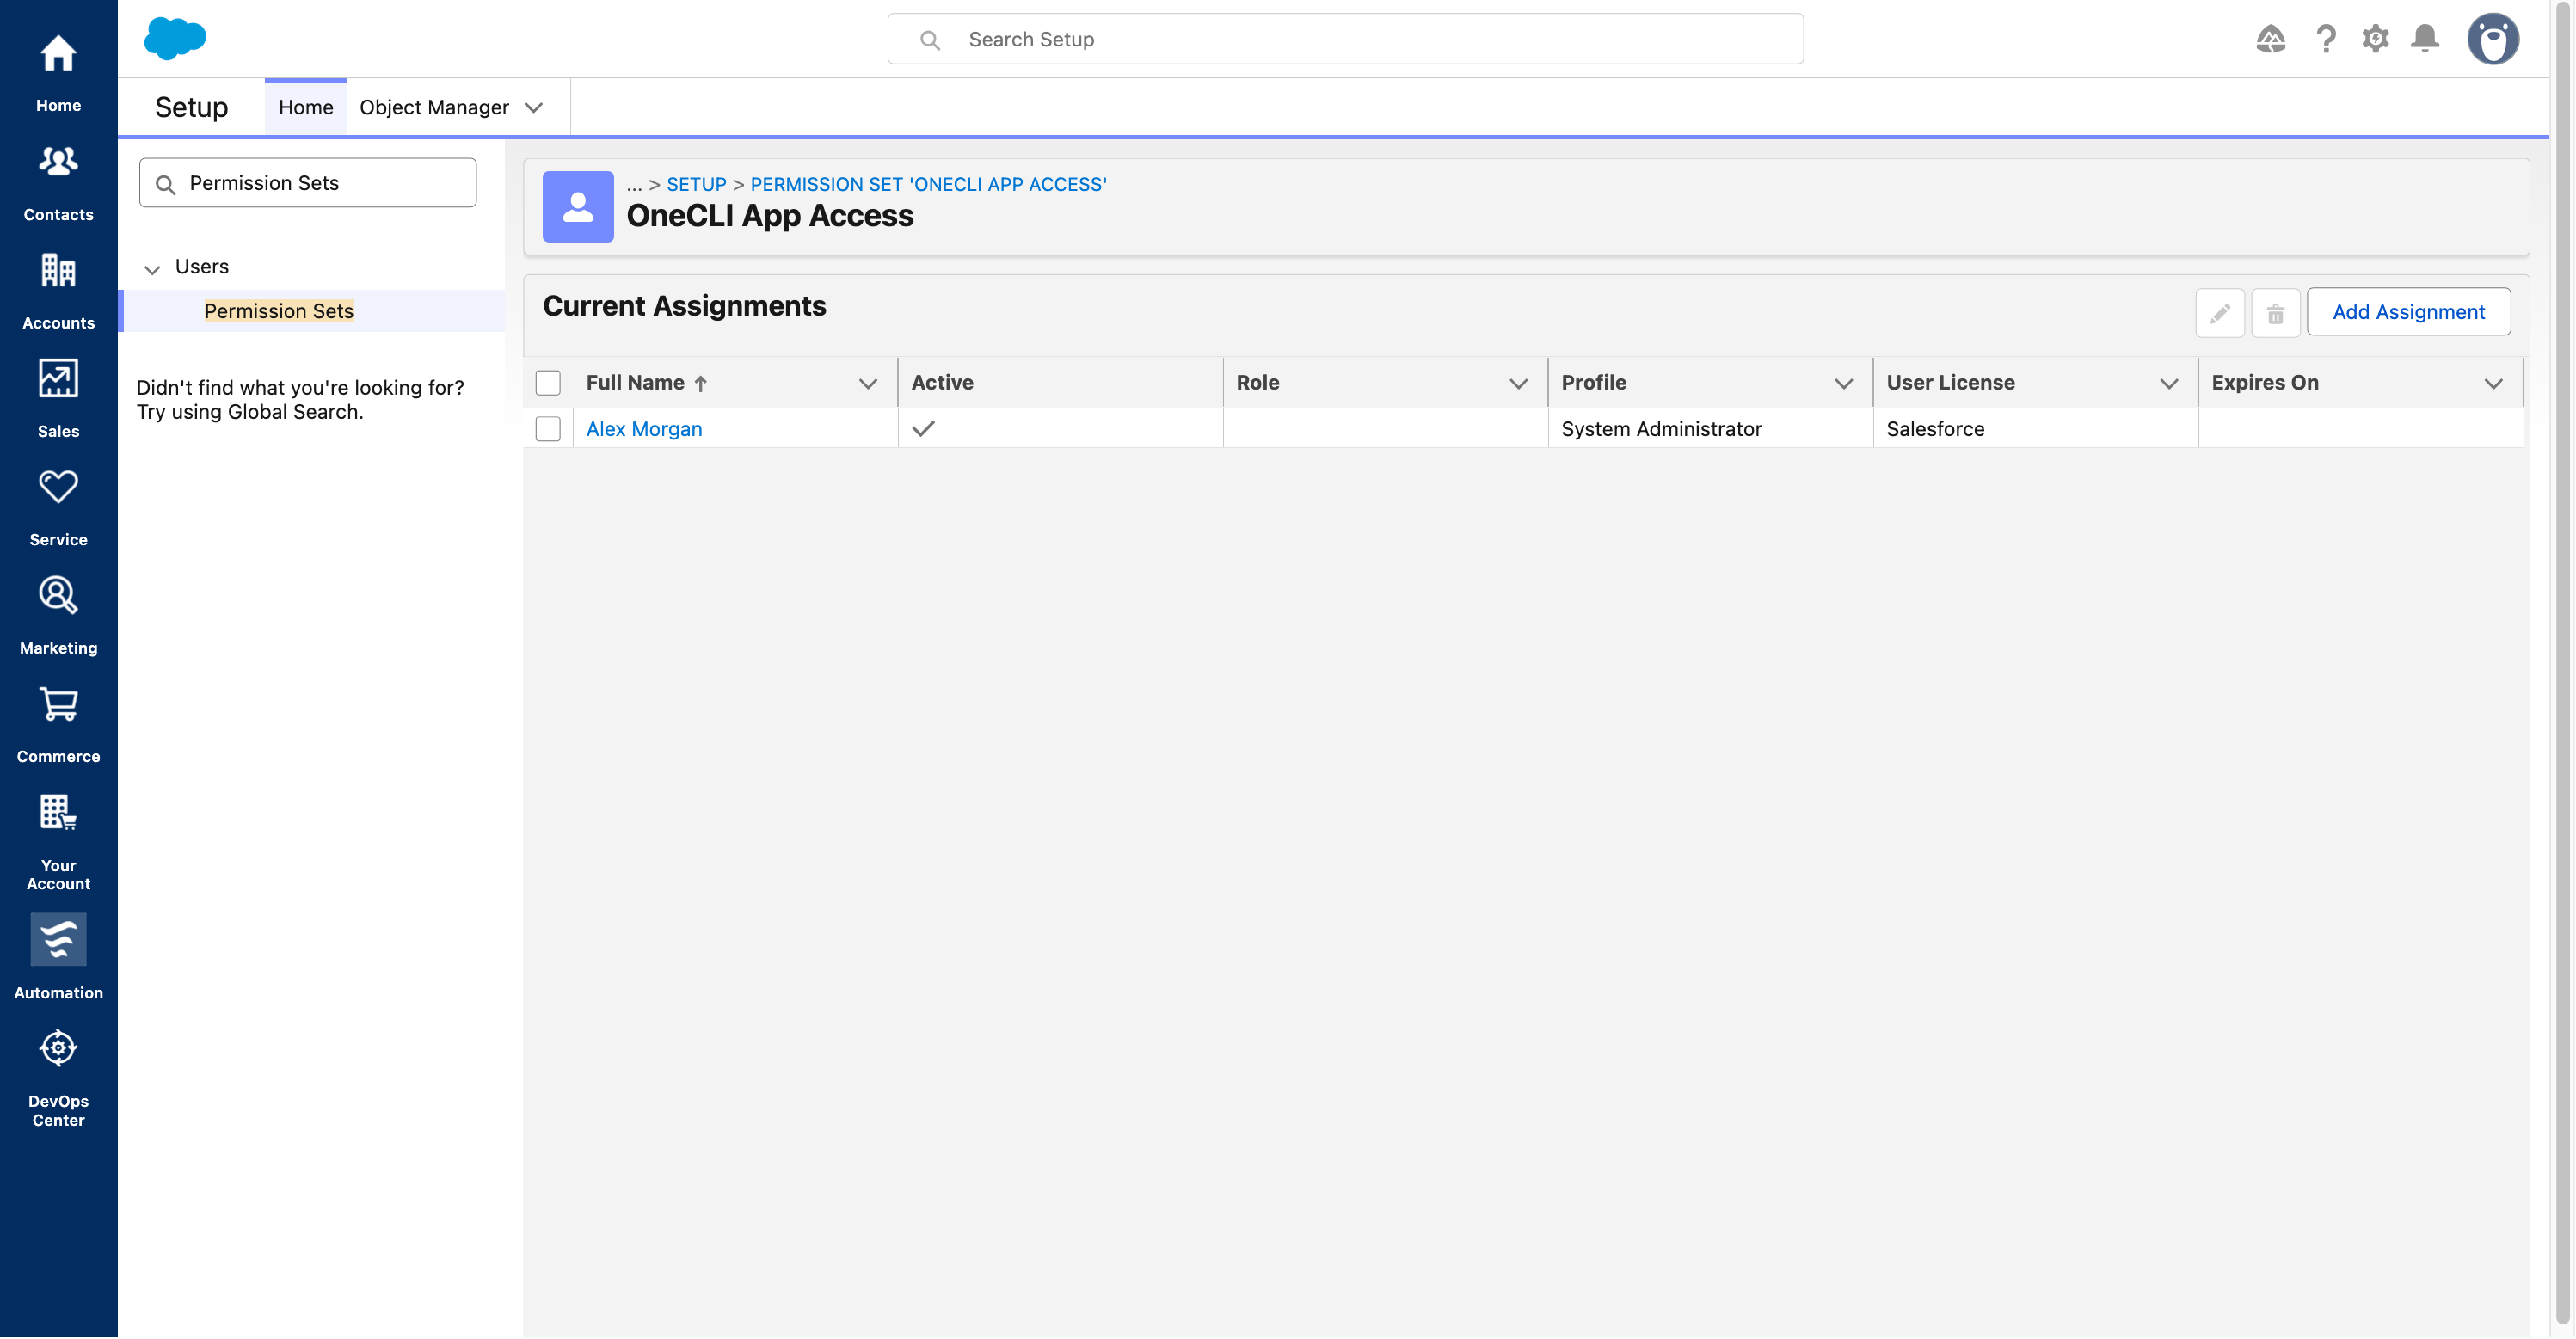
Assign the permission set to the user who will authorize OneCLI.
- 1. Choose Add Assignment, select the exact OAuth login user, then click Next.
- 2. After assigning, confirm the intended user appears here. Alex Morgan is an example. The System Administrator profile shown is not required.
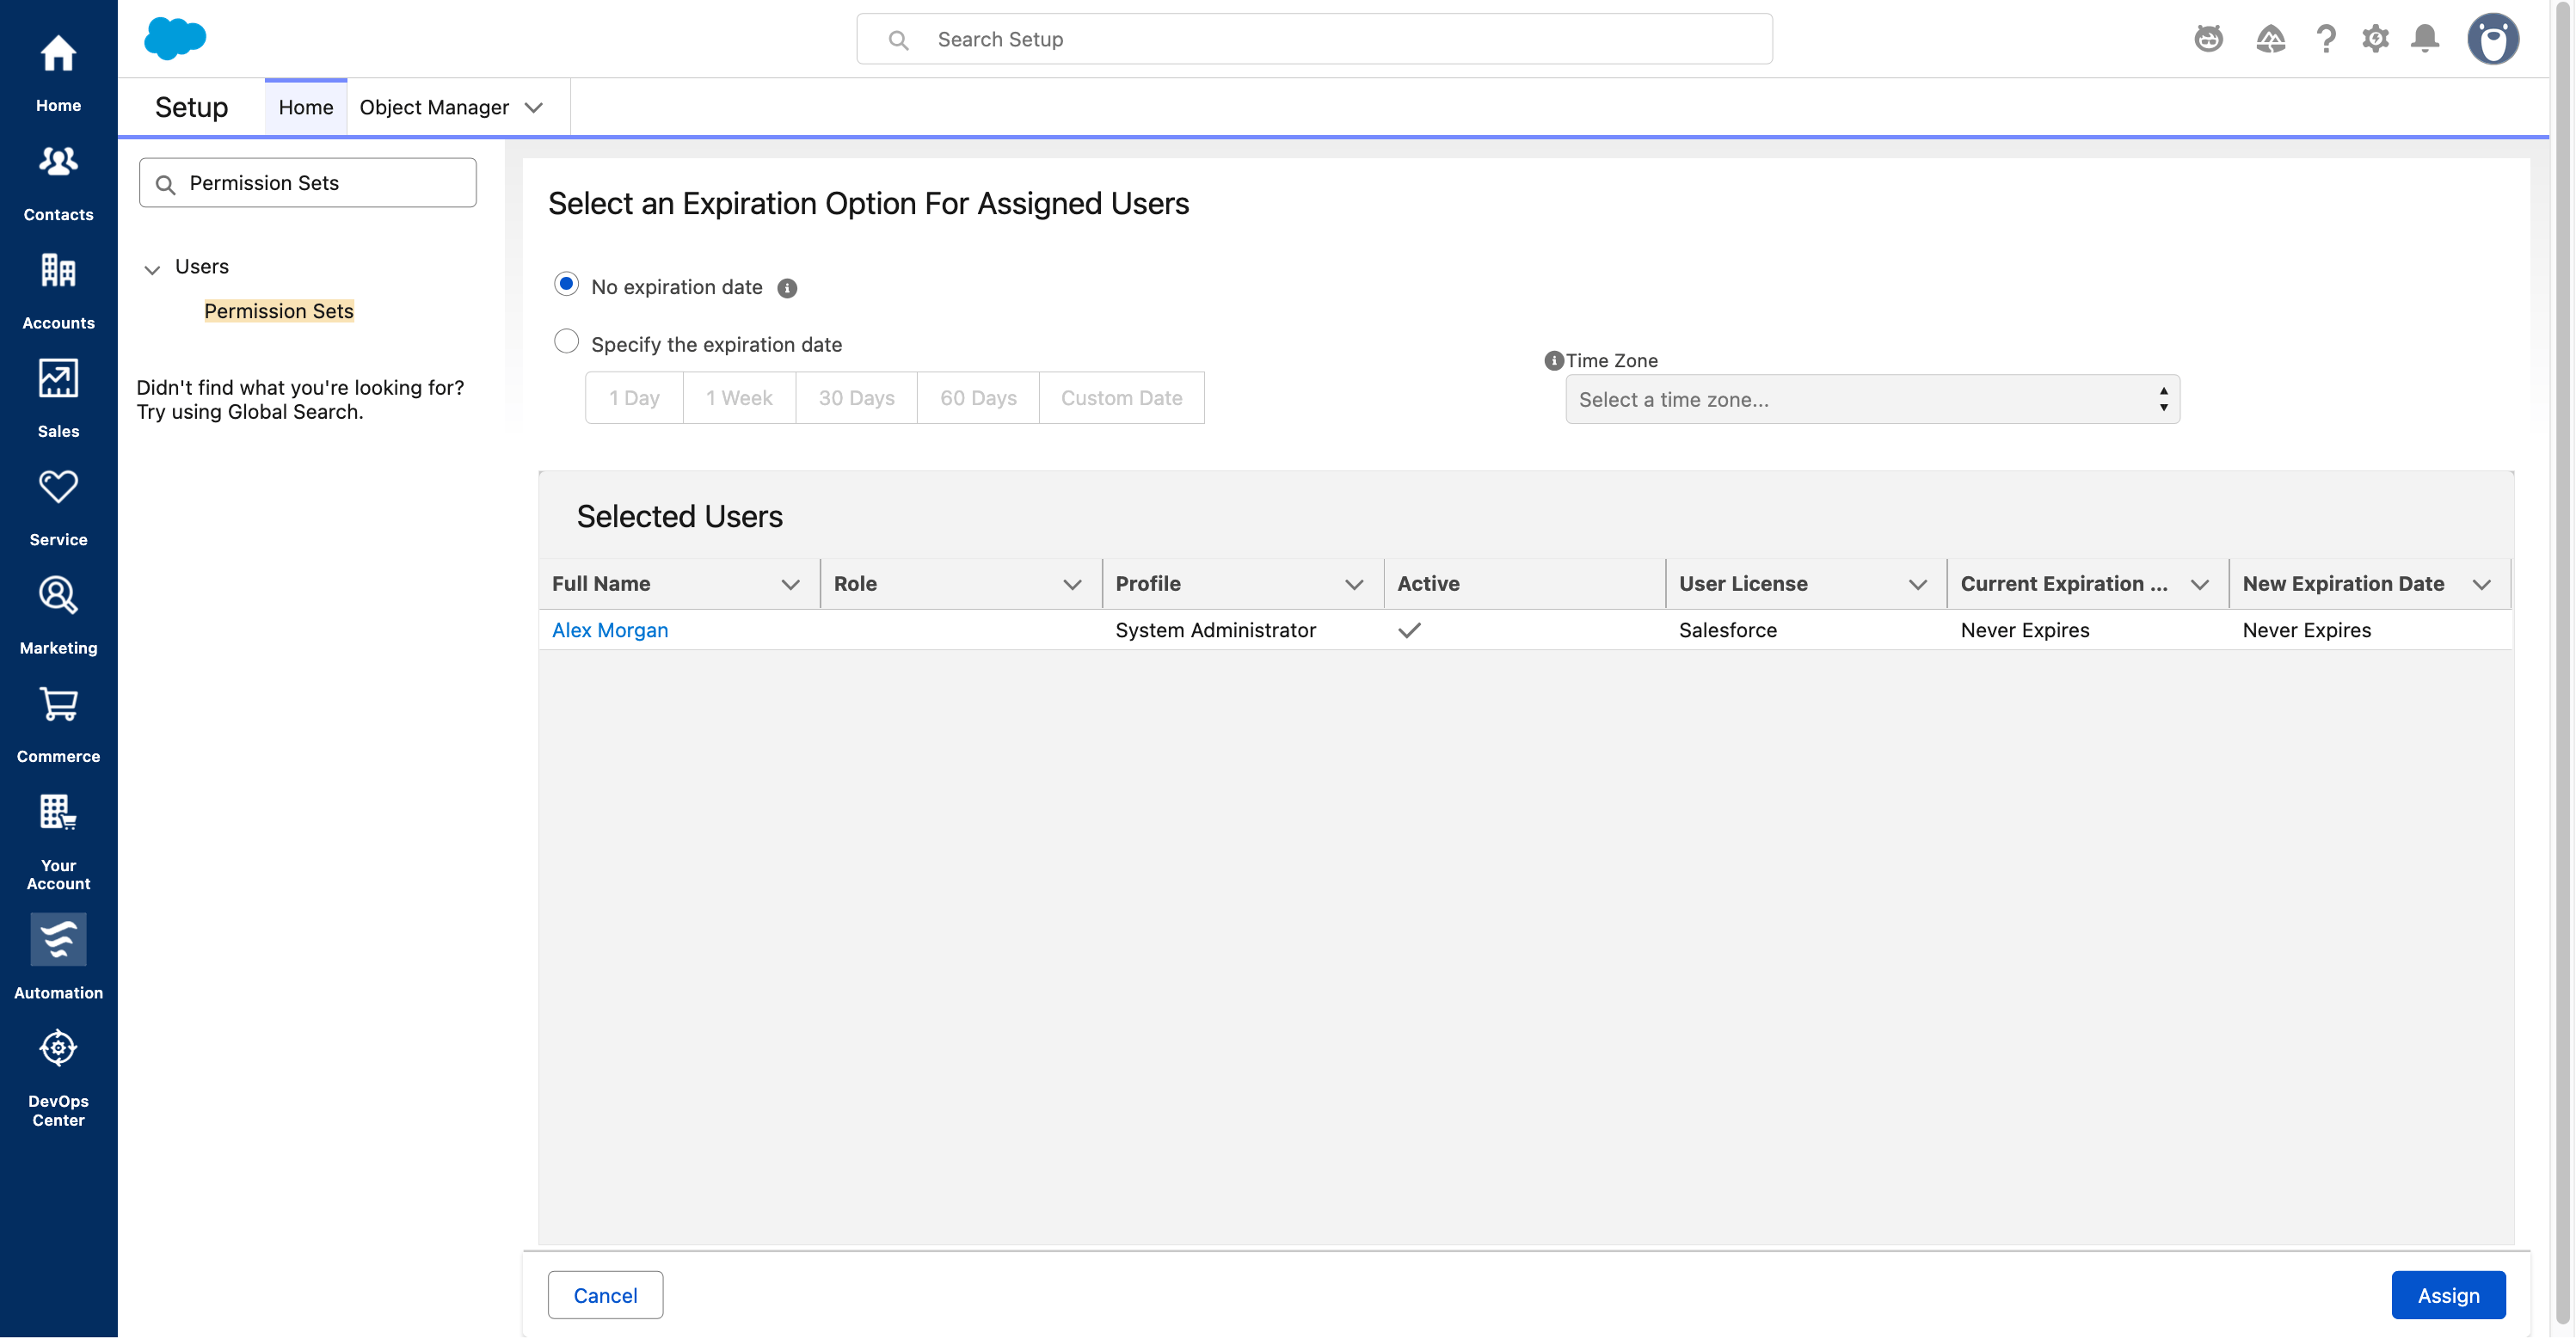
Choose an assignment expiration that follows your organization’s policy.
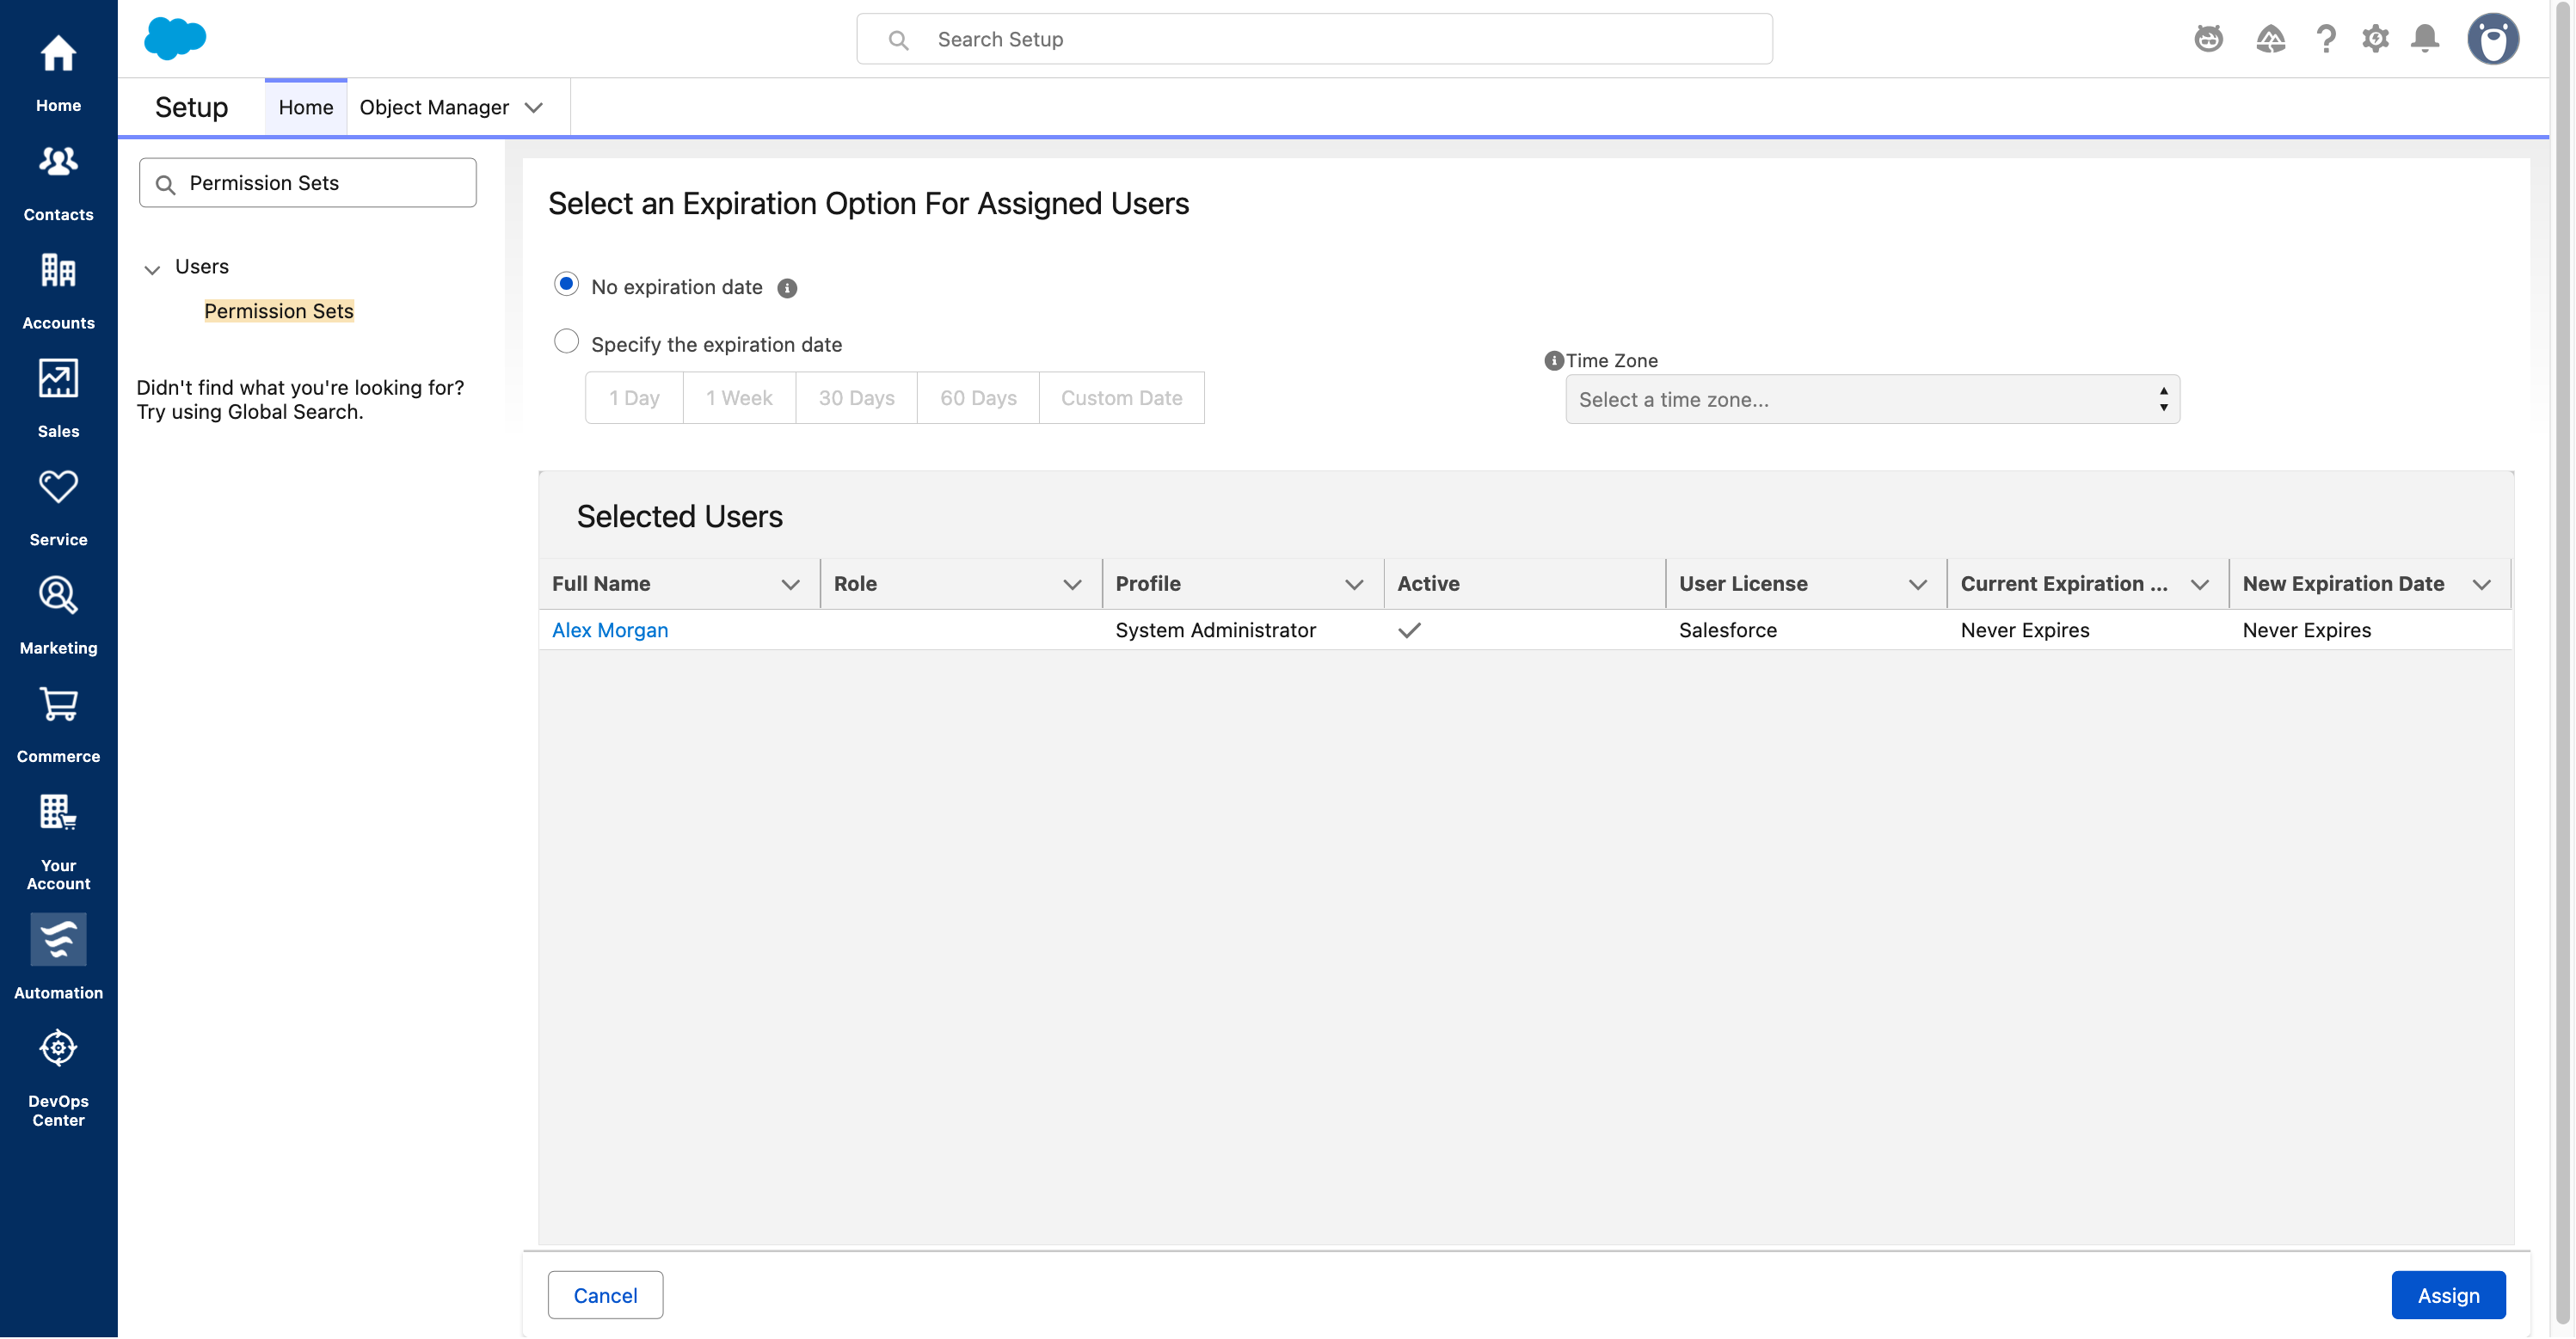
- 1. Choose No expiration date only if ongoing access is approved.
- 2. For temporary access, choose Specify the expiration date and the required date/time zone.
- 3. Verify the selected user and new expiration, then click Assign at the bottom of the page. The screenshot’s no-expiration choice is only an example.
Connect and test in OneCLI
- Return to OneCLI’s Salesforce setup dialog in the intended workspace or organization. Confirm Consumer Key, Consumer Secret, Environment and the registered Redirect URI, then click Save & Connect.
- Sign in to Salesforce as the user assigned in step 7 and complete any authorization prompts. Return to OneCLI and confirm Salesforce shows Connected with the expected account and instance.
- Grant this connection to the intended agent through Agent access or the agent’s Apps settings. A connection existing in the workspace does not automatically mean every agent can use it.
- For a safe first test, customize the agent’s permissions: allow the read tools you need, set Write / delete to Never, and Save. The api scope and the default full-access setting are not read-only. Do not rely on the Read-only group heading alone.
- Ask the agent: “Use my connected Salesforce account to list the available CRM objects. Make a fresh API request and do not create, update or delete any records.” An authenticated object-list request is a better connection check than public API-version discovery.
- If the agent has an old failure in its conversation, request a fresh check after connecting. Do not paste a raw Salesforce access token or create a duplicate custom credential to work around an OAuth connection.
Troubleshooting and maintenance
OAUTH_APP_ACCESS_DENIED / user is not admin approved
OAUTH_APP_ACCESS_DENIED / user is not admin approved
Redirect URI mismatch
Redirect URI mismatch
Invalid client or client authentication failure
Invalid client or client authentication failure
Expired or revoked refresh token
Expired or revoked refresh token
Connected in OneCLI but agent asks for a custom credential
Connected in OneCLI but agent asks for a custom credential
API access or IP restriction error
API access or IP restriction error
Permission denied on a particular operation
Permission denied on a particular operation
Keep ownership and access current
Keep ownership and access current