> ## Documentation Index
> Fetch the complete documentation index at: https://onecli.sh/docs/llms.txt
> Use this file to discover all available pages before exploring further.

# Salesforce Integration: OAuth Setup for Agents

> Connect Salesforce to OneCLI with an External Client App. Set up OAuth callbacks, consumer credentials, permission sets, assignment expiration, and agent access.

Connect Salesforce to OneCLI with an External Client App, then give an agent access.

<Warning>
  Keep Consumer Secrets out of chat, screenshots, and source code. Salesforce API access can include writes. Limit both the Salesforce user’s permissions and the agent’s access.
</Warning>

## Before you start

* Use a Salesforce administrator account to configure the app and permission sets. The user connecting OneCLI needs API access and the appropriate CRM permissions.
* Use your Salesforce **My Domain** host, such as `your-company.my.salesforce.com` or `your-company.sandbox.my.salesforce.com`.

<Note>
  Screenshots use example names and domains. Red numbers match the actions below each image. Some screens show saved settings, so click **Edit** before making changes.
</Note>

## Set up your connection

<Steps>
  <Step title="Start in OneCLI">
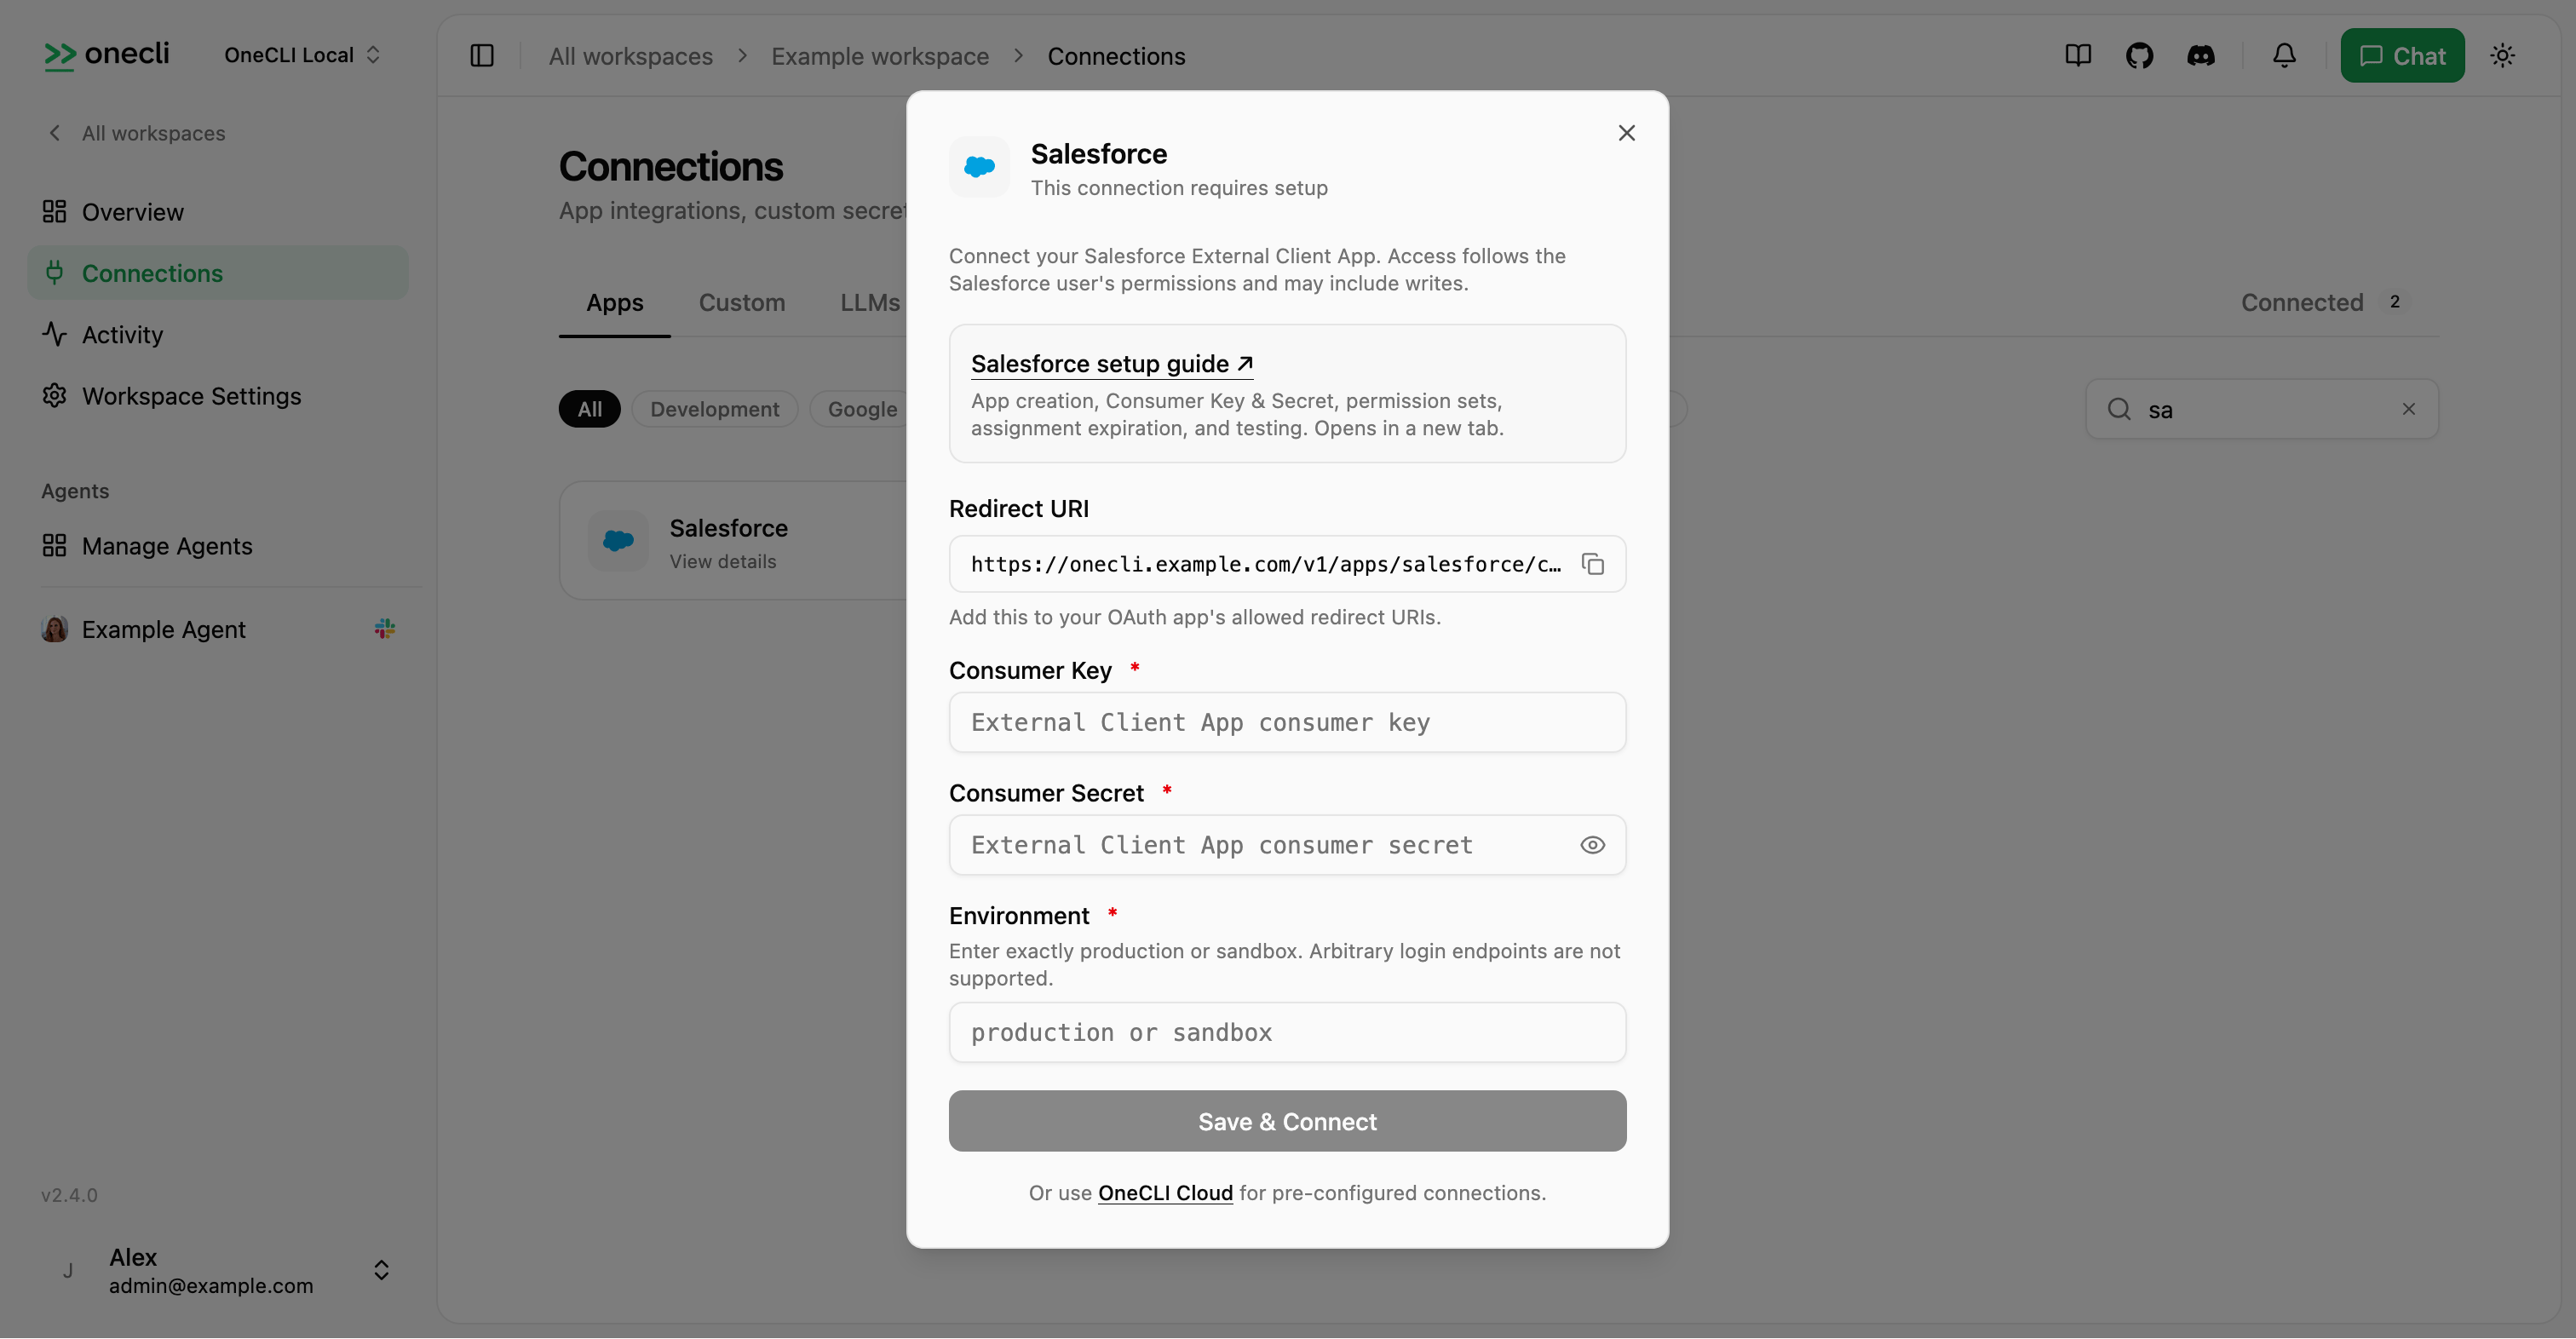
    Open **Connections → Apps → Salesforce → Connect** in the workspace or organization you want to connect.
    <Frame caption="Start with the Salesforce setup popup in OneCLI.">
      <div style={{ position: "relative", width: "100%", maxWidth: "440px", margin: "0 auto", aspectRatio: "896 / 1250", overflow: "hidden", background: "white" }}>
        <img noZoom src="https://mintcdn.com/chartdbinc/y-cRtdYnhnBqPivg/images/integrations/salesforce/00-onecli-setup.png?fit=max&auto=format&n=y-cRtdYnhnBqPivg&q=85&s=f0a51b180640e3bb44e8cfe3385a2eef" alt="OneCLI Salesforce setup popup with the setup guide link, Redirect URI copy button, and empty credential fields." style={{ position: "absolute", width: "337.5000%", maxWidth: "none", height: "auto", left: "-118.7500%", top: "-8.4800%", margin: 0 }} width="3024" height="1572" data-path="images/integrations/salesforce/00-onecli-setup.png" />

        <span aria-hidden="true" style={{ position: "absolute", left: "clamp(13px, 88.281%, calc(100% - 13px))", top: "clamp(13px, 25.520%, calc(100% - 13px))", transform: "translate(-50%, -50%)", display: "grid", placeItems: "center", width: "24px", height: "24px", borderRadius: "50%", background: "#b91c1c", color: "#fff", border: "2px solid white", fontSize: "13px", fontWeight: 800, lineHeight: 1, boxShadow: "0 1px 4px #0006" }}>1</span>
        <span aria-hidden="true" style={{ position: "absolute", left: "clamp(13px, 89.397%, calc(100% - 13px))", top: "clamp(13px, 39.680%, calc(100% - 13px))", transform: "translate(-50%, -50%)", display: "grid", placeItems: "center", width: "24px", height: "24px", borderRadius: "50%", background: "#b91c1c", color: "#fff", border: "2px solid white", fontSize: "13px", fontWeight: 800, lineHeight: 1, boxShadow: "0 1px 4px #0006" }}>2</span>
        <span aria-hidden="true" style={{ position: "absolute", left: "clamp(13px, 88.281%, calc(100% - 13px))", top: "clamp(13px, 54.560%, calc(100% - 13px))", transform: "translate(-50%, -50%)", display: "grid", placeItems: "center", width: "24px", height: "24px", borderRadius: "50%", background: "#b91c1c", color: "#fff", border: "2px solid white", fontSize: "13px", fontWeight: 800, lineHeight: 1, boxShadow: "0 1px 4px #0006" }}>3</span>
      </div>
    </Frame>

    [View full-size screenshot](/docs/images/integrations/salesforce/00-onecli-setup.png)

    * **1.** The **Salesforce setup guide** link opens this guide in a new tab.
    * **2.** Copy your **Redirect URI**. You’ll paste it into Salesforce next. Do not use the example URL shown here.
    * **3.** Leave this popup open. After the Salesforce setup, return to enter the **Consumer Key**, **Consumer Secret**, and **Environment**, then **Save & Connect**.
  </Step>

  <Step title="Create the app">
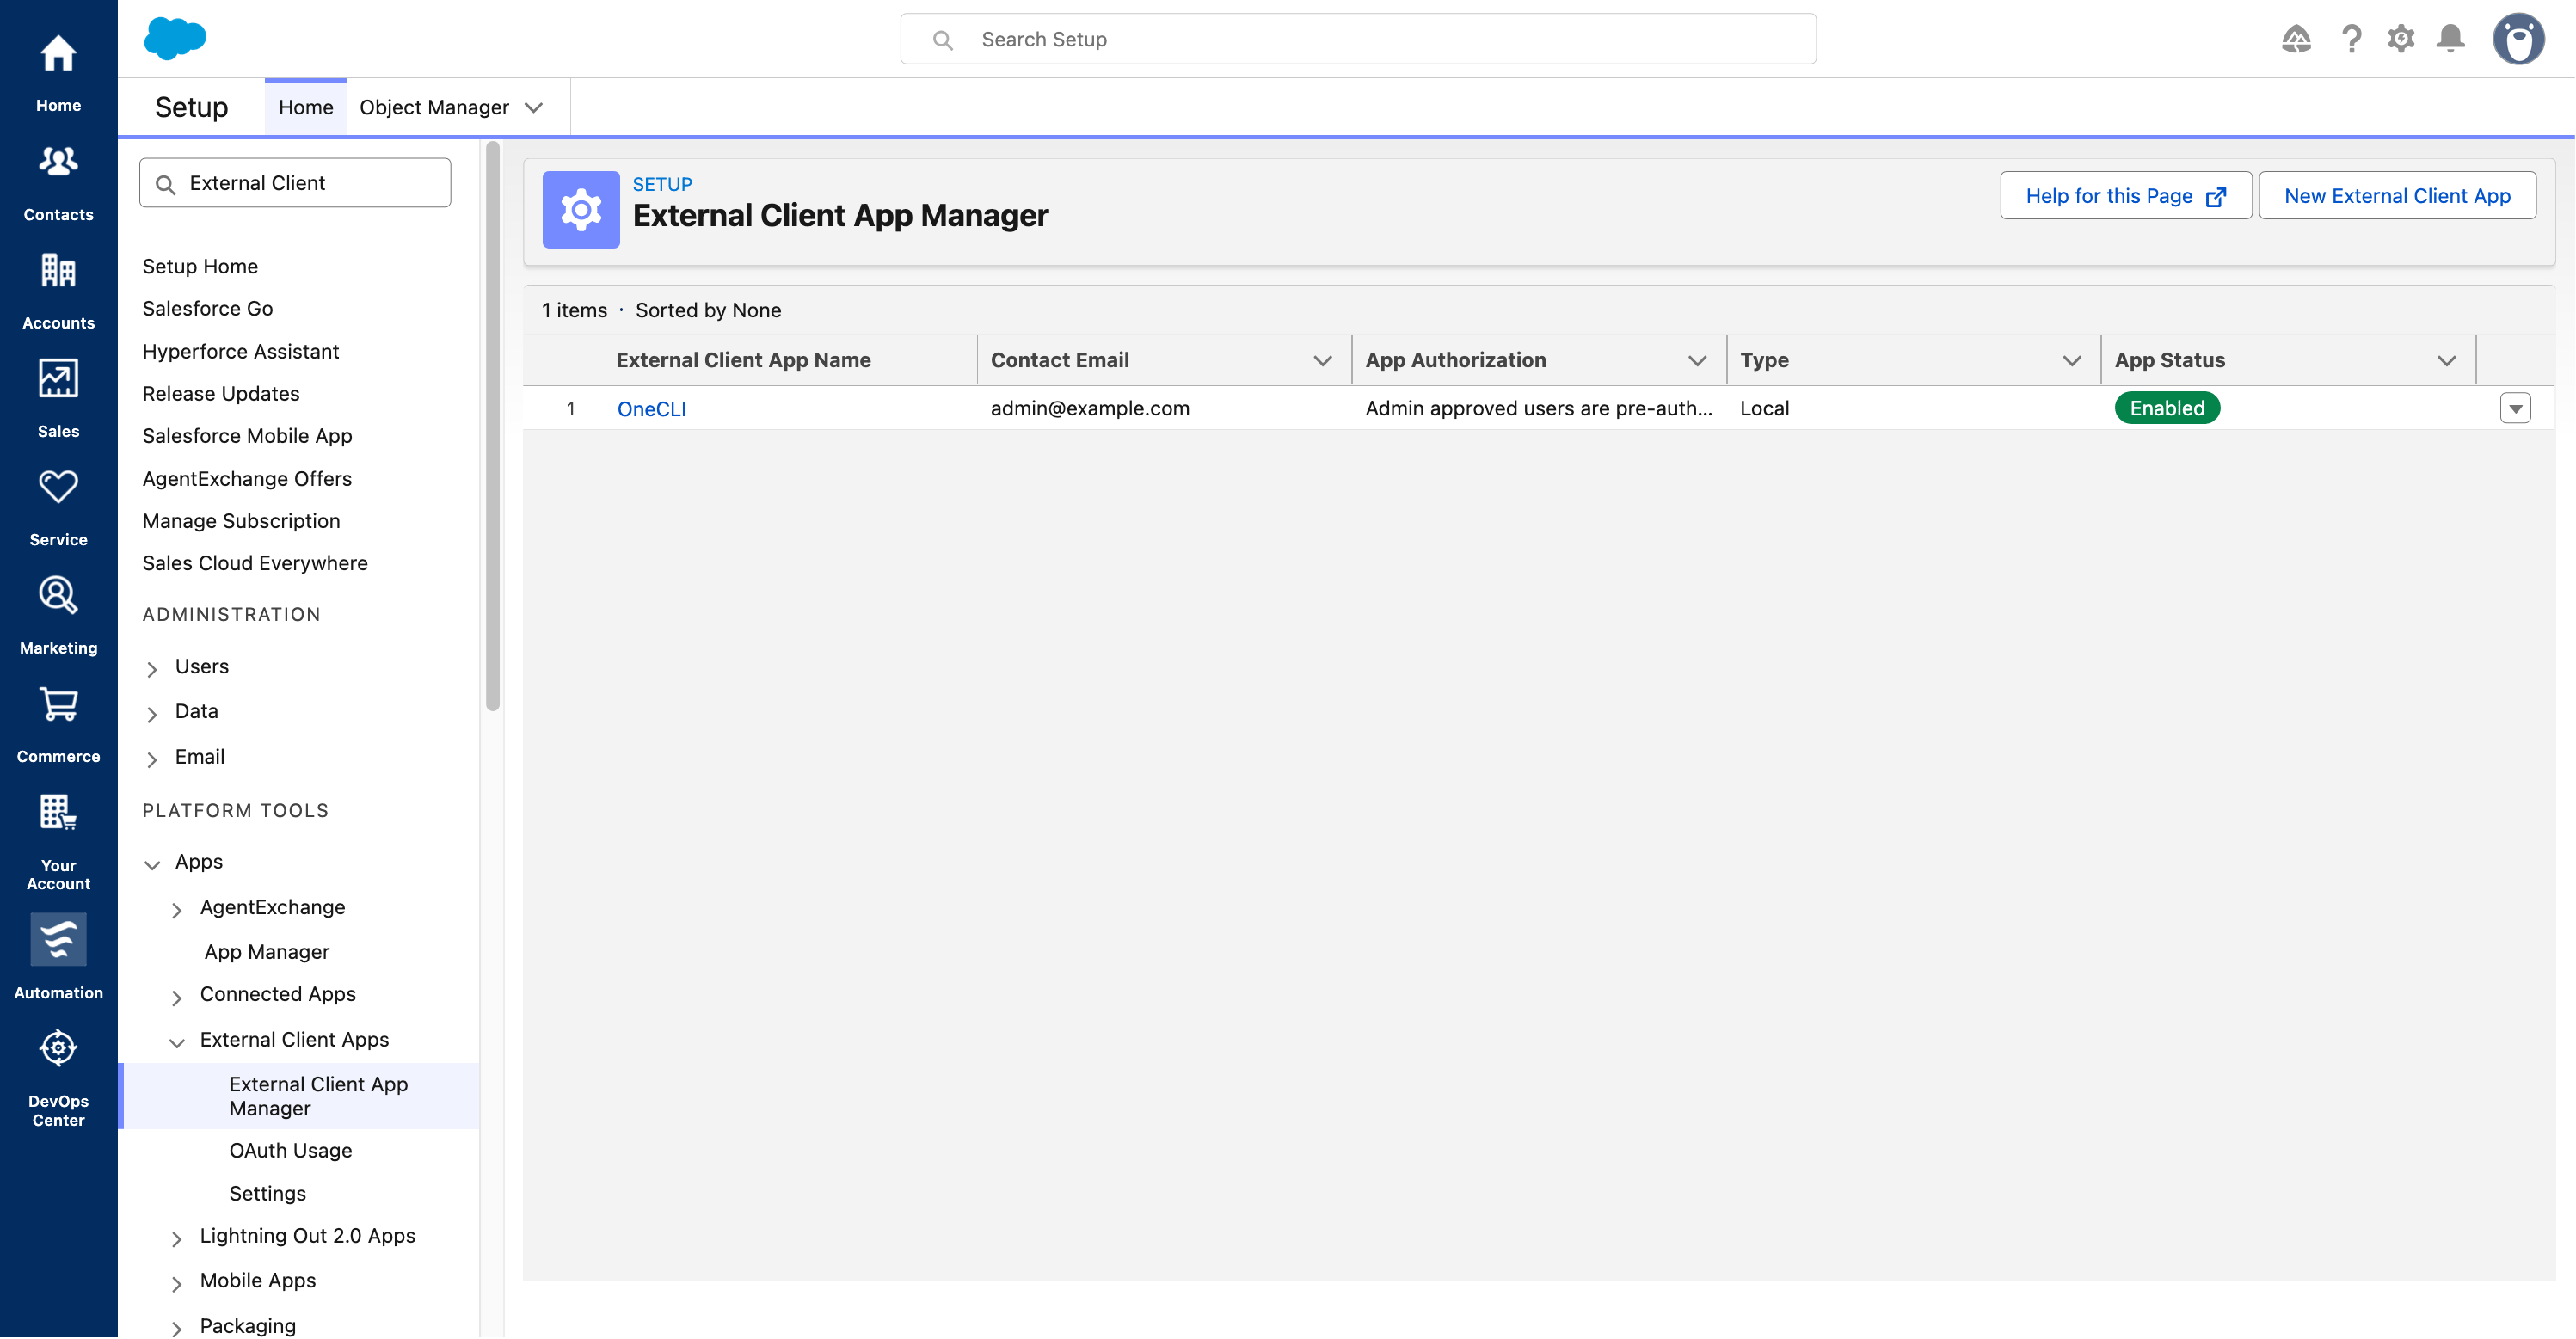
    In Salesforce **Setup**, search for **External Client App Manager** in Quick Find.
    <Frame caption="Open the External Client App Manager.">
      <div style={{ position: "relative", width: "100%", aspectRatio: "2365 / 360", overflow: "hidden", background: "white" }}>
        <img noZoom src="https://mintcdn.com/chartdbinc/Mnt4_Jddiutw73Ni/images/integrations/salesforce/01-app-manager.png?fit=max&auto=format&n=Mnt4_Jddiutw73Ni&q=85&s=94d2be0ebcf520424349d4fc8bda11b0" alt="Open the External Client App Manager." style={{ position: "absolute", width: "126.6385%", maxWidth: "none", height: "auto", left: "-25.5814%", top: "-50.0000%", margin: 0 }} width="2995" height="1557" data-path="images/integrations/salesforce/01-app-manager.png" />

        <span aria-hidden="true" style={{ position: "absolute", left: "clamp(13px, 89.852%, calc(100% - 13px))", top: "clamp(13px, 29.167%, calc(100% - 13px))", transform: "translate(-50%, -50%)", display: "grid", placeItems: "center", width: "24px", height: "24px", borderRadius: "50%", background: "#b91c1c", color: "#fff", border: "2px solid white", fontSize: "13px", fontWeight: 800, lineHeight: 1, boxShadow: "0 1px 4px #0006" }}>1</span>
      </div>
    </Frame>

    [View full-size screenshot](/docs/images/integrations/salesforce/01-app-manager.png)

    * **1.** Click **New External Client App**.

    Enter these settings:

    | Field                    | Value                      |
    | ------------------------ | -------------------------- |
    | External Client App Name | `OneCLI`                   |
    | API Name                 | Keep the generated value   |
    | Contact Email            | Your administrator’s email |
    | Distribution State       | **Local**                  |

    Expand **API (Enable OAuth Settings)** and check **Enable OAuth**. Leave unrelated features off. **Local** limits distribution to this Salesforce organization, not to localhost.
  </Step>

  <Step title="Set the callback and scopes">
    <Frame caption="Register your callback and select only the three required scopes.">
      <div style={{ position: "relative", width: "100%", aspectRatio: "1770 / 685", overflow: "hidden", background: "white" }}>
        <img noZoom src="https://mintcdn.com/chartdbinc/Mnt4_Jddiutw73Ni/images/integrations/salesforce/02-oauth-scopes.png?fit=max&auto=format&n=Mnt4_Jddiutw73Ni&q=85&s=fffcc9fe17dd5d7cd4e99b346cac0269" alt="Register your callback and select only the three required scopes." style={{ position: "absolute", width: "169.2090%", maxWidth: "none", height: "auto", left: "-38.4181%", top: "-35.0365%", margin: 0 }} width="2995" height="1557" data-path="images/integrations/salesforce/02-oauth-scopes.png" />

        <span aria-hidden="true" style={{ position: "absolute", left: "clamp(13px, 47.175%, calc(100% - 13px))", top: "clamp(13px, 8.759%, calc(100% - 13px))", transform: "translate(-50%, -50%)", display: "grid", placeItems: "center", width: "24px", height: "24px", borderRadius: "50%", background: "#b91c1c", color: "#fff", border: "2px solid white", fontSize: "13px", fontWeight: 800, lineHeight: 1, boxShadow: "0 1px 4px #0006" }}>1</span>
        <span aria-hidden="true" style={{ position: "absolute", left: "clamp(13px, 96.610%, calc(100% - 13px))", top: "clamp(13px, 38.686%, calc(100% - 13px))", transform: "translate(-50%, -50%)", display: "grid", placeItems: "center", width: "24px", height: "24px", borderRadius: "50%", background: "#b91c1c", color: "#fff", border: "2px solid white", fontSize: "13px", fontWeight: 800, lineHeight: 1, boxShadow: "0 1px 4px #0006" }}>2</span>
      </div>
    </Frame>

    [View full-size screenshot](/docs/images/integrations/salesforce/02-oauth-scopes.png)

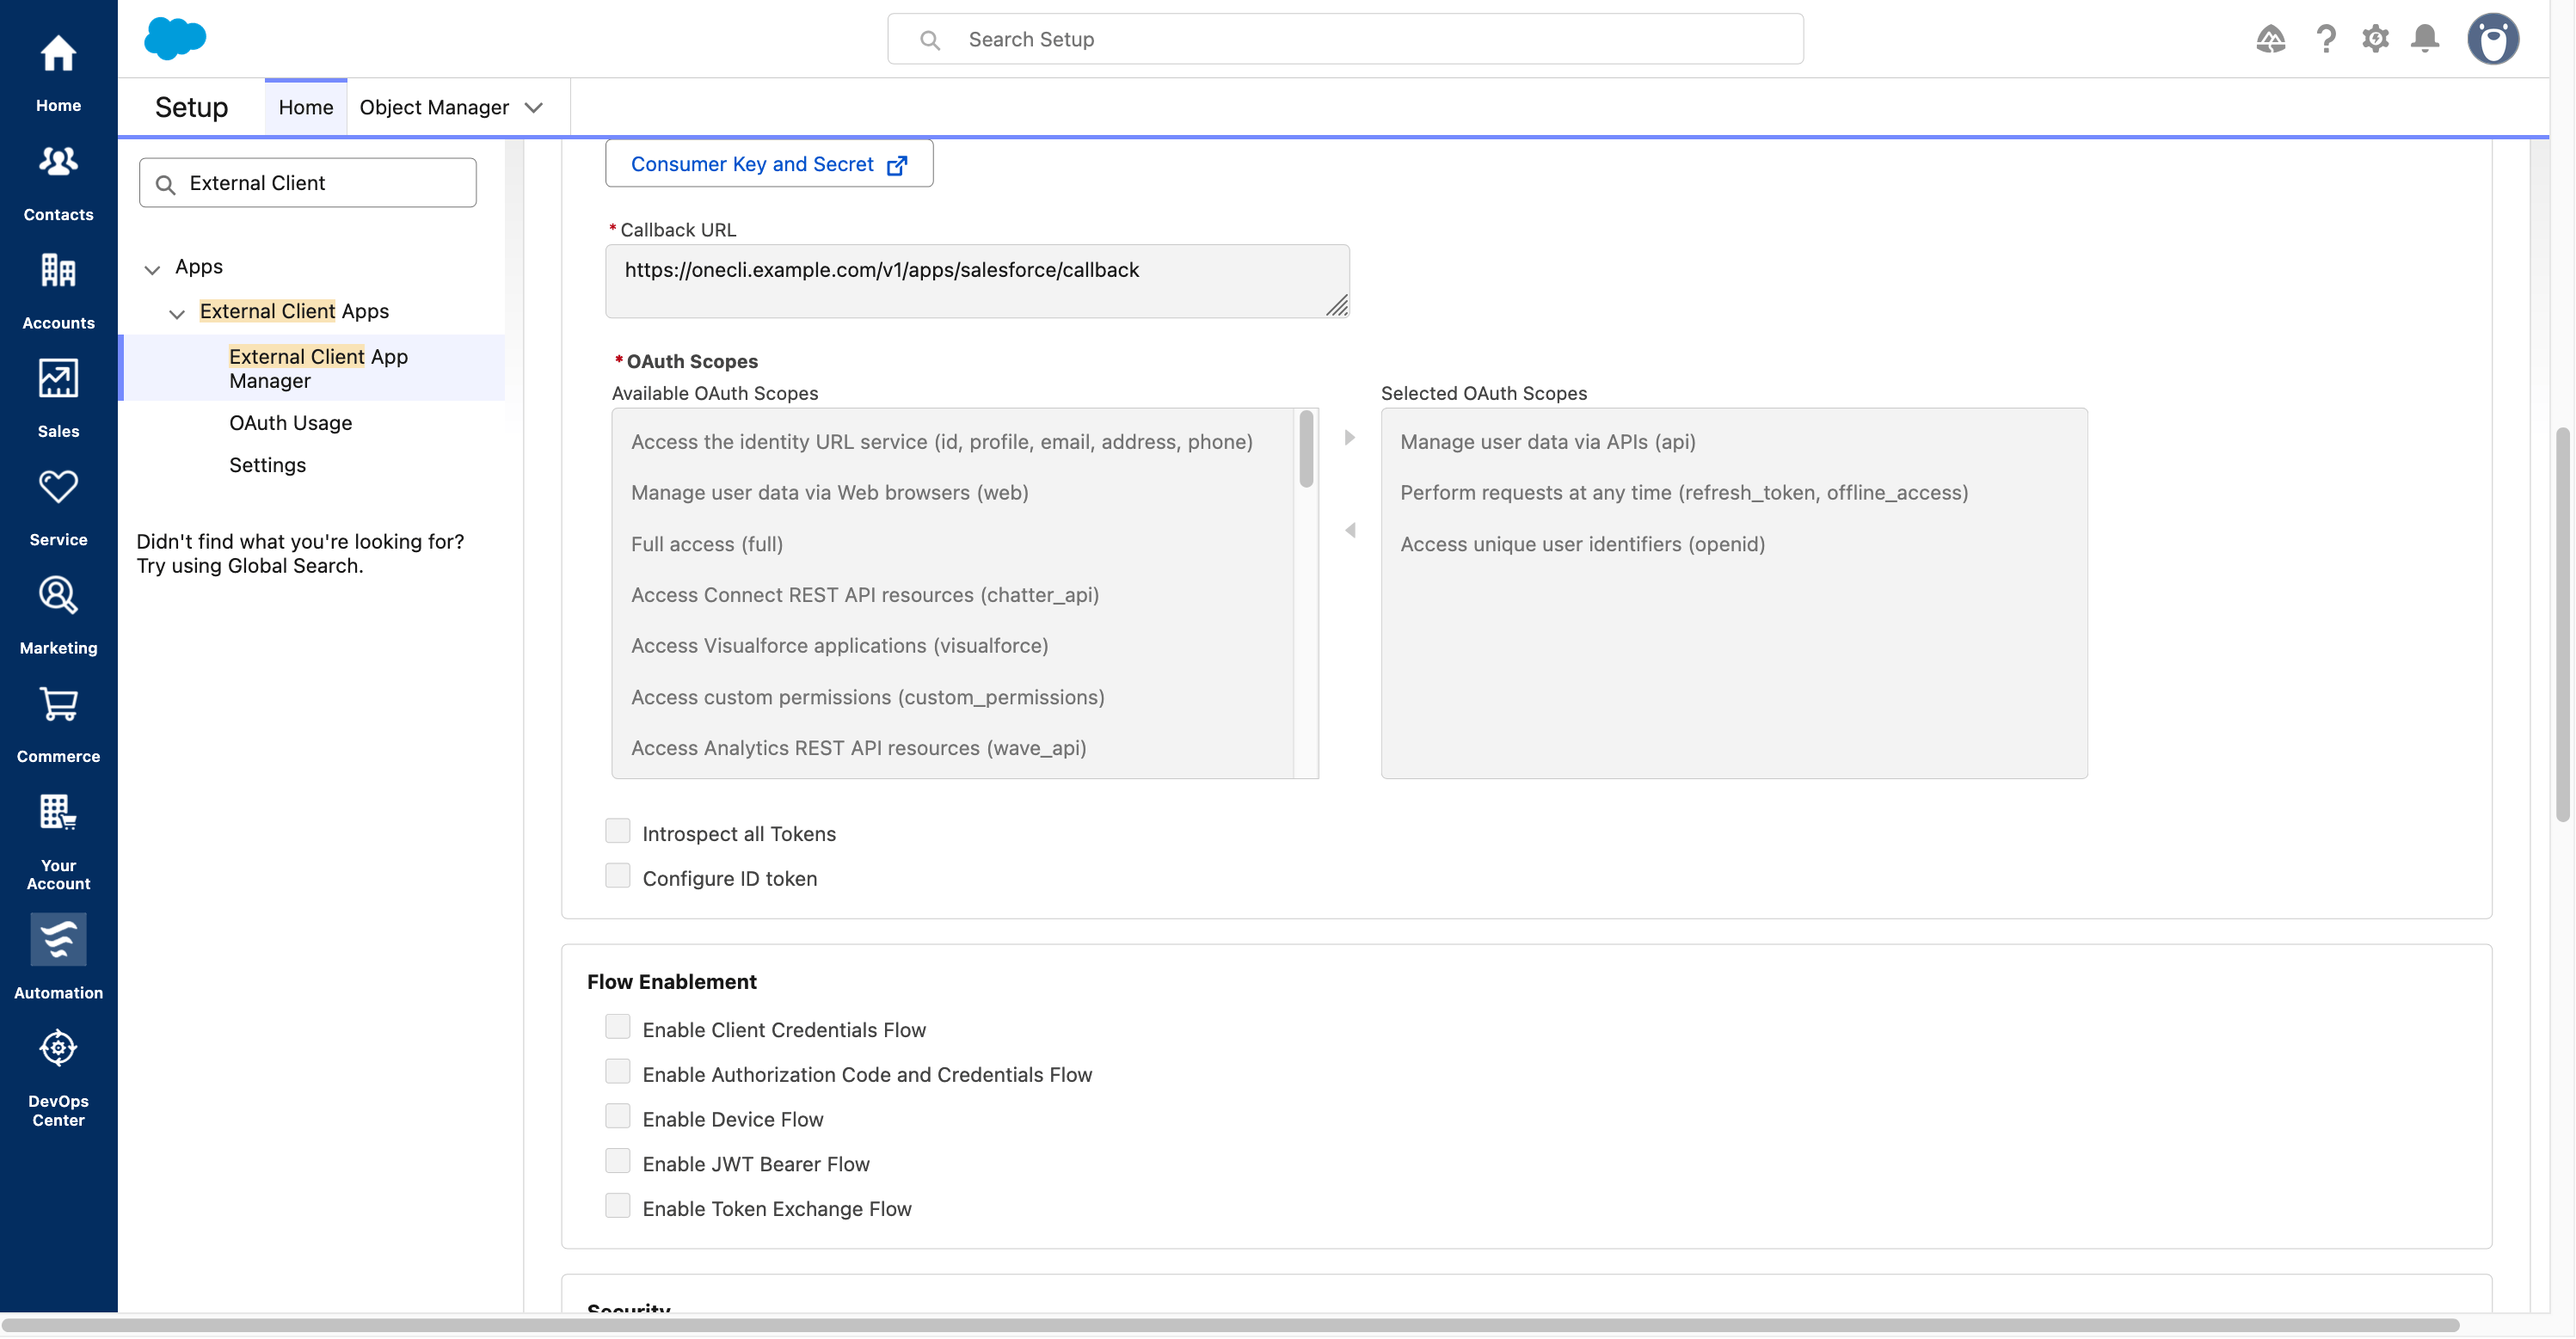
    * **1.** Paste the exact **Redirect URI** from OneCLI into **Callback URL**.
    * **2.** Add only these scopes: **api**, **refresh\_token / offline\_access**, and **openid**.

    Use your own HTTPS domain or active tunnel, not the example domain. URLs must match exactly. For multiple environments, add one actual callback per line. Copy organization-level callbacks from OneCLI rather than assuming the workspace path.

    Leave **Introspect all Tokens** and **Configure ID token** off.
  </Step>

  <Step title="Keep security protections enabled">
    <Frame caption="Keep client-secret requirements, PKCE, and refresh-token rotation enabled.">
      <div style={{ position: "relative", width: "100%", aspectRatio: "1800 / 505", overflow: "hidden", background: "white" }}>
        <img noZoom src="https://mintcdn.com/chartdbinc/Mnt4_Jddiutw73Ni/images/integrations/salesforce/03-oauth-security.png?fit=max&auto=format&n=Mnt4_Jddiutw73Ni&q=85&s=0e3f7f64a1ed7ac40de0146093597fb5" alt="Keep client-secret requirements, PKCE, and refresh-token rotation enabled." style={{ position: "absolute", width: "166.3889%", maxWidth: "none", height: "auto", left: "-37.2222%", top: "-155.4455%", margin: 0 }} width="2995" height="1557" data-path="images/integrations/salesforce/03-oauth-security.png" />

        <span aria-hidden="true" style={{ position: "absolute", left: "clamp(13px, 2.500%, calc(100% - 13px))", top: "clamp(13px, 7.921%, calc(100% - 13px))", transform: "translate(-50%, -50%)", display: "grid", placeItems: "center", width: "24px", height: "24px", borderRadius: "50%", background: "#b91c1c", color: "#fff", border: "2px solid white", fontSize: "13px", fontWeight: 800, lineHeight: 1, boxShadow: "0 1px 4px #0006" }}>1</span>
        <span aria-hidden="true" style={{ position: "absolute", left: "clamp(13px, 2.500%, calc(100% - 13px))", top: "clamp(13px, 32.079%, calc(100% - 13px))", transform: "translate(-50%, -50%)", display: "grid", placeItems: "center", width: "24px", height: "24px", borderRadius: "50%", background: "#b91c1c", color: "#fff", border: "2px solid white", fontSize: "13px", fontWeight: 800, lineHeight: 1, boxShadow: "0 1px 4px #0006" }}>2</span>
        <span aria-hidden="true" style={{ position: "absolute", left: "clamp(13px, 2.500%, calc(100% - 13px))", top: "clamp(13px, 47.921%, calc(100% - 13px))", transform: "translate(-50%, -50%)", display: "grid", placeItems: "center", width: "24px", height: "24px", borderRadius: "50%", background: "#b91c1c", color: "#fff", border: "2px solid white", fontSize: "13px", fontWeight: 800, lineHeight: 1, boxShadow: "0 1px 4px #0006" }}>3</span>
      </div>
    </Frame>

    [View full-size screenshot](/docs/images/integrations/salesforce/03-oauth-security.png)

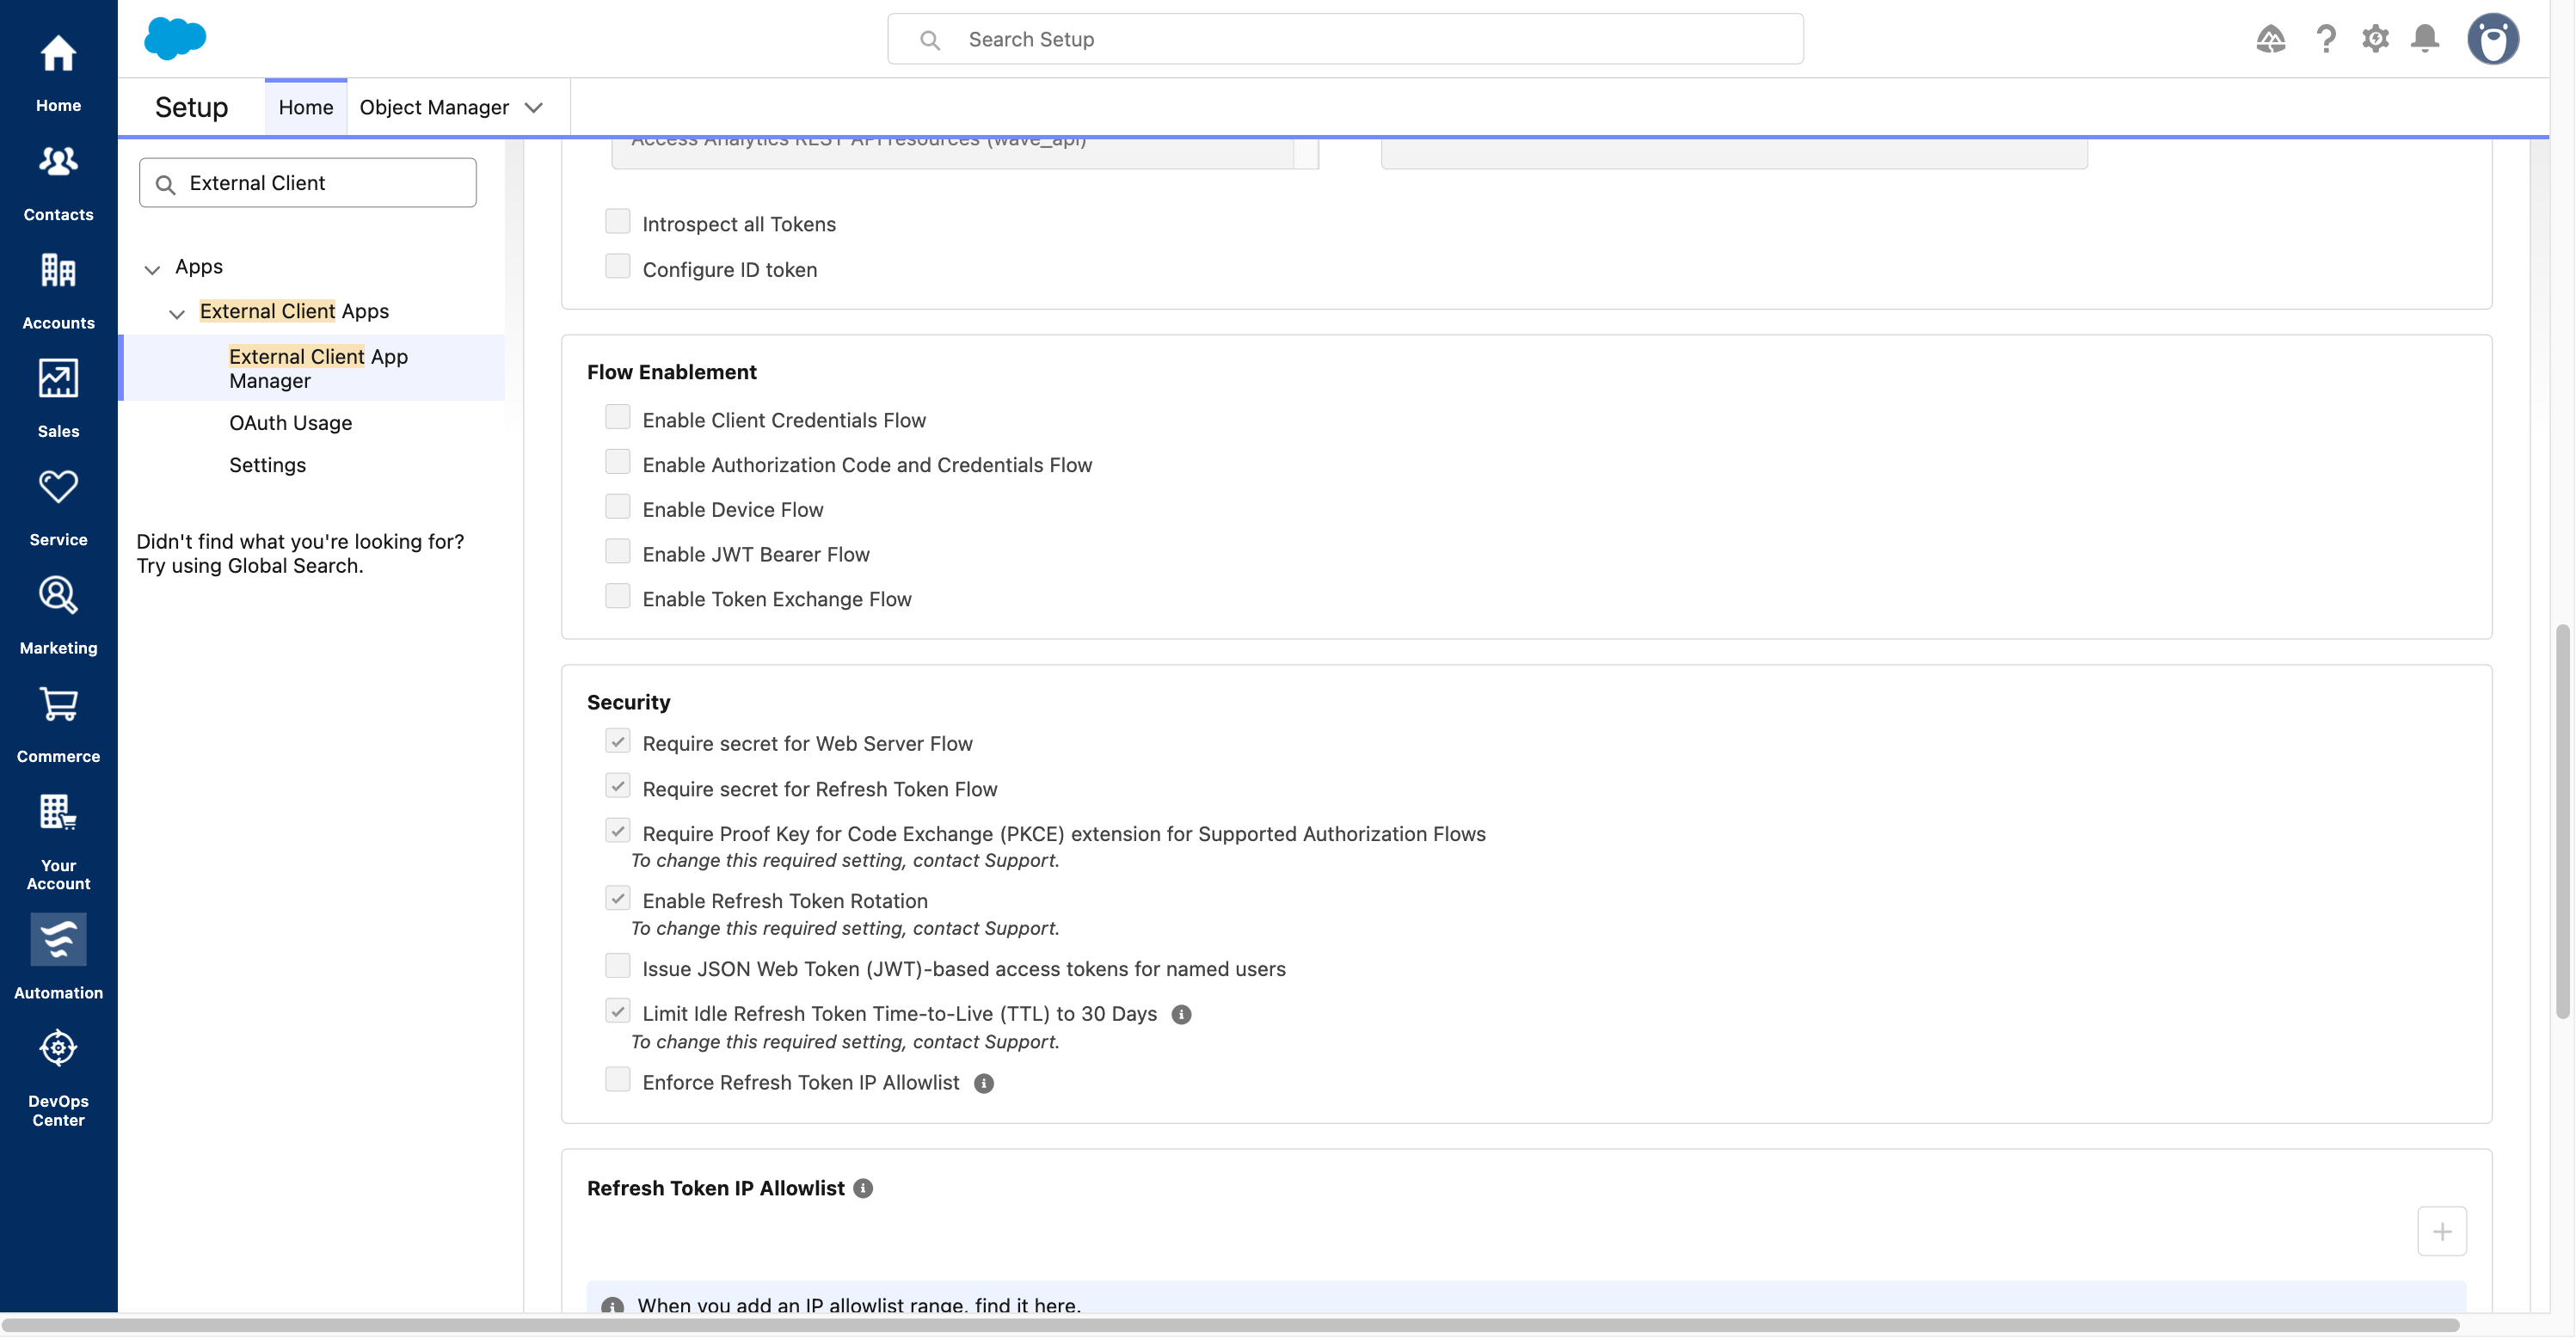
    * **1.** Enable both **Require secret** options.
    * **2.** Keep **PKCE** enabled. OneCLI uses S256.
    * **3.** Keep **Refresh Token Rotation** enabled. Salesforce may require these settings.

    Leave all optional **Flow Enablement** choices off, including **Authorization Code and Credentials Flow**. That option is not needed for OneCLI’s standard web-server OAuth flow.

    Click **Create** or **Save** and confirm the app is **Enabled**.
  </Step>

  <Step title="Copy consumer credentials">
    Open **OneCLI → Settings → OAuth Settings** in the External Client App Manager.

    <Frame caption="Open consumer details without exposing credentials in this guide.">
      <div style={{ position: "relative", width: "100%", aspectRatio: "940 / 220", overflow: "hidden", background: "white" }}>
        <img noZoom src="https://mintcdn.com/chartdbinc/Mnt4_Jddiutw73Ni/images/integrations/salesforce/02-oauth-scopes.png?fit=max&auto=format&n=Mnt4_Jddiutw73Ni&q=85&s=fffcc9fe17dd5d7cd4e99b346cac0269" alt="Open consumer details without exposing credentials in this guide." style={{ position: "absolute", width: "318.6170%", maxWidth: "none", height: "auto", left: "-72.3404%", top: "-72.7273%", margin: 0 }} width="2995" height="1557" data-path="images/integrations/salesforce/02-oauth-scopes.png" />

        <span aria-hidden="true" style={{ position: "absolute", left: "clamp(13px, 48.936%, calc(100% - 13px))", top: "clamp(13px, 15.909%, calc(100% - 13px))", transform: "translate(-50%, -50%)", display: "grid", placeItems: "center", width: "24px", height: "24px", borderRadius: "50%", background: "#b91c1c", color: "#fff", border: "2px solid white", fontSize: "13px", fontWeight: 800, lineHeight: 1, boxShadow: "0 1px 4px #0006" }}>1</span>
      </div>
    </Frame>

    [View full-size screenshot](/docs/images/integrations/salesforce/02-oauth-scopes.png)

    * **1.** Click **Consumer Key and Secret** and complete any identity verification.

    Copy **Consumer Key** (client ID) and **Consumer Secret** into the matching OneCLI fields privately. Set **Environment** to `production` or `sandbox`, according to the Salesforce organization, not where OneCLI is hosted.
  </Step>

  <Step title="Create a permission set">
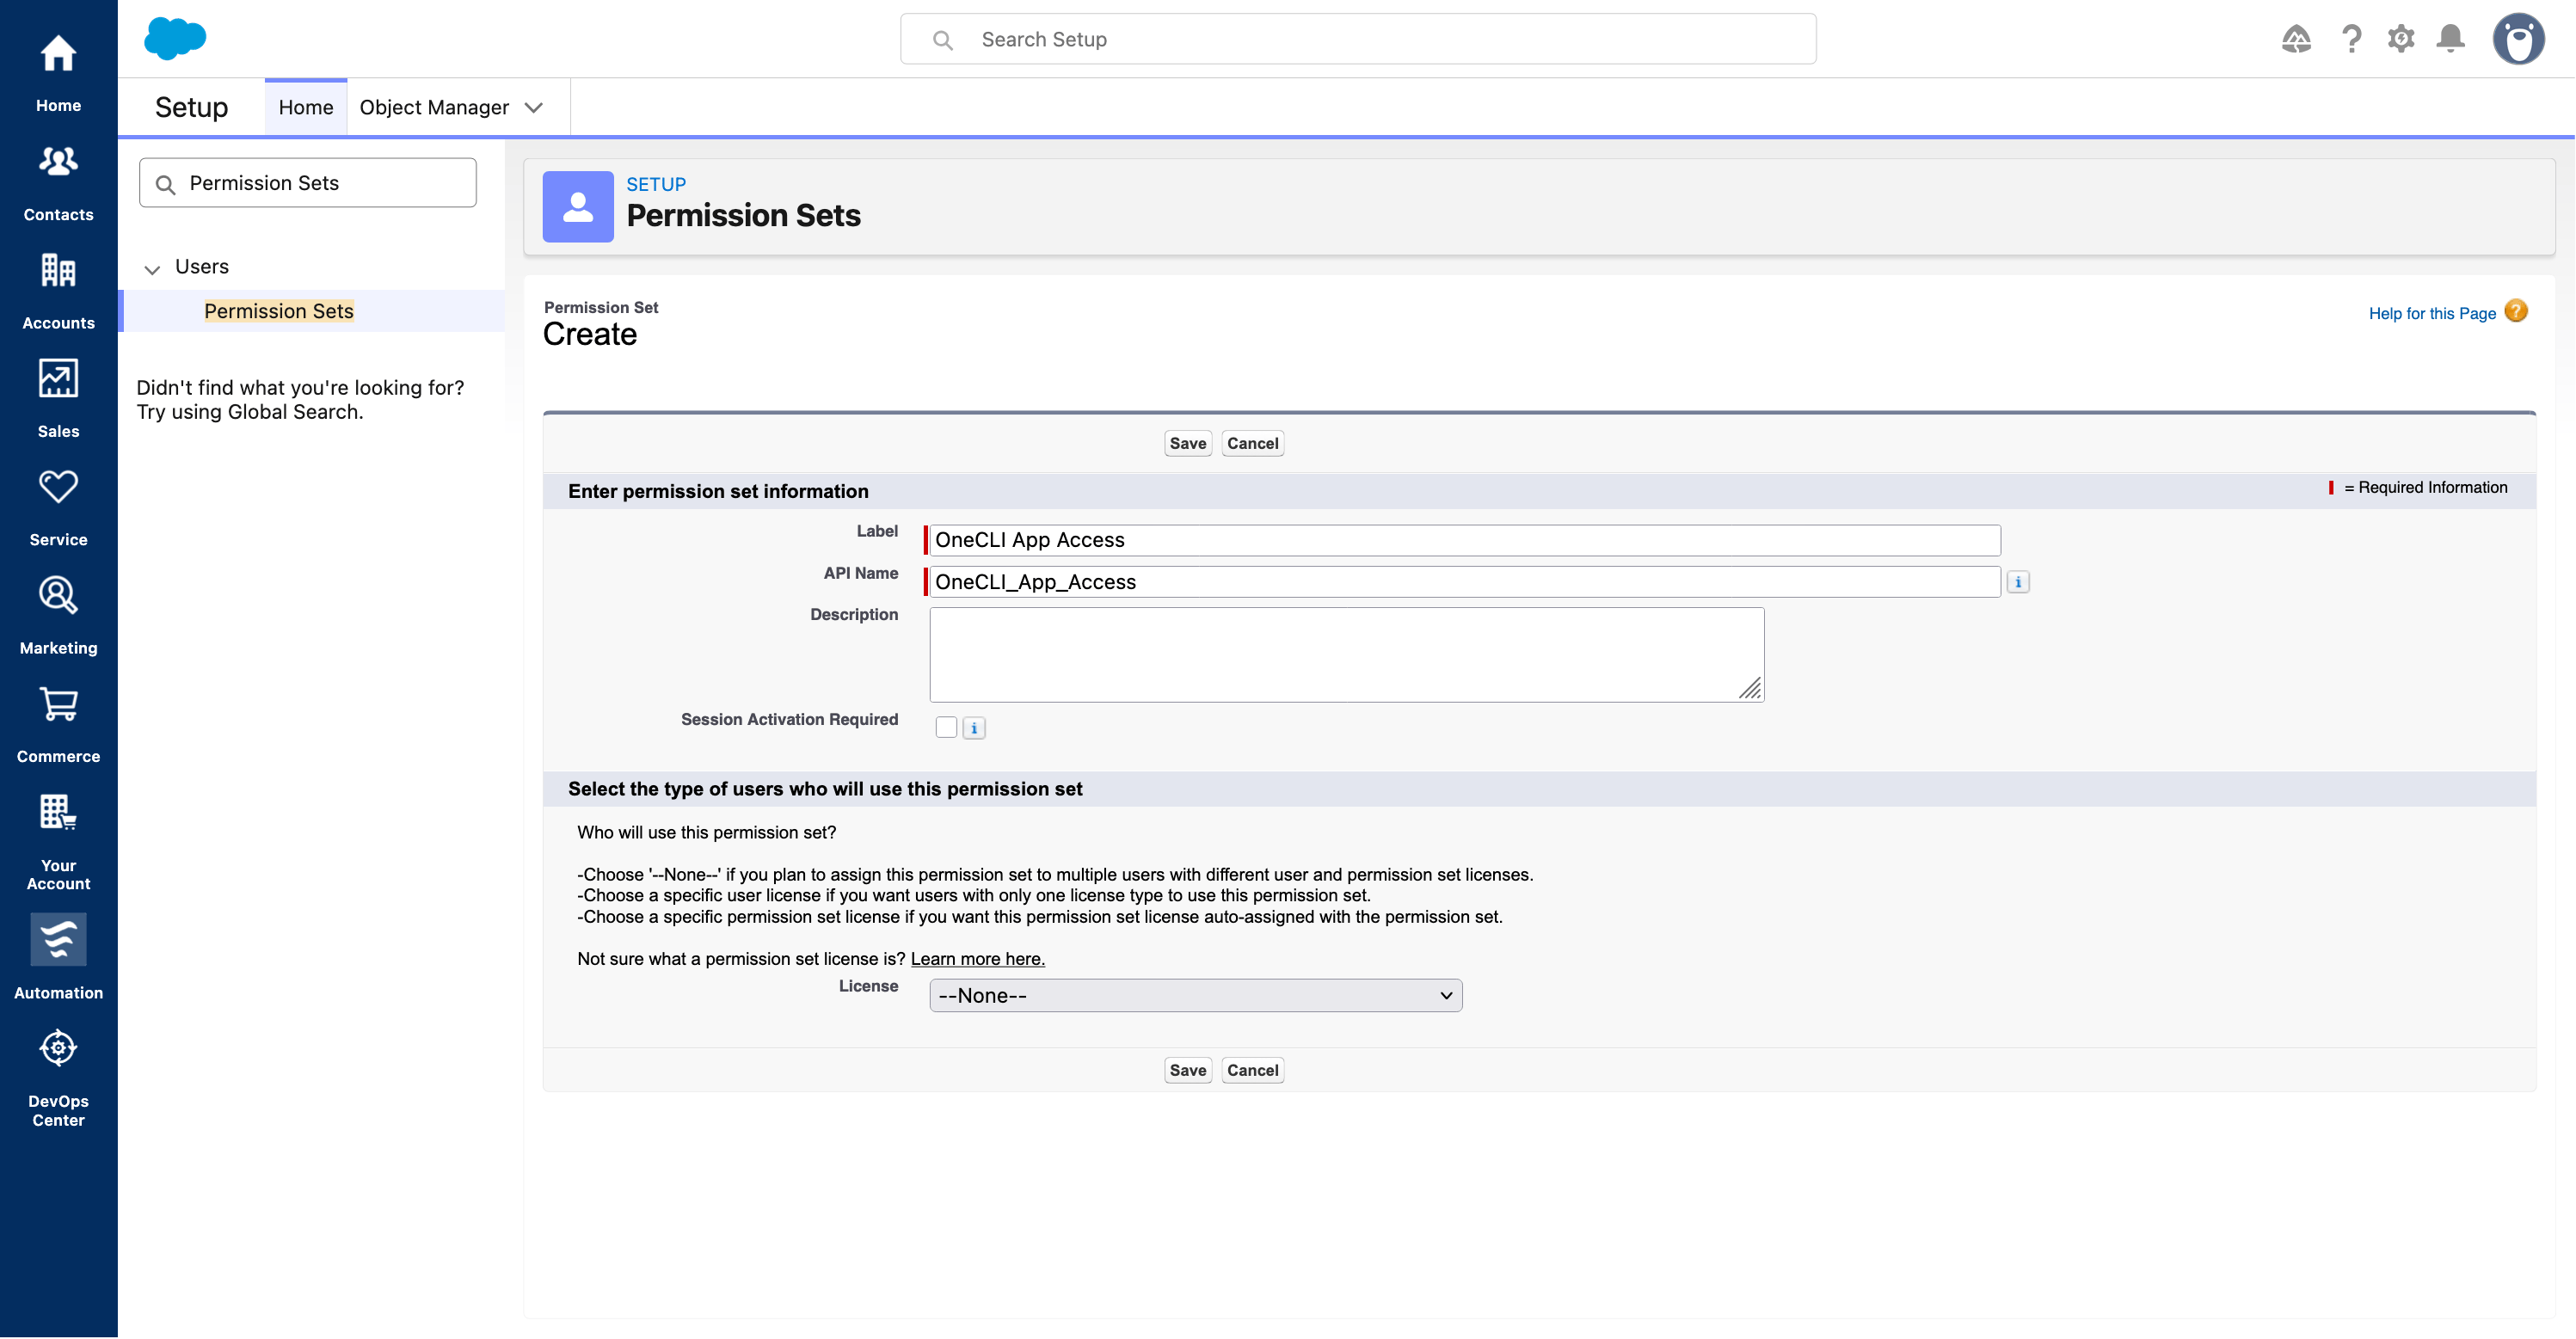
    In Salesforce **Setup**, search for **Permission Sets** and click **New**.
    <Frame caption="Create a dedicated permission set without adding unrelated privileges.">
      <div style={{ position: "relative", width: "100%", aspectRatio: "2320 / 800", overflow: "hidden", background: "white" }}>
        <img noZoom src="https://mintcdn.com/chartdbinc/Mnt4_Jddiutw73Ni/images/integrations/salesforce/06-create-permission-set.png?fit=max&auto=format&n=Mnt4_Jddiutw73Ni&q=85&s=49e72f88aa9bfa7ba5f82200bcc7a952" alt="Create a dedicated permission set without adding unrelated privileges." style={{ position: "absolute", width: "129.0948%", maxWidth: "none", height: "auto", left: "-27.1552%", top: "-59.3750%", margin: 0 }} width="2995" height="1557" data-path="images/integrations/salesforce/06-create-permission-set.png" />

        <span aria-hidden="true" style={{ position: "absolute", left: "clamp(13px, 17.888%, calc(100% - 13px))", top: "clamp(13px, 19.000%, calc(100% - 13px))", transform: "translate(-50%, -50%)", display: "grid", placeItems: "center", width: "24px", height: "24px", borderRadius: "50%", background: "#b91c1c", color: "#fff", border: "2px solid white", fontSize: "13px", fontWeight: 800, lineHeight: 1, boxShadow: "0 1px 4px #0006" }}>1</span>
        <span aria-hidden="true" style={{ position: "absolute", left: "clamp(13px, 18.103%, calc(100% - 13px))", top: "clamp(13px, 46.000%, calc(100% - 13px))", transform: "translate(-50%, -50%)", display: "grid", placeItems: "center", width: "24px", height: "24px", borderRadius: "50%", background: "#b91c1c", color: "#fff", border: "2px solid white", fontSize: "13px", fontWeight: 800, lineHeight: 1, boxShadow: "0 1px 4px #0006" }}>2</span>
        <span aria-hidden="true" style={{ position: "absolute", left: "clamp(13px, 17.888%, calc(100% - 13px))", top: "clamp(13px, 85.000%, calc(100% - 13px))", transform: "translate(-50%, -50%)", display: "grid", placeItems: "center", width: "24px", height: "24px", borderRadius: "50%", background: "#b91c1c", color: "#fff", border: "2px solid white", fontSize: "13px", fontWeight: 800, lineHeight: 1, boxShadow: "0 1px 4px #0006" }}>3</span>
        <span aria-hidden="true" style={{ position: "absolute", left: "clamp(13px, 29.741%, calc(100% - 13px))", top: "clamp(13px, 96.250%, calc(100% - 13px))", transform: "translate(-50%, -50%)", display: "grid", placeItems: "center", width: "24px", height: "24px", borderRadius: "50%", background: "#b91c1c", color: "#fff", border: "2px solid white", fontSize: "13px", fontWeight: 800, lineHeight: 1, boxShadow: "0 1px 4px #0006" }}>4</span>
      </div>
    </Frame>

    [View full-size screenshot](/docs/images/integrations/salesforce/06-create-permission-set.png)

    * **1.** Set **Label** to `OneCLI App Access`. Keep the generated API name.
    * **2.** Leave **Session Activation Required** unchecked.
    * **3.** Set **License** to **--None--**.
    * **4.** Click **Save**.

    Do not add administrator or broad data permissions. This permission set authorizes app access. Existing user permissions determine accessible CRM data.
  </Step>

  <Step title="Link the permission set">
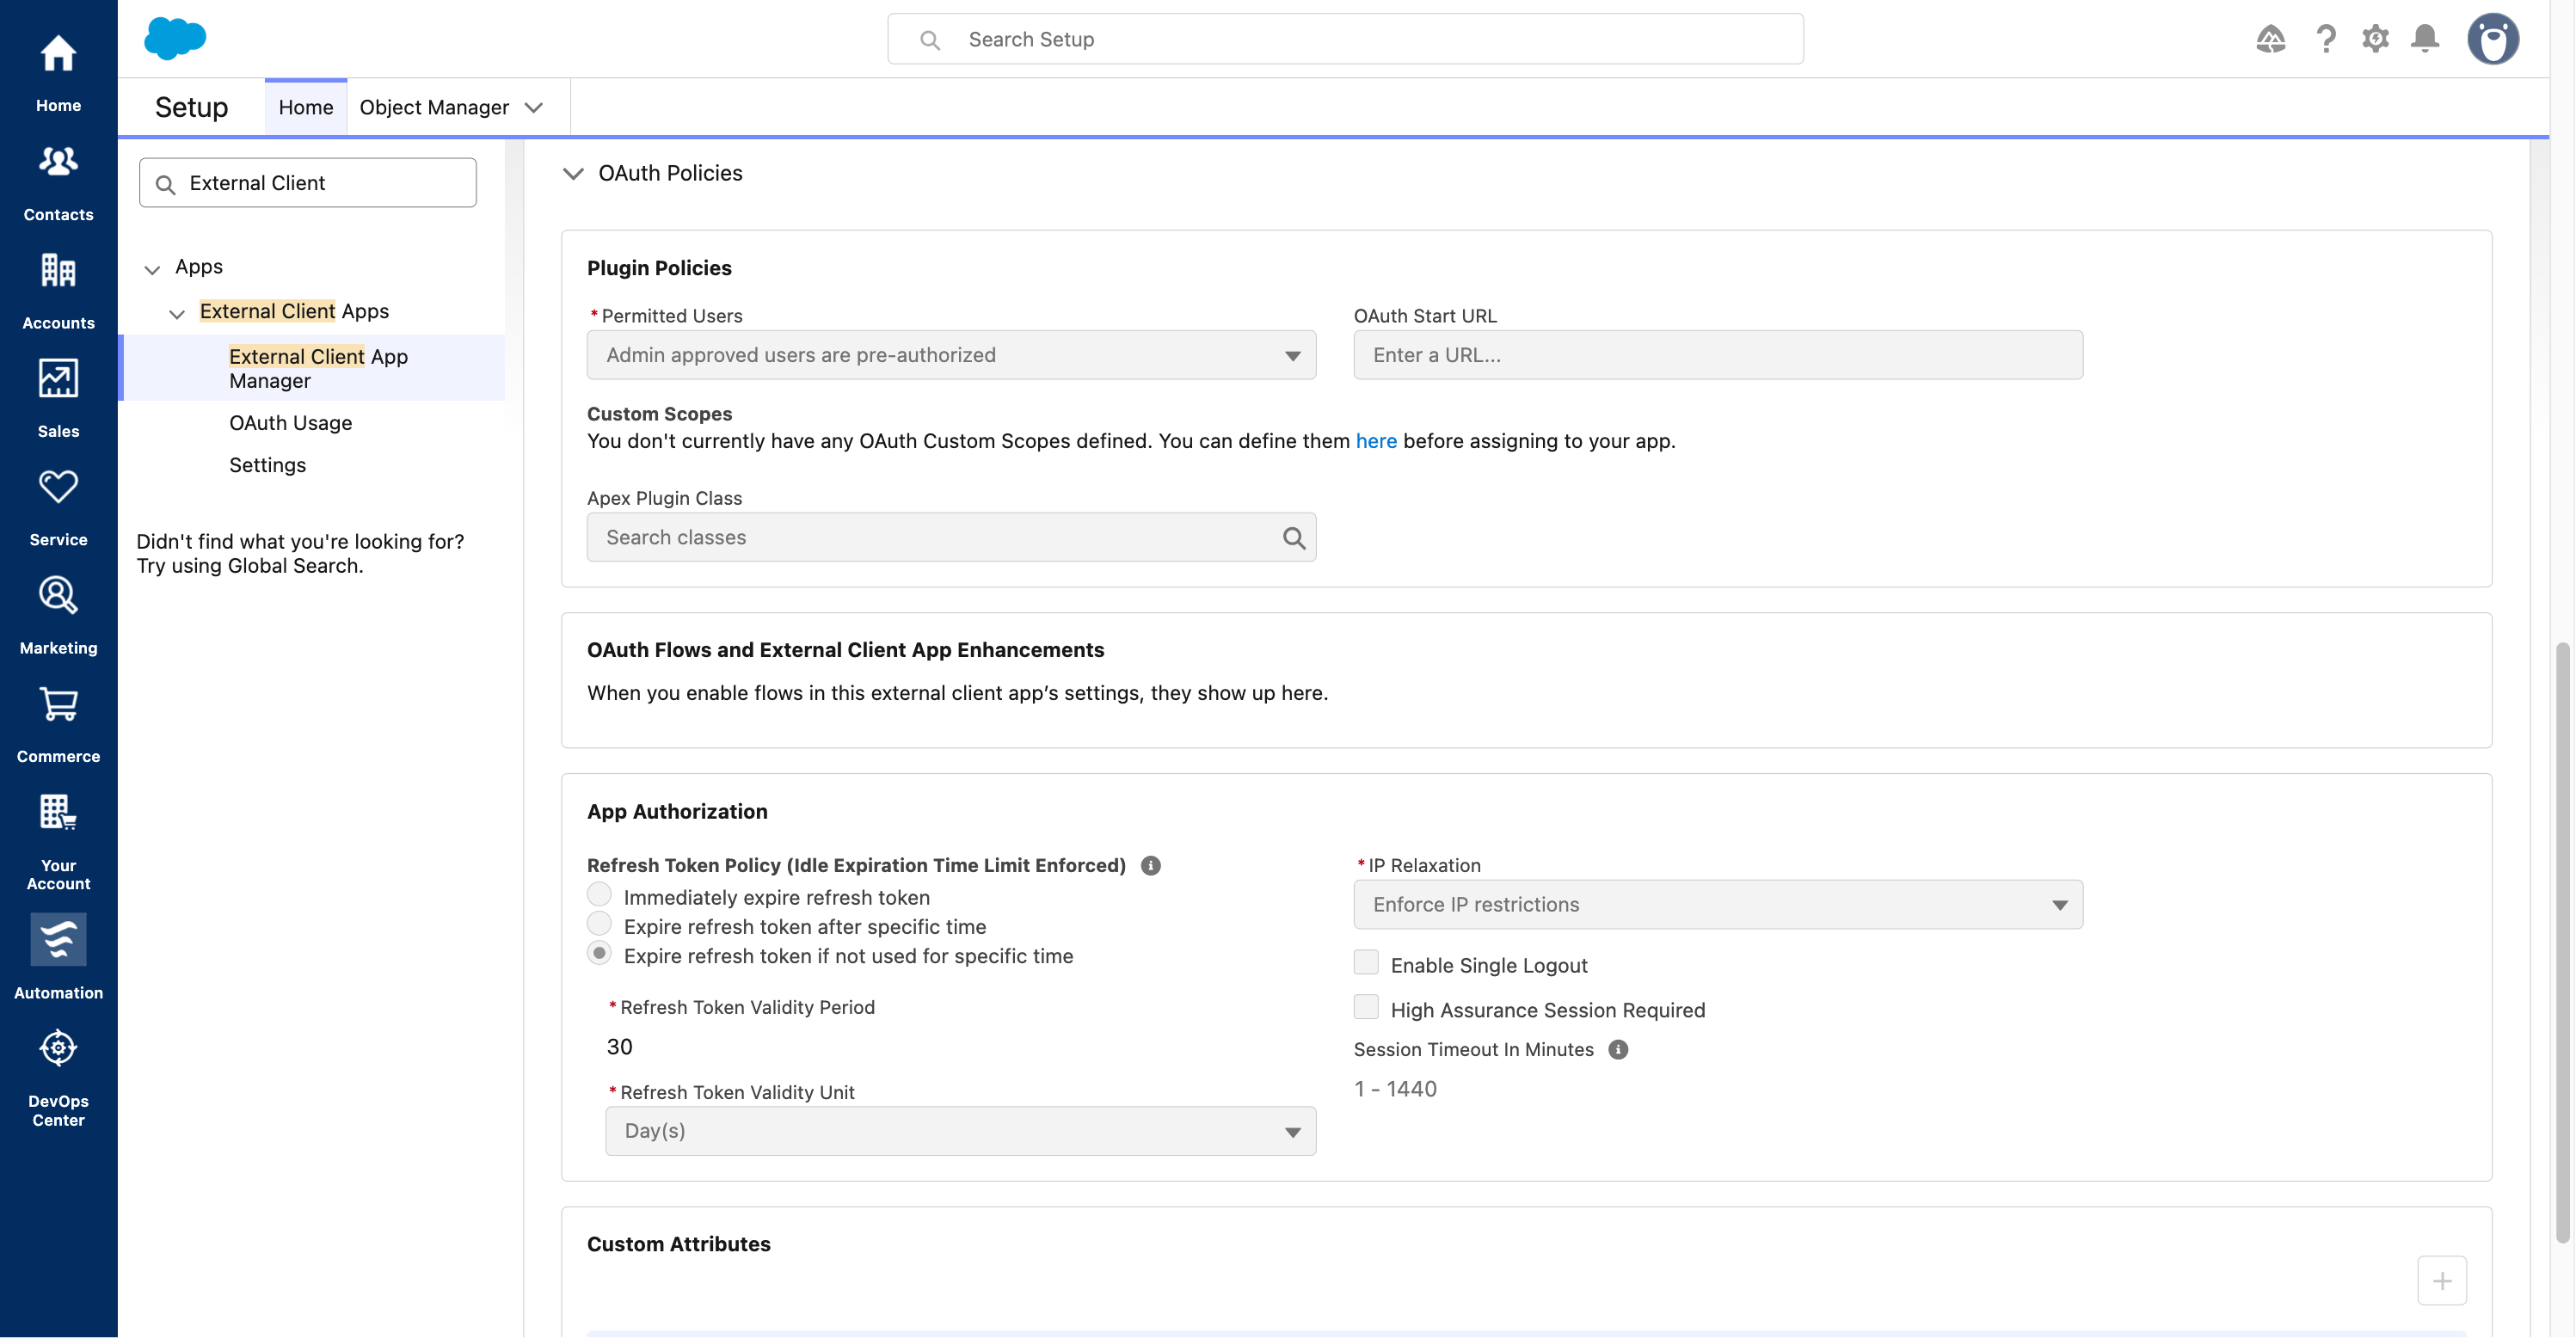
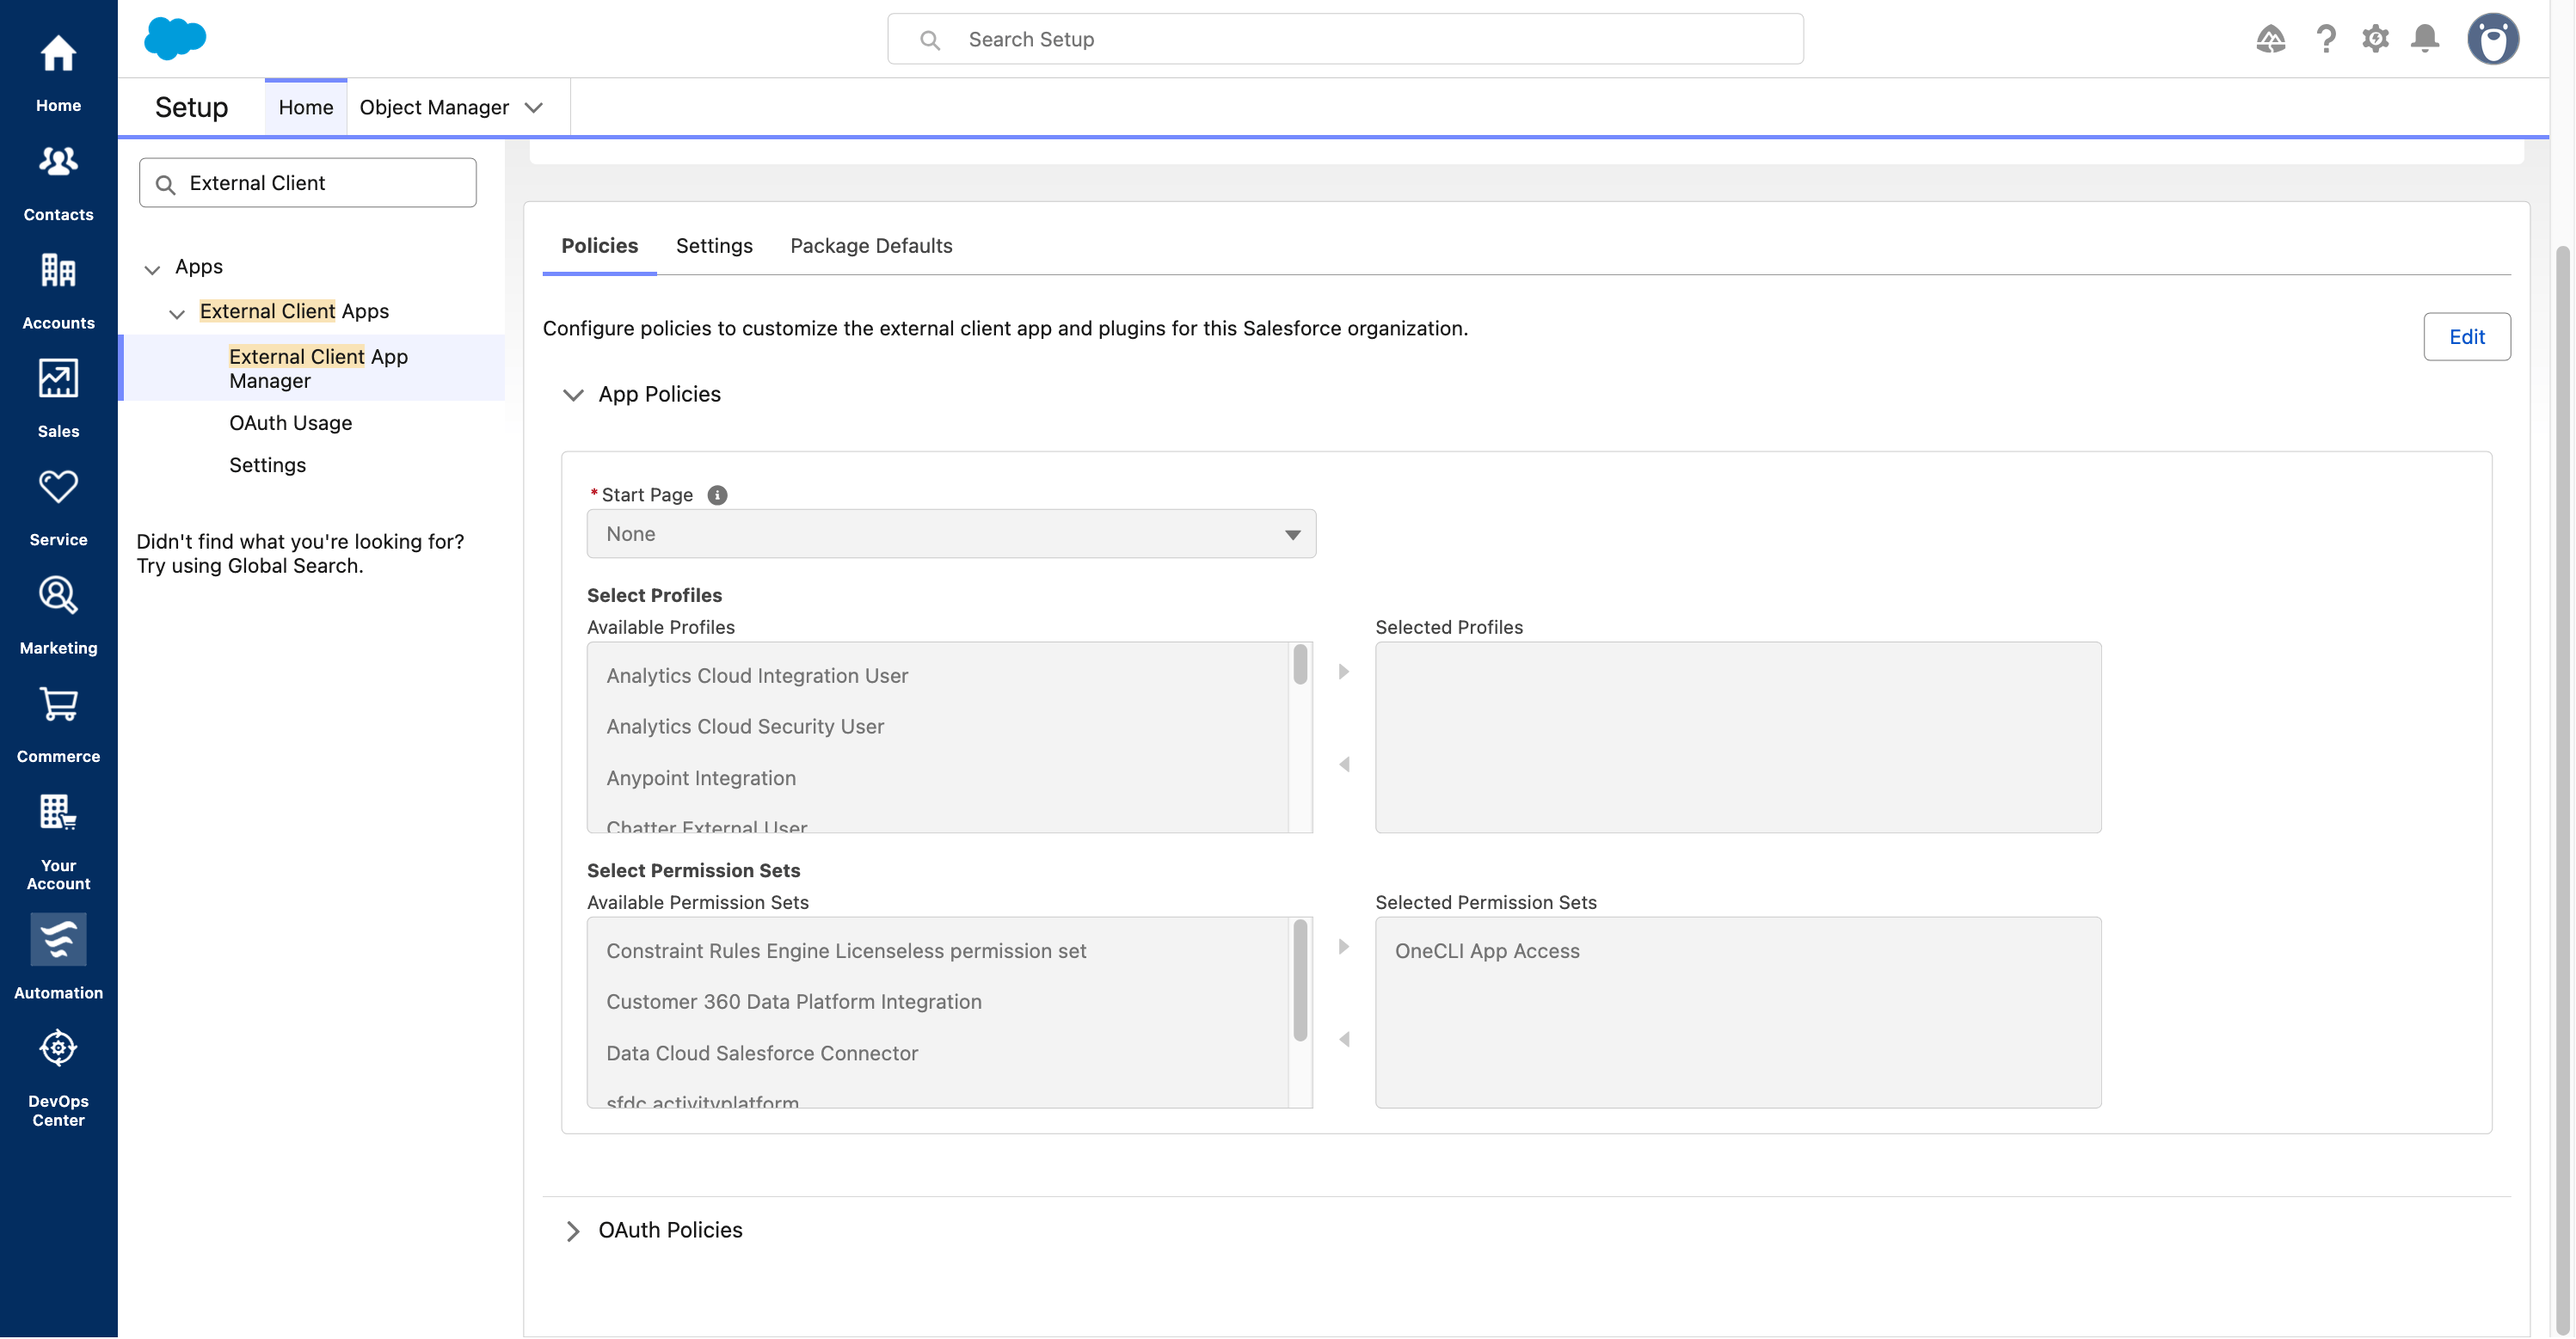
    Return to **External Client App Manager → OneCLI → Policies → Edit**.
    <Frame caption="Require administrator-approved users.">
      <div style={{ position: "relative", width: "100%", aspectRatio: "1790 / 175", overflow: "hidden", background: "white" }}>
        <img noZoom src="https://mintcdn.com/chartdbinc/Mnt4_Jddiutw73Ni/images/integrations/salesforce/05-permitted-users.png?fit=max&auto=format&n=Mnt4_Jddiutw73Ni&q=85&s=f4e55c5bf3c6c19c754945b947ad5026" alt="Require administrator-approved users." style={{ position: "absolute", width: "167.3184%", maxWidth: "none", height: "auto", left: "-37.1508%", top: "-162.8571%", margin: 0 }} width="2995" height="1557" data-path="images/integrations/salesforce/05-permitted-users.png" />

        <span aria-hidden="true" style={{ position: "absolute", left: "clamp(13px, 45.531%, calc(100% - 13px))", top: "clamp(13px, 46.857%, calc(100% - 13px))", transform: "translate(-50%, -50%)", display: "grid", placeItems: "center", width: "24px", height: "24px", borderRadius: "50%", background: "#b91c1c", color: "#fff", border: "2px solid white", fontSize: "13px", fontWeight: 800, lineHeight: 1, boxShadow: "0 1px 4px #0006" }}>1</span>
      </div>
    </Frame>

    [View full-size screenshot](/docs/images/integrations/salesforce/05-permitted-users.png)

    * **1.** Under **OAuth Policies**, set **Permitted Users** to **Admin approved users are pre-authorized**.
    <Frame caption="Link OneCLI App Access to the External Client App.">
      <div style={{ position: "relative", width: "100%", aspectRatio: "1800 / 325", overflow: "hidden", background: "white" }}>
        <img noZoom src="https://mintcdn.com/chartdbinc/Mnt4_Jddiutw73Ni/images/integrations/salesforce/04-permission-set-link.png?fit=max&auto=format&n=Mnt4_Jddiutw73Ni&q=85&s=e1e382246fedb92885bfa5fd9a1f9815" alt="Link OneCLI App Access to the External Client App." style={{ position: "absolute", width: "166.3889%", maxWidth: "none", height: "auto", left: "-36.9444%", top: "-303.0769%", margin: 0 }} width="2995" height="1557" data-path="images/integrations/salesforce/04-permission-set-link.png" />

        <span aria-hidden="true" style={{ position: "absolute", left: "clamp(13px, 49.722%, calc(100% - 13px))", top: "clamp(13px, 16.923%, calc(100% - 13px))", transform: "translate(-50%, -50%)", display: "grid", placeItems: "center", width: "24px", height: "24px", borderRadius: "50%", background: "#b91c1c", color: "#fff", border: "2px solid white", fontSize: "13px", fontWeight: 800, lineHeight: 1, boxShadow: "0 1px 4px #0006" }}>1</span>
        <span aria-hidden="true" style={{ position: "absolute", left: "clamp(13px, 94.444%, calc(100% - 13px))", top: "clamp(13px, 36.923%, calc(100% - 13px))", transform: "translate(-50%, -50%)", display: "grid", placeItems: "center", width: "24px", height: "24px", borderRadius: "50%", background: "#b91c1c", color: "#fff", border: "2px solid white", fontSize: "13px", fontWeight: 800, lineHeight: 1, boxShadow: "0 1px 4px #0006" }}>2</span>
      </div>
    </Frame>

    [View full-size screenshot](/docs/images/integrations/salesforce/04-permission-set-link.png)

    * **1.** Under **App Policies**, select **OneCLI App Access** on the left and click the right arrow.
    * **2.** Confirm it appears in **Selected Permission Sets**, then save.

    Keep **Start Page** = **None** and **Selected Profiles** empty. Leave OAuth Start URL, custom scopes, and Apex Plugin Class blank.

    Keep the required refresh-token idle expiration, typically **30 days**, and your organization’s IP restrictions. Do not choose **Immediately expire refresh token** or relax security to bypass an error.
  </Step>

  <Step title="Assign the connecting user">
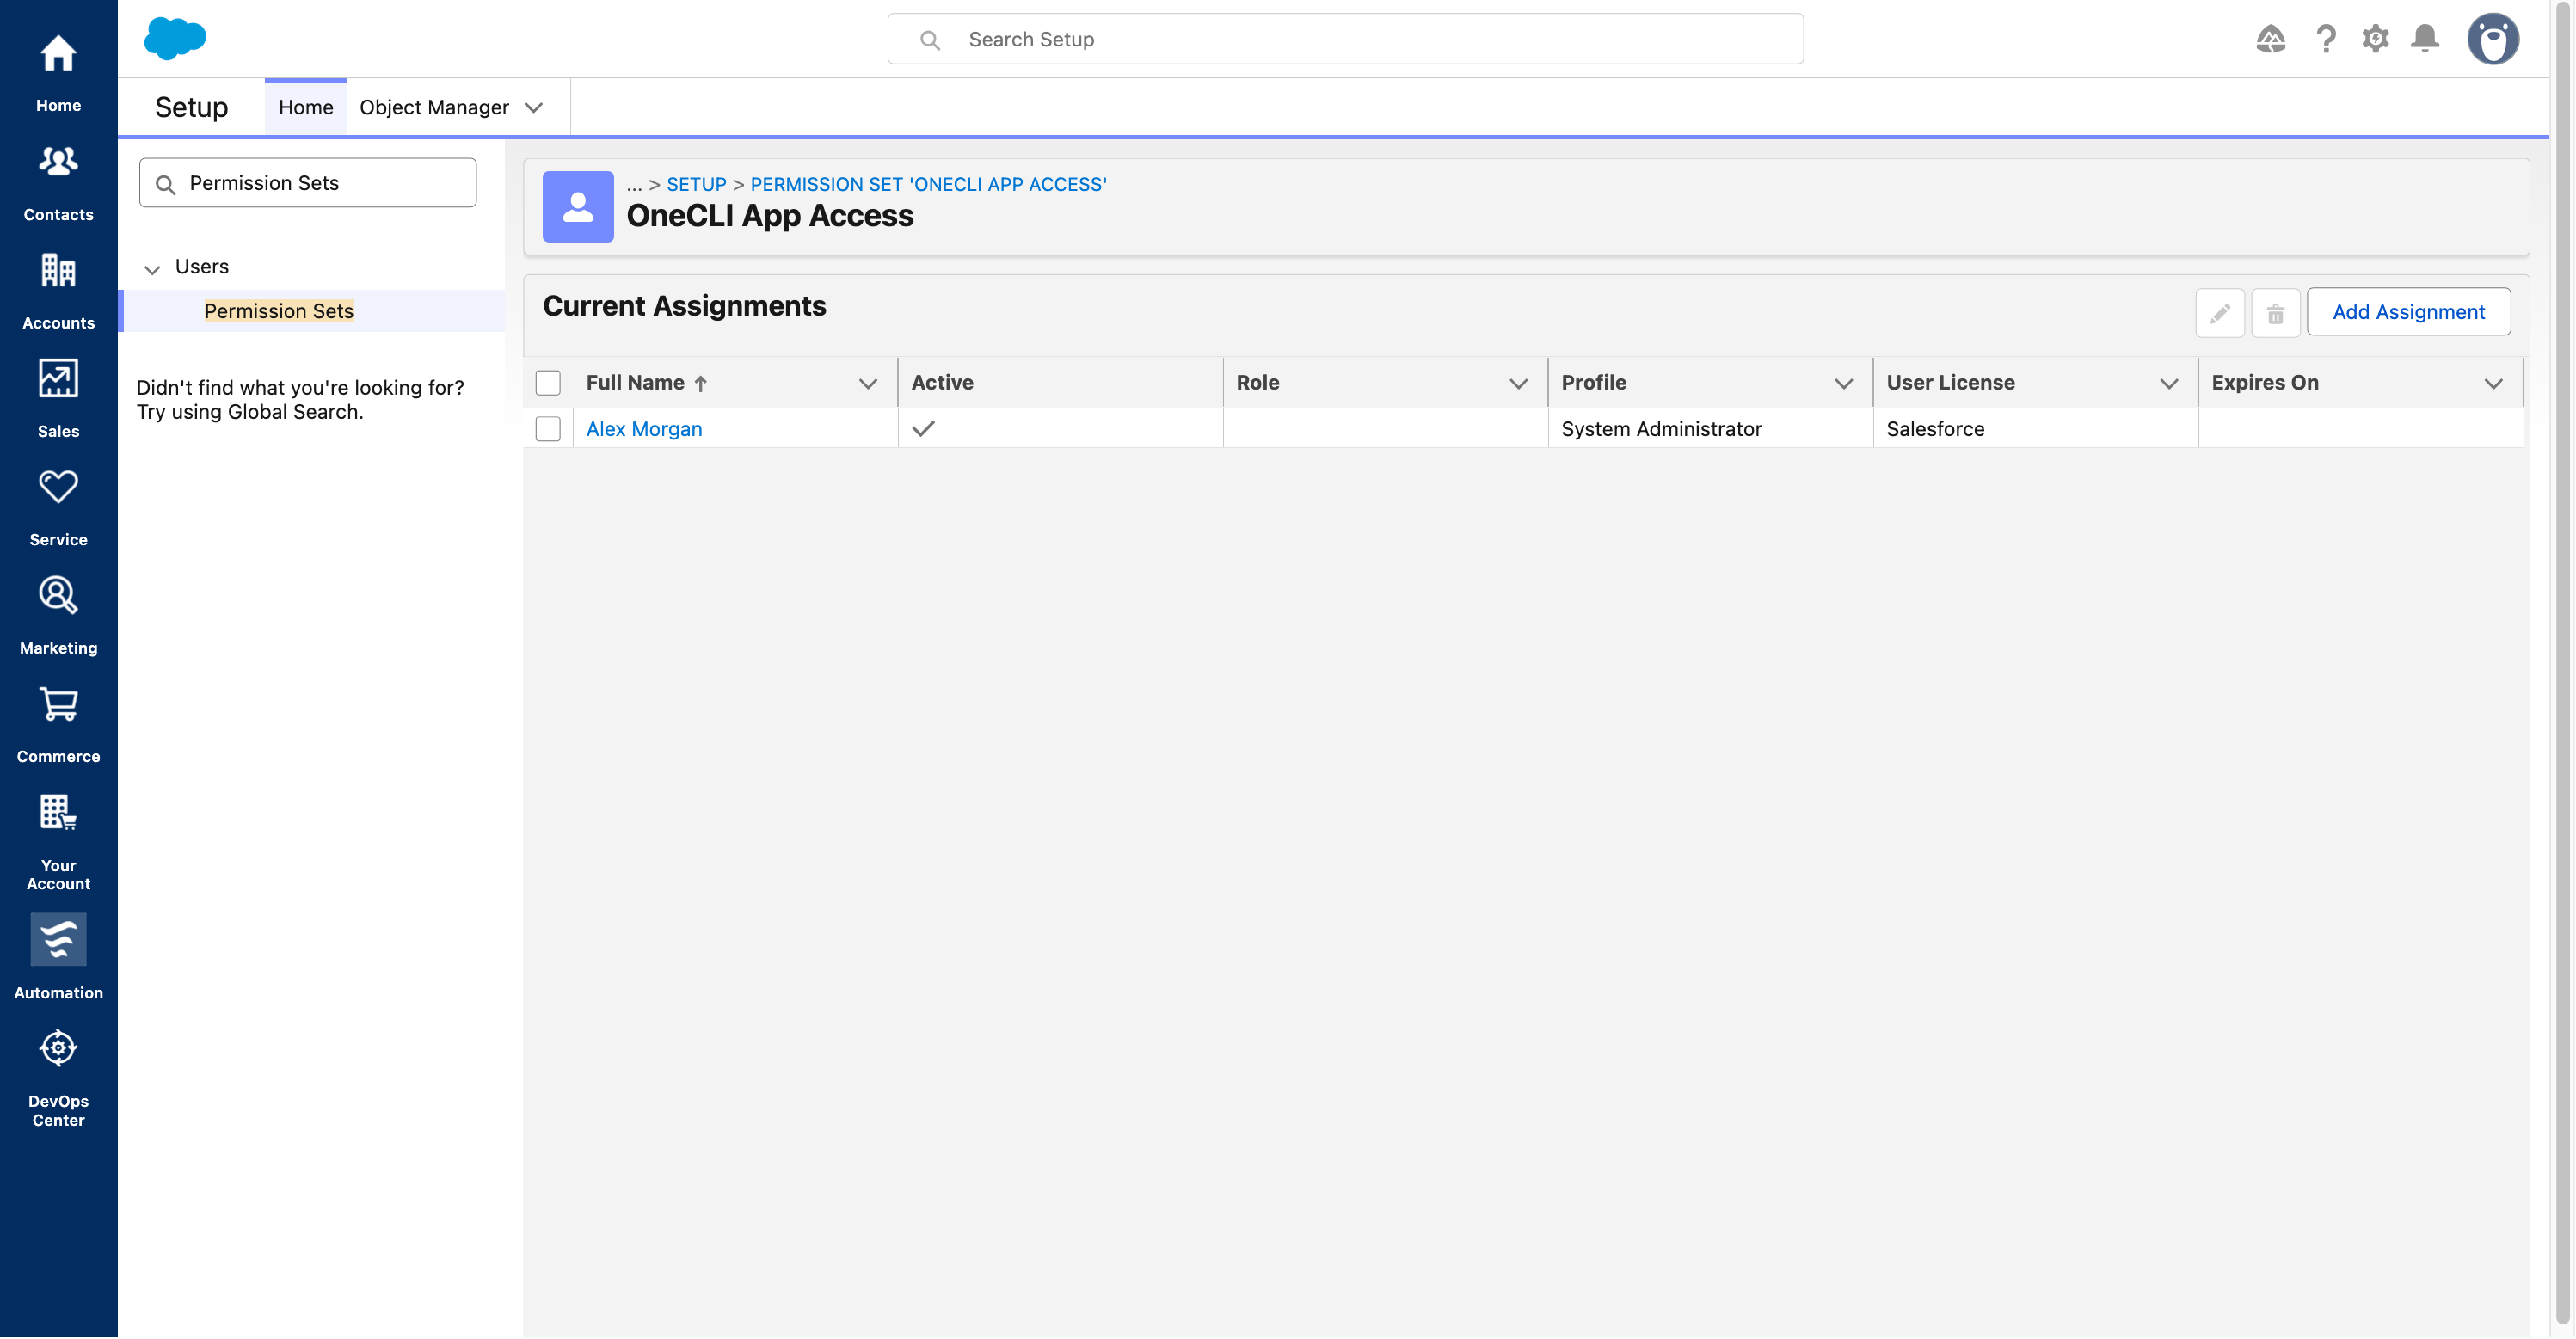
    Open **Setup → Permission Sets → OneCLI App Access → Manage Assignments**.
    <Frame caption="Assign the permission set to the user who will authorize OneCLI.">
      <div style={{ position: "relative", width: "100%", aspectRatio: "2325 / 350", overflow: "hidden", background: "white" }}>
        <img noZoom src="https://mintcdn.com/chartdbinc/Mnt4_Jddiutw73Ni/images/integrations/salesforce/07-manage-assignments.png?fit=max&auto=format&n=Mnt4_Jddiutw73Ni&q=85&s=d2cf3e7152d590cf7ea382be1a62a9a0" alt="Assign the permission set to the user who will authorize OneCLI." style={{ position: "absolute", width: "128.8172%", maxWidth: "none", height: "auto", left: "-26.1505%", top: "-52.2857%", margin: 0 }} width="2995" height="1557" data-path="images/integrations/salesforce/07-manage-assignments.png" />

        <span aria-hidden="true" style={{ position: "absolute", left: "clamp(13px, 92.989%, calc(100% - 13px))", top: "clamp(13px, 37.714%, calc(100% - 13px))", transform: "translate(-50%, -50%)", display: "grid", placeItems: "center", width: "24px", height: "24px", borderRadius: "50%", background: "#b91c1c", color: "#fff", border: "2px solid white", fontSize: "13px", fontWeight: 800, lineHeight: 1, boxShadow: "0 1px 4px #0006" }}>1</span>
        <span aria-hidden="true" style={{ position: "absolute", left: "clamp(13px, 10.409%, calc(100% - 13px))", top: "clamp(13px, 90.000%, calc(100% - 13px))", transform: "translate(-50%, -50%)", display: "grid", placeItems: "center", width: "24px", height: "24px", borderRadius: "50%", background: "#b91c1c", color: "#fff", border: "2px solid white", fontSize: "13px", fontWeight: 800, lineHeight: 1, boxShadow: "0 1px 4px #0006" }}>2</span>
      </div>
    </Frame>

    [View full-size screenshot](/docs/images/integrations/salesforce/07-manage-assignments.png)

    * **1.** Click **Add Assignment**, select the exact user who will sign in to Salesforce from OneCLI, then click **Next**.
    * **2.** After assigning, confirm that user appears here. The example’s administrator profile is not required.
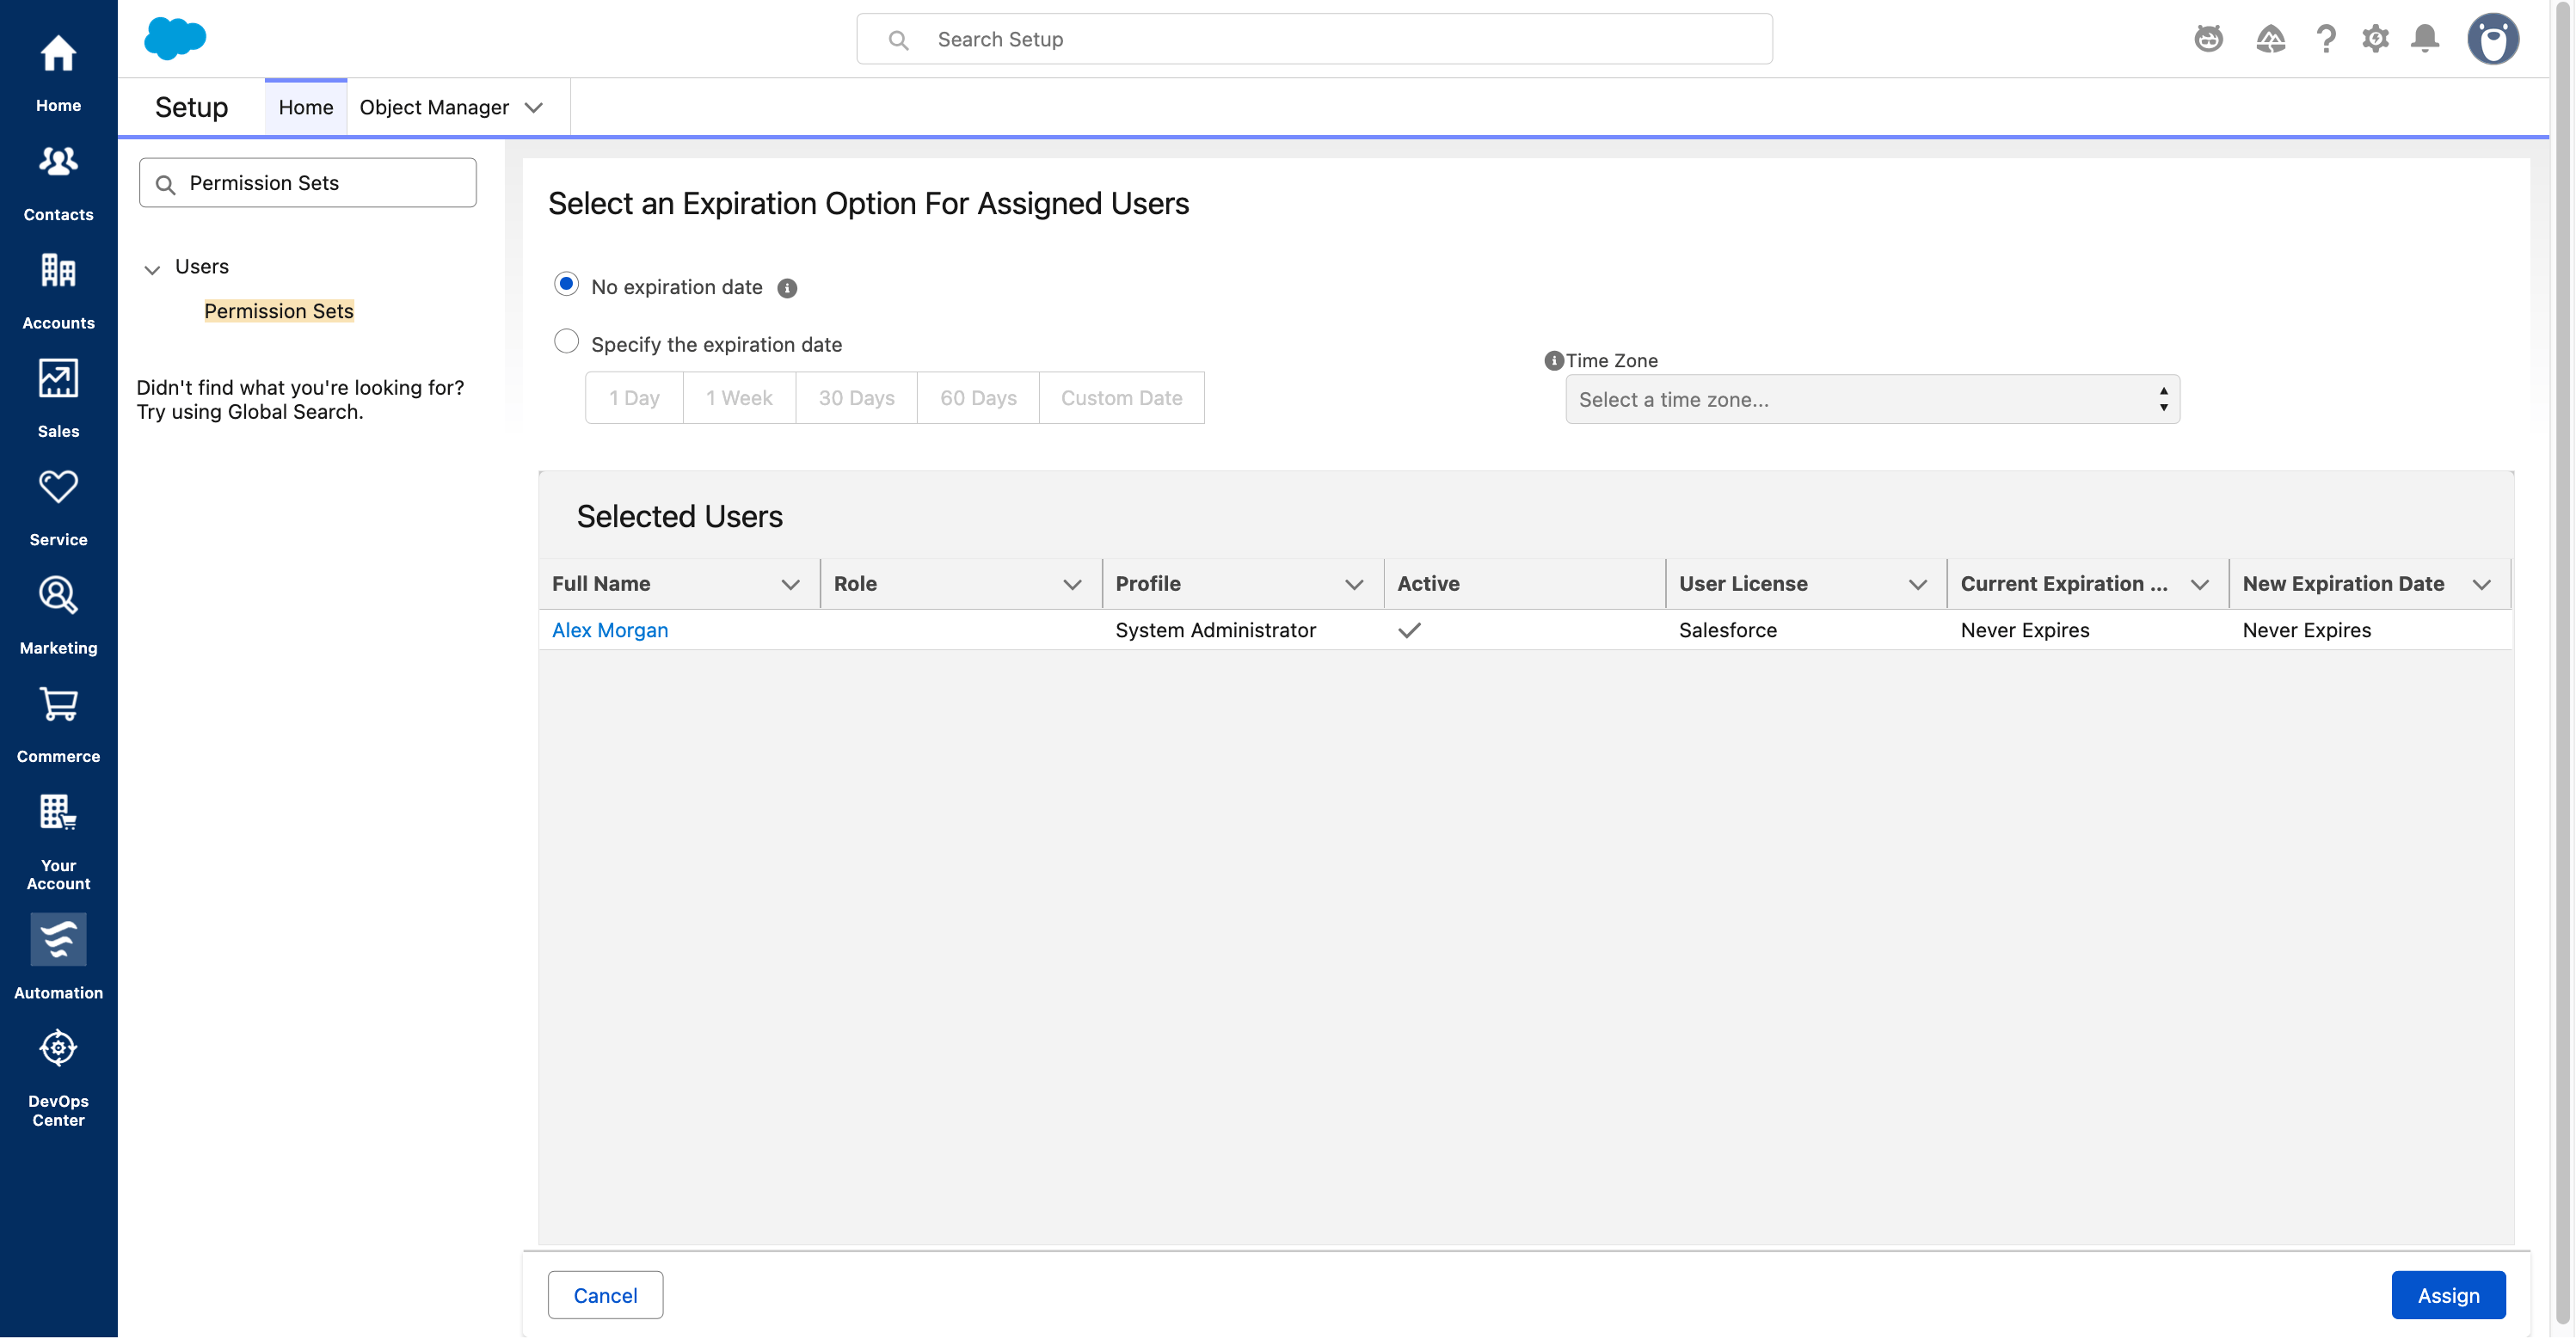
    <Frame caption="Choose an assignment expiration that follows your organization’s policy.">
      <div style={{ position: "relative", width: "100%", aspectRatio: "2310 / 580", overflow: "hidden", background: "white" }}>
        <img noZoom src="https://mintcdn.com/chartdbinc/Mnt4_Jddiutw73Ni/images/integrations/salesforce/08-assignment-expiration.png?fit=max&auto=format&n=Mnt4_Jddiutw73Ni&q=85&s=17b618572040ef73d10100b12a561fbb" alt="Choose an assignment expiration that follows your organization’s policy." style={{ position: "absolute", width: "129.6537%", maxWidth: "none", height: "auto", left: "-27.0563%", top: "-32.7586%", margin: 0 }} width="2995" height="1557" data-path="images/integrations/salesforce/08-assignment-expiration.png" />

        <span aria-hidden="true" style={{ position: "absolute", left: "clamp(13px, 1.429%, calc(100% - 13px))", top: "clamp(13px, 17.241%, calc(100% - 13px))", transform: "translate(-50%, -50%)", display: "grid", placeItems: "center", width: "24px", height: "24px", borderRadius: "50%", background: "#b91c1c", color: "#fff", border: "2px solid white", fontSize: "13px", fontWeight: 800, lineHeight: 1, boxShadow: "0 1px 4px #0006" }}>1</span>
        <span aria-hidden="true" style={{ position: "absolute", left: "clamp(13px, 1.429%, calc(100% - 13px))", top: "clamp(13px, 34.483%, calc(100% - 13px))", transform: "translate(-50%, -50%)", display: "grid", placeItems: "center", width: "24px", height: "24px", borderRadius: "50%", background: "#b91c1c", color: "#fff", border: "2px solid white", fontSize: "13px", fontWeight: 800, lineHeight: 1, boxShadow: "0 1px 4px #0006" }}>2</span>
        <span aria-hidden="true" style={{ position: "absolute", left: "clamp(13px, 13.203%, calc(100% - 13px))", top: "clamp(13px, 93.621%, calc(100% - 13px))", transform: "translate(-50%, -50%)", display: "grid", placeItems: "center", width: "24px", height: "24px", borderRadius: "50%", background: "#b91c1c", color: "#fff", border: "2px solid white", fontSize: "13px", fontWeight: 800, lineHeight: 1, boxShadow: "0 1px 4px #0006" }}>3</span>
      </div>
    </Frame>

    [View full-size screenshot](/docs/images/integrations/salesforce/08-assignment-expiration.png)

    * **1.** Choose **No expiration date** only if ongoing access is approved.
    * **2.** Otherwise, set the expiration required by your organization.
    * **3.** Verify the user and expiration, then click **Assign → Done**.

    Both links are required: the app must include the permission set, and the connecting user must have it assigned. Assignment expiration is separate from refresh-token idle expiration.
  </Step>

  <Step title="Connect and test in OneCLI">
    1. In OneCLI, confirm the credentials, **Environment**, and **Redirect URI**, then click **Save & Connect**.
    2. Sign in as the assigned Salesforce user. Confirm OneCLI shows **Connected** with the expected account and instance.
    3. Grant the connection to the intended agent through **Agent access** or the agent’s **Apps** settings.
    4. For a read-only first test, allow the needed read tools, set **Write / delete** to **Never**, and save. The `api` scope is not read-only.
    5. Ask the agent: “Use my connected Salesforce account to make a fresh request listing available CRM objects. Do not create, update, or delete records.”
  </Step>
</Steps>

## Troubleshooting

<AccordionGroup>
  <Accordion title="User is not admin approved / OAUTH_APP_ACCESS_DENIED">
    Check the app’s selected permission set, the exact login user’s assignment, its expiration, and the Salesforce organization. Retry authorization.
  </Accordion>

  <Accordion title="Redirect URI mismatch">
    Copy the URI again from OneCLI. Check HTTPS, host, path, trailing slash, workspace versus organization scope, and your tunnel’s destination.
  </Accordion>

  <Accordion title="Invalid client or exposed secret">
    Use credentials from the same enabled app and the correct Salesforce environment. If a secret was exposed, rotate it in Salesforce, update OneCLI privately, and reconnect. Do not reset your Salesforce password.
  </Accordion>

  <Accordion title="Expired or revoked refresh token">
    Reconnect through Salesforce OAuth. Idle expiration or revocation can require fresh authorization.
  </Accordion>

  <Accordion title="Connected, but the agent cannot use Salesforce">
    Grant the connection to that agent and request a fresh test. Operators should check for outdated runners or gateways. Do not paste access tokens into chat or create duplicate custom credentials.
  </Accordion>

  <Accordion title="API, IP, or permission error">
    Check Salesforce API entitlement, the user’s API Enabled and object/field permissions, and the agent’s OneCLI permissions. Have an administrator allow required OneCLI egress IPs if needed. Extra scopes do not fix missing permissions.
  </Accordion>
</AccordionGroup>

## Next steps

* [Grant the connection to an agent](/docs/guides/agent-access).
* [Add organization-wide rules](/docs/guides/rules).
* [Understand OAuth app connections](/docs/integrations/app-connections).
